
Nissan Armada 2025-2026 Service and Repair Manual: Work Procedure
CAUTION:
When performing the following operations, always use CONSULT. (It cannot be performed by any means other than CONSULT.)
Connect external power supply and so on not to lower the 12 V battery voltage.
 NOTE:
NOTE:
When replacing the electrical brake control unit, check the procedure for the title name of "When replace electrical brake control unit".
Otherwise, check the procedure for the title name of "When the electrical brake control unit is not replaced".
When replace electrical brake control unit
CAUTION:
Perform the following works with two persons or more.
Monitor the fluid level in the reservoir tank while performing the air bleeding.
Never spill or splash brake fluid on painted surfaces. Brake fluid may seriously damage paint. Wipe it off immediately and wash with water if it gets on a painted surface. For brake component parts, never wash them with water.
Never allow foreign matter (e.r.dust) and oil other than brake fluid to enter the reservoir tank.
Keep CONULT connecting.
Be careful not the DDL2 connector disconnected during brake pedal operation.
Install the tires after all work is completed.
NOTE:
Conditions for air bleeding
Not depressing the brake pedal
Shift position is in P position
ADVANCE PREPARATION
 With CONSULT
- Ignition switch is ON.
- Operate the electric parking brake system.
- Select "ABS", "Work support", and "(Air bleeding) Accumulator pressure release" according to this order.
- Perform the work according to the directions of CONSULT.
GO TO 2.
PERFORM AIR BLEEDING
With CONSULT
- Select "ABS", "Work support", and "(Air bleeding) Perform air bleeding" according to this order.
- Perform the work according to the directions of CONSULT.
Supplementary explanation for air bleeding
 : Low-pressure hose
 : High pressure tube
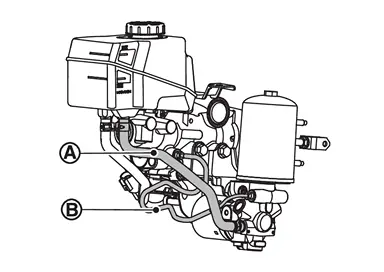
- Connect a vinyl tube to the bleeder valve of the front brake.
NOTE:
Perform both left and right sides, but in either order.
- Depress the brake pedal to full stroke.
- Release the brake pedal.
- Wait for two seconds.
- Repeat step 4 to 6 until brake fluid coming out of brake calipers.
- Tighten the bleeder valve to the specified torque. Refer to FRONT BRAKE CALIPER ASSEMBLY : Exploded View.
- Connect a vinyl tube to the bleeder valve of the rear brake.
NOTE:
Perform both left and right sides, but in either order.
- Depress the brake pedal to full stroke.
- Release the brake pedal.
- Wait for two seconds.
- Repeat step 10 to 12 until brake fluid coming out of brake calipers.
- Tighten the bleeder valve to the specified torque. Refer to Exploded View.
- Connect a vinyl tube to the bleeder valve of the front brake.
NOTE:
Perform both left and right sides, but in either order.
- Depress the brake pedal half-way.
- Open the bleeder valve.
- Depress the brake pedal to full stroke.
- Tighten the bleeder valve.
- Wait for two seconds.
- Repeat steps 16 and 20 until the air is completely bleeds.
- Connect a vinyl tube to the bleeder valve of the rear brake.
NOTE:
Perform both left and right sides, but in either order.
- Depress the brake pedal half-way.
- Open the bleeder valve.
- Depress the brake pedal to full stroke.
- Tighten the bleeder valve.
- Wait for two seconds.
- Repeat steps 23 and 27 until the air is completely bleeds.
- Inspect brake fliud according to the directions of CONSULT.
- Perform learning according to the directions of CONSULT.
Did it learn correctly?
YES>>GO TO 5.
NO>>GO TO 3.
RELEARNING
With CONSULT
- Cancel electric parking brake system.
- Select "ABS", "Work support", and "(Air bleeding) Relearning" according to this order.
- Perform the work according to the directions of CONSULT.
Did it learn correctly?
YES>>GO TO 5.
NO>>Erase the memory of self-diagnosis results. GO TO 4.
FORCIBLY ELECTRICAL BRAKE CONTROL UNIT
With CONSULT
- Select "ABS", "Work support", and "(Air bleeding) Forcibly electrical brake control unit" according to this order.
- Perform the work according to the directions of CONSULT.
CAUTION:
Start the engine → Operate the electric parking brake system → Get out of the vehicle → Never touch or operate the vehicle → CONSULT operation → After completing �(Air bleeding) Forcibly electrical brake control unit", stop the engine → Ignition switch ON → Cancel electric parking brake system.
Did it learn correctly?
YES>>GO TO 5.
NO>>GO TO 1.
CHECK AIR POLLUTION
With CONSULT
Perform the work according to the directions of CONSULT.
NOTE:
When following item is indicated on the CONSULT, operate quickly.
- To depress the brake pedal : within 20 seconds
- To release the brake pedal : within 10 seconds
INSPECTION END
When the electrical brake control unit is not replaced
CAUTION:
Perform the following works with two persons or more.
Monitor the fluid level in the reservoir tank while performing the air bleeding.
Never spill or splash brake fluid on painted surfaces. Brake fluid may seriously damage paint. Wipe it off immediately and wash with water if it gets on a painted surface. For brake component parts, never wash them with water.
Never allow foreign matter (e.r.dust) and oil other than brake fluid to enter the reservoir tank.
Keep CONULT connecting.
Be careful not the DDL2 connector disconnected during brake pedal operation.
Install the tires after all work is completed.
NOTE:
Conditions for air bleeding
Not depressing the brake pedal
Shift position is in P position
ADVANCE PREPARATION
With CONSULT
- Ignition switch is ON.
- Operate the electric parking brake system.
- Select "ABS", "Work support", and "(Air bleeding) Accumulator pressure release" according to this order.
- Perform the work according to the directions of CONSULT.
GO TO 2.
PERFORM AIR BLEEDING
With CONSULT
- Select "ABS", "Work support", and "(Air bleeding) Perform air bleeding" according to this order.
- Perform the work according to the directions of CONSULT.
- Connect a vinyl tube to the bleeder valve of the front brake.
NOTE:
Perform both left and right sides, but in either order.
- Depress the brake pedal to full stroke.
- Release the brake pedal.
- Wait for two seconds.
- Repeat step 4 to 6 until brake fluid coming out of brake calipers.
- Tighten the bleeder valve to the specified torque. Refer to FRONT BRAKE CALIPER ASSEMBLY : Exploded View.
- Connect a vinyl tube to the bleeder valve of the rear brake.
NOTE:
Perform both left and right sides, but in either order.
- Depress the brake pedal to full stroke.
- Release the brake pedal.
- Wait for two seconds.
- Repeat step 10 to 12 until brake fluid coming out of brake calipers.
- Tighten the bleeder valve to the specified torque. Refer to Exploded View.
- Connect a vinyl tube to the bleeder valve of the front brake.
NOTE:
Perform both left and right sides, but in either order.
- Depress the brake pedal half-way.
- Open the bleeder valve.
- Depress the brake pedal to full stroke.
- Tighten the bleeder valve.
- Wait for two seconds.
- Repeat steps 16 and 20 until the air is completely bleeds.
- Connect a vinyl tube to the bleeder valve of the rear brake.
NOTE:
Perform both left and right sides, but in either order.
- Depress the brake pedal half-way.
- Open the bleeder valve.
- Depress the brake pedal to full stroke.
- Tighten the bleeder valve.
- Wait for two seconds.
- Repeat steps 23 and 27 until the air is completely bleeds.
- Inspect brake fliud according to the directions of CONSULT.
- Perform learning according to the directions of CONSULT.
Did it learn correctly?
YES>>GO TO 5.
NO>>GO TO 3.
RELEARNING
With CONSULT
- Cancel electric parking brake system.
- Select "ABS", "Work support", and "(Air bleeding) Relearning" according to this order.
- Perform the work according to the directions of CONSULT.
Did it learn correctly?
YES>>GO TO 5.
NO>>Erase the memory of self-diagnosis results. GO TO 4.
FORCIBLY ELECTRICAL BRAKE CONTROL UNIT
With CONSULT
- Select "ABS", "Work support", and "(Air bleeding) Forcibly electrical brake control unit" according to this order.
- Perform the work according to the directions of CONSULT.
CAUTION:
Start the engine → Operate the electric parking brake system → Get out of the vehicle → Never touch or operate the vehicle → CONSULT operation → After completing �(Air bleeding) Forcibly electrical brake control unit", stop the engine → Ignition switch ON → Cancel electric parking brake system.
Did it learn correctly?
YES>>INSPECTION END
NO>>GO TO 1.
CHECK AIR POLLUTION
With CONSULT
Perform the work according to the directions of CONSULT.
NOTE:
When following item is indicated on the CONSULT, operate quickly.
- To depress the brake pedal : within 20 seconds
- To release the brake pedal : within 10 seconds
INSPECTION END
 Bleeding Brake System
CAUTION:
When the following operations are performed, always use CONSULT, for performing each air bleding of “WORK SUPPORT�. Refer to Work Procedure. ...

Other materials:
Service Data
ALUMINUM WHEEL
Item Limit Runout Axial runout 0.3 mm (0.012 in) or less Radial runout Allowable unbalance Dynamic (At flange) 5 g (0.17 oz) or less (one side) Static (At flange) 10 g (0.35 oz) or less
ALUMINUM WHEEL (EMERGENCY)
Item Limit Runout Axial runout (Average) 0.3 mm (0.012 ...
Removal & Installation
REMOVAL
Remove the map lamp assembly. Refer to Removal and Installation.
Remove the microphone harness connector .
Use a suitable tool to release pawls and remove the switch finisher .
: Pawls
CAUTION:
Do not damage pawls.
Use a suitable tool to release pawl and remove the microphone .
: ...
Basic information
WARNING
The air conditioning system in the Nissan Armada operates only when the
engine is running.
Never leave children, dependent adults, or pets unattended inside the
Nissan Armada. Interior temperatures can rise rapidly in hot weather, potentially
leading to severe injury or death. ...

0.0065