Removal and Installation
CAUTION:
-
Perform work with 2 workers, because it is heavy weight.
-
Support back door with a proper material and use protective tape or shop cloth to protect back door and body from falling and damage when removing and installing back door stay.
REMOVAL
Support back door assembly with the proper material to prevent it from falling.
WARNING:
Injury may occur if back door assembly is not supported with a proper material when removing back door stay.
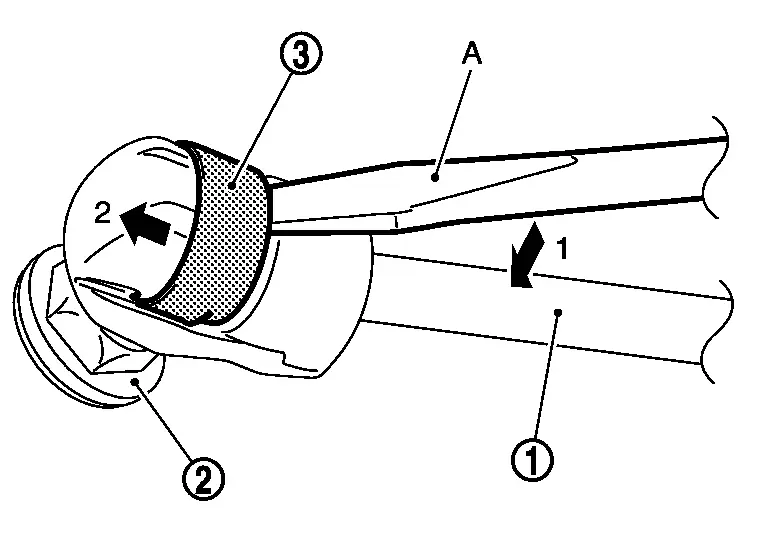
Remove metal clip  located on connection between back door stay
  and stud ball
  using a remover tool (A) according to the numerical order 1→2 indicated by arrows as shown in the figure.
CAUTION:
2 workers are required to support back door.
Disengage back door stay from stud ball of back door stay lower bracket.
Repeat the same operation to disengage back door stay from stud ball of back door stay upper bracket, and then remove back door stay.
Remove back door stay upper bracket mounting bolts, and then remove back door stay upper bracket.
Remove back door stay lower bracket mounting bolts, and then remove back door stay lower bracket.
INSTALLATION
Note the following items, and then install in the reverse order of removal.
CAUTION:
-
After installation, apply anticorrosive around the bolts to prevent rust.
-
After adjusting, check the open/close operation. Refer to Inspection.
Disposal
CAUTION:
When performing disposal operation, wear the protective glasses and protective gloves.
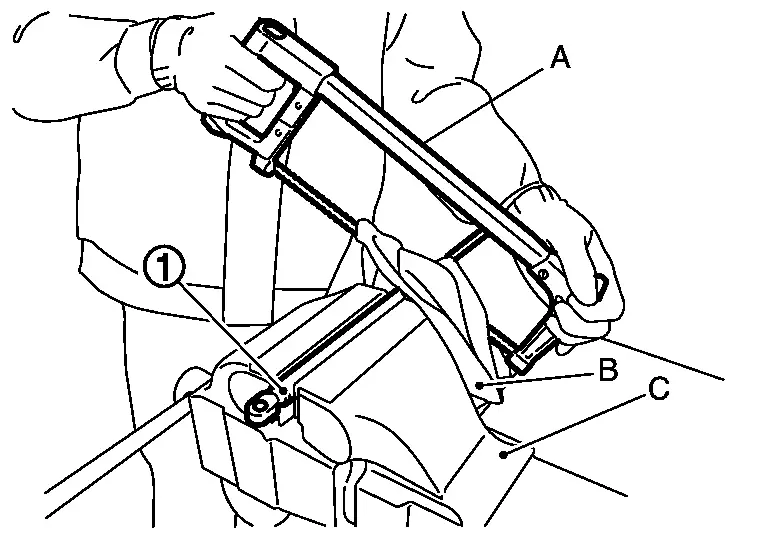
Fix back door stay using a vise (C).
CAUTION:
When cutting a hole on back door stay, always cover a hacksaw (A) using a shop cloth (B) to avoid scattering metal fragments or oil.
Using hacksaw slowly make 2 holes in the back door stay, in numerical order as shown in the figure.
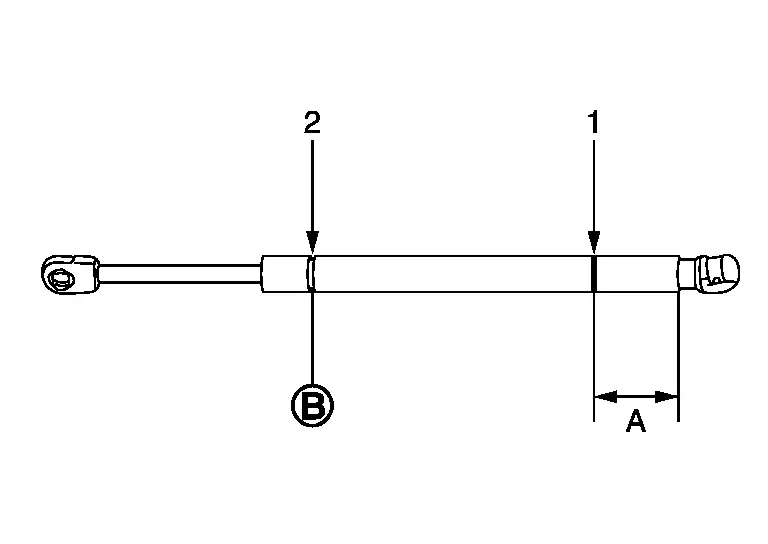
| A: | 20.0 mm (0.787 in) |
 : : |
Cut at the groove. |
Other materials
Rab System Symptoms
Symptom Table
CAUTION:
Perform the self-diagnosis with CONSULT before the symptom diagnosis. Perform the trouble diagnosis if any DTC is detected. Symptom Confirmation item Reference page
RAB system display does not display
Combination meter
On Board Diagnosis Function
...
Unbalance Steering Wheel Turning Force (torque Variation)
Description
Unbalance steering wheel turning force (torque variation).
Diagnosis Procedure
PERFORM SELF-DIAGNOSIS
With CONSULT
Pull the parking brake switch.
NOTE:
Check to make sure that the parking brake switch indicator is turned ON.
Ignition switch OFF.
Get out of the vehicle and close all ...
Seat Belt Warning (buzzer) Does Not Sound
Diagnosis Procedure
CHECK DTC OF AIR BAG DIAGNOSIS SENSOR UNIT
Check DTC in “Self Diagnosis Result� mode of “AIR BAG� using CONSULT.
Is DTC detected?
YES>>
Perform trouble diagnosis related to the detected DTC. Refer to DTC Index.
NO>>
GO TO 2.
CHECK DTC OF BCM
Check DTC in “ ...