Exploded View
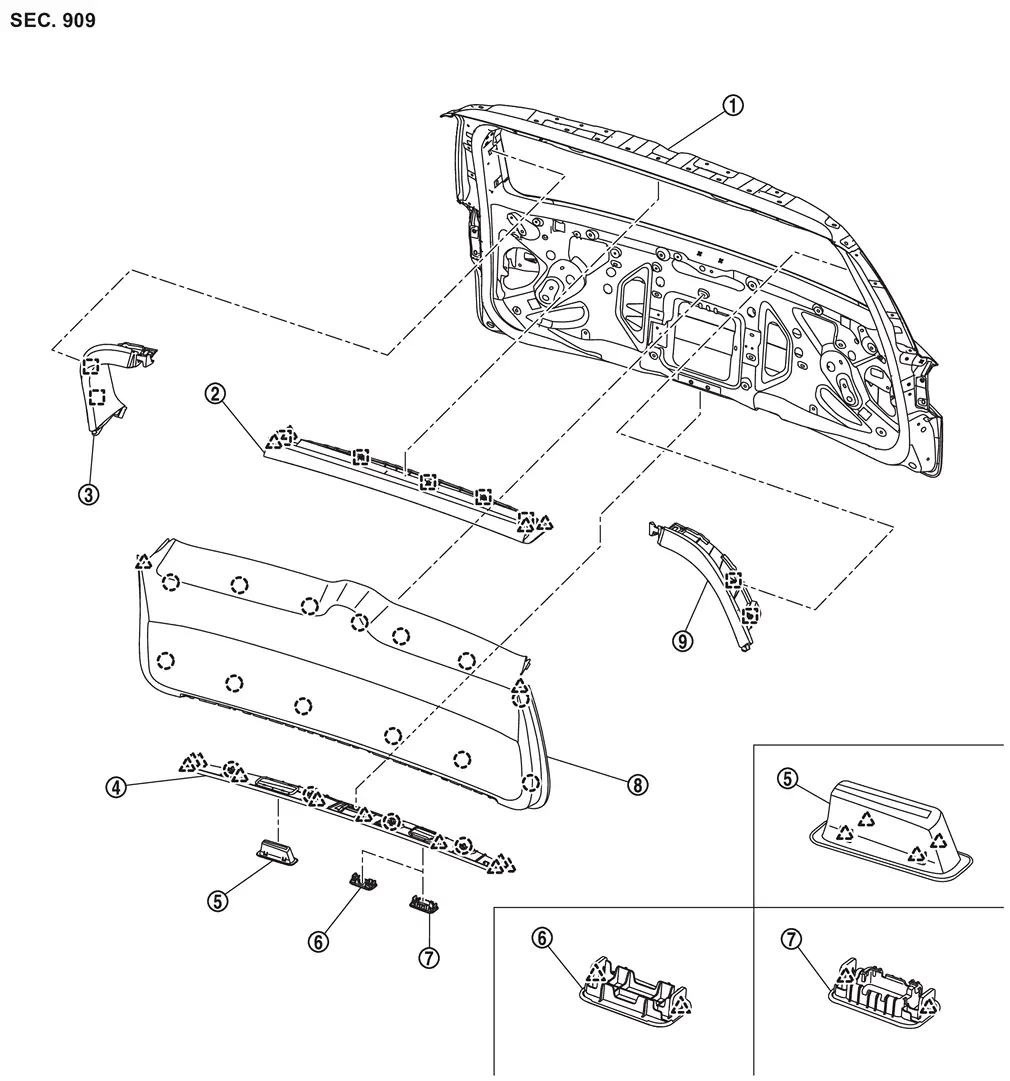
 |
Back door panel |  |
Back door upper garnish |  |
Back door side garnish RH |
 |
Back door lower finisher |  |
Back door pull handle |  |
Back door finisher cap*1 |
 |
Automatic back door switch finisher*2 |  |
Back door inner finisher |  |
Back door side garnish LH |
 |
: Clip | ||||
 |
: Pawl | ||||
 |
: Metal clip | ||||
*1: Without automatic back door system models
*2: With automatic back door system models
Back Door Lower Finisher
Removal and Installation
CAUTION:
Never damage the back door panel.
REMOVAL
CAUTION:
When removing, always use a remover tool that is made of plastic to prevent damage to the parts.
Remove back door pull handle. Refer to Removal and Installation.
Remove back door finisher cap (without automatic back door system models) or automatic back door switch finisher (with automatic back door system models).
- Back door finisher cap: Refer to Removal and Installation.
- Automatic back door switch finisher: Refer to Removal and Installation.
Apply protective tapes (A) on back door inner finisher to protect it from damage.
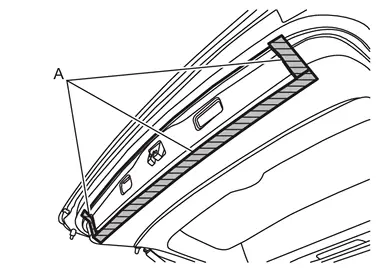
Disengage back door lower finisher fixing clips and pawls using a remover tool (A), and then back door lower finisher.
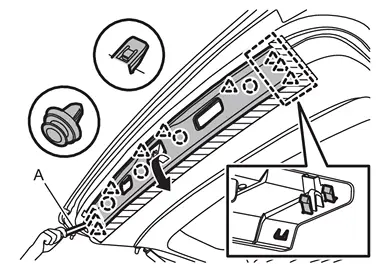
|
: Clip |
|
: Pawl |
INSTALLATION
Note the following items, and then install in the reverse order of removal.
CAUTION:
-
Visually check clips for deformation and damage during installation. Replace with new ones if necessary.
-
Check in advance that clips and pawls are accurately aligned with the portions on back door panel, and then install by pressing in.
Back Door Inner Finisher
Removal and Installation
CAUTION:
Never damage the back door panel.
REMOVAL
CAUTION:
When removing, always use a remover tool that is made of plastic to prevent damage to the parts.
Remove back door lower finisher. Refer to Removal and Installation.
Apply protective tapes (A) on back door panel to protect it from damage.
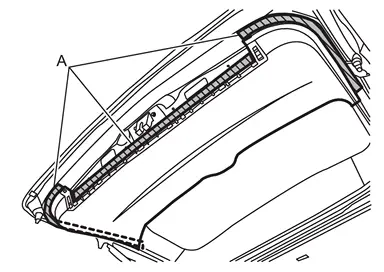
Insert remover tool (A) close to clip when starting to remove back door inner finisher.
Disengage back door inner finisher fixing clips and pawls according to numerical order 1→15 indicated by arrow as shown in the figure, and then remove back door inner finisher.
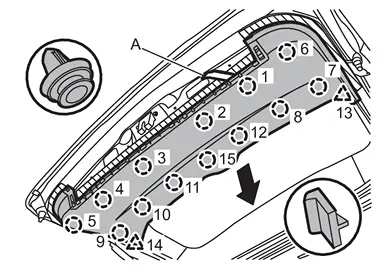
CAUTION:
- Always use remover tool, when removing fixing clips and pawls.
- To avoid damage, disengage fixing clips and pawls according to numerical order and also never pull back door inner finisher without disengage fixing clips.
|
: Clip |
|
: Pawl |
INSTALLATION
Note the following items, and then install in the reverse order of removal.
CAUTION:
-
Visually check clips for deformation and damage during installation. Replace with new ones if necessary.
-
Check in advance that clips and pawls are accurately aligned with the portions on back door panel, and then install by pressing in.
Back Door Upper Garnish
Removal and Installation
CAUTION:
Never damage the back door panel.
REMOVAL
CAUTION:
When removing, always use a remover tool that is made of plastic to prevent damage to the parts.
Fully open back door.
Apply protective tape (A) on back door panel to protect it from damage.
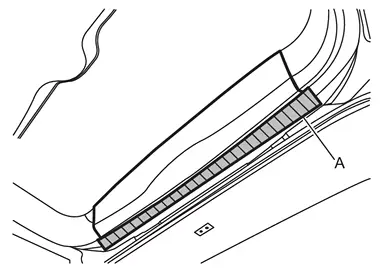
Disengage back door upper garnish fixing pawls and metal clips using a remover tool (A), and then remove back door upper garnish.
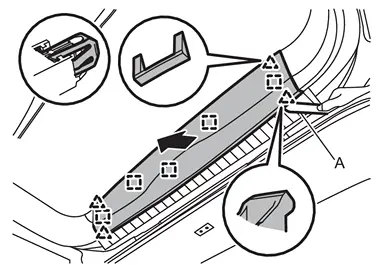
|
: Pawl |
|
: Metal clip |
INSTALLATION
Note the following items, and then install in the reverse order of removal.
CAUTION:
-
Visually check metal clips for deformation and damage during installation. Replace with new ones if necessary.
-
Check in advance that pawls and metal clips are accurately aligned with the portions on back door panel, and then install by pressing in.
Back Door Side Garnish
Removal and Installation
CAUTION:
Never damage the back door panel.
REMOVAL
CAUTION:
When removing, always use a remover tool that is made of plastic to prevent damage to the parts.
Remove back door inner finisher. Refer to Removal and Installation.
Remove back door upper garnish. Refer to Removal and Installation.
Apply protective tape (A) on back door panel to protect it from damage.
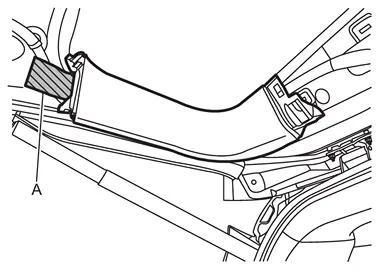
Disengage back door side garnish fixing metal clips using a remover tool (A), and then remove back door side garnish.
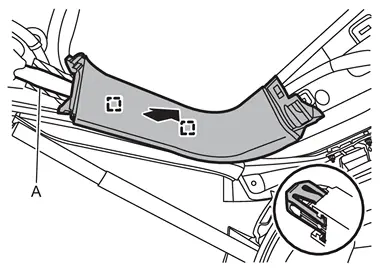
|
: Metal clip |
INSTALLATION
Note the following items, and then install in the reverse order of removal.
CAUTION:
-
Visually check metal clips for deformation and damage during installation. Replace with new ones if necessary.
-
Check in advance that metal clips are accurately aligned with the portions on back door panel, and then install by pressing in.
Back Door Pull Handle
Removal and Installation
CAUTION:
Never damage the back door panel.
REMOVAL
Fully open back door.
Disengage back door pull handle fixing pawls, and then remove back door pull handle.
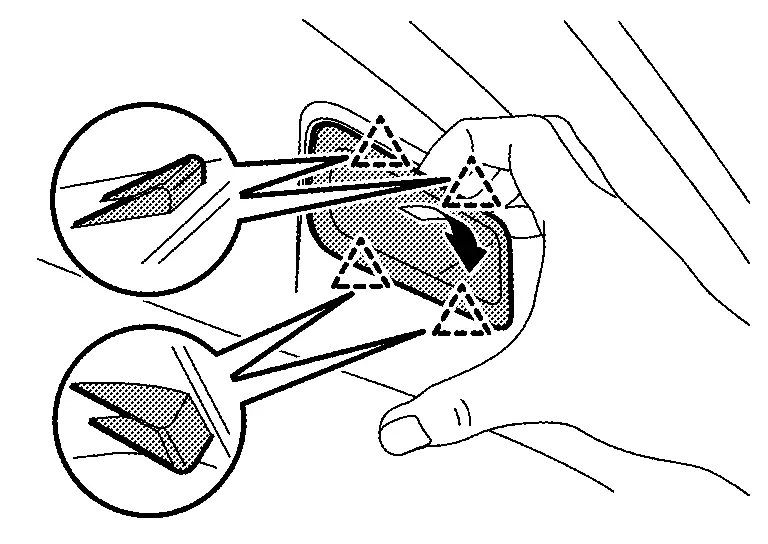
|
: Pawl |
INSTALLATION
Note the following item, and then install in the reverse order of removal.
CAUTION:
Check in advance that pawls are accurately aligned with the portions on back door panel, and then install by pressing in.
Back Door Finisher Cap
Removal and Installation
CAUTION:
Never damage the back door panel.
REMOVAL
CAUTION:
When removing, always use a remover tool that is made of plastic to prevent damage to the parts.
Fully open back door.
Apply protective tape (A) on back door lower finisher to protect it from damage.
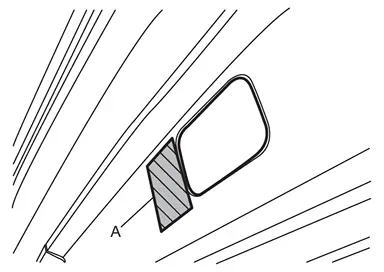
Disengage back door finisher cap fixing pawls using a remover tool (A), and then remove back door finisher cap.
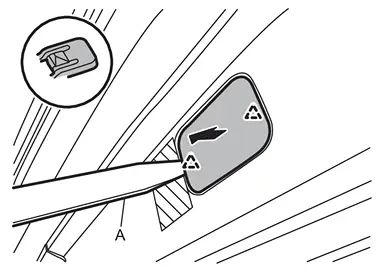
|
: Pawl |
INSTALLATION
Note the following item, and then install in the reverse order of removal.
CAUTION:
Check in advance that pawls are accurately aligned with the portions on back door panel, and then install by pressing in.
Automatic Back Door Switch Finisher
Removal and Installation
CAUTION:
Never damage the back door panel.
REMOVAL
CAUTION:
When removing, always use a remover tool that is made of plastic to prevent damage to the parts.
Fully open back door.
Apply protective tape (A) on back door lower finisher to protect it from damage.
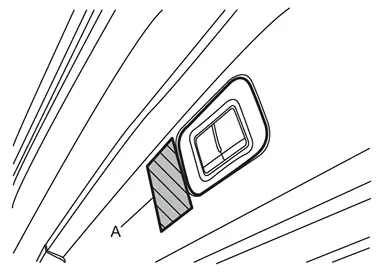
Disengage automatic back door switch finisher fixing pawls using a remover tool (A).
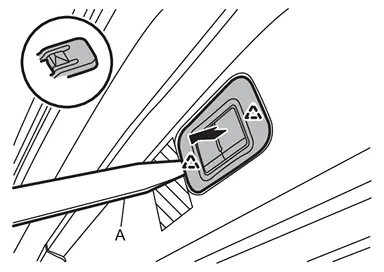
|
: Pawl |
Disconnect harness connectors, and then remove automatic back door switch finisher.
INSTALLATION
Note the following item, and then install in the reverse order of removal.
CAUTION:
Check in advance that pawls are accurately aligned with the portions on back door panel, and then install by pressing in.
Other materials
Heated Steering Wheel System Does Not Activate
Description
The heated steering wheel does not warm up.
The heated steering wheel system cannot be turned OFF.
Diagnosis Procedure
PERFORM SELF-DIAGNOSIS
With CONSULT
Ignition switch ON.
Select “Self Diagnostic Result� mode of “HVAC� using CONSULT.
Check DTC.
Is DTC detected?
B ...
Wireless Charger Unit
Removal and Installation
REMOVALRemove the front center console cup holder assembly. Refer to Removal and Installation.
Remove the center console pocket mat. Refer to Exploded View.
Press the wireless charger unit pawl from the back of the front center console cup holder assembly to remove the wirel ...
Transfer Fluid: Atx93b
Inspection
WARNING:
Jacking up or lift up the vehicle may the vehicle height to go down which cause a personal injury and/or damage to the air suspension component parts. Refer to Precaution for when Jacking and Lifting Up the vehicle with Electronic Air Suspension System.
FLUID LEAKAGECheck t ...