Removal and Installation
CAUTION:
-
Perform work with 2 workers, because it is heavy weight.
-
Support back door with a proper material and use protective tape or shop cloth to protect back door and body from falling and damage when removing and installing back door stay.
REMOVAL
Support back door assembly with the proper material to prevent it from falling.
WARNING:
Injury may occur if back door assembly is not supported with a proper material when removing back door stay.
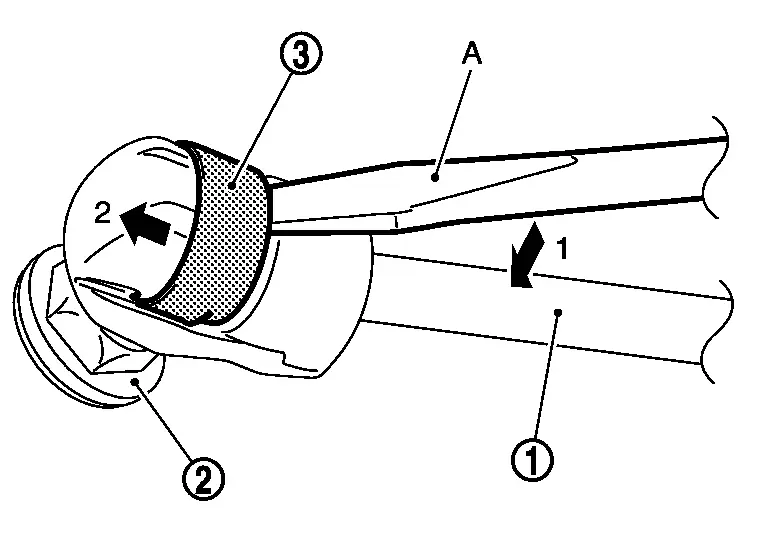
Remove metal clip  located on connection between back door stay
  and stud ball
  using a remover tool (A) according to the numerical order 1→2 indicated by arrows as shown in the figure.
CAUTION:
2 workers are required to support back door.
Disengage back door stay from stud ball of back door stay lower bracket.
Repeat the same operation to disengage back door stay from stud ball of back door stay upper bracket, and then remove back door stay.
Remove back door stay upper bracket mounting bolts, and then remove back door stay upper bracket.
Remove back door stay lower bracket mounting bolts, and then remove back door stay lower bracket.
INSTALLATION
Note the following items, and then install in the reverse order of removal.
CAUTION:
-
After installation, apply anticorrosive around the bolts to prevent rust.
-
After adjusting, check the open/close operation. Refer to Inspection.
Disposal
CAUTION:
When performing disposal operation, wear the protective glasses and protective gloves.
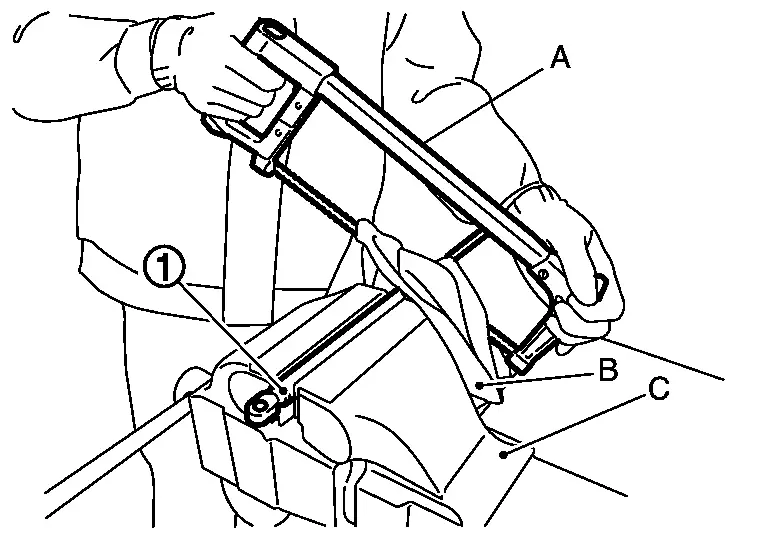
Fix back door stay using a vise (C).
CAUTION:
When cutting a hole on back door stay, always cover a hacksaw (A) using a shop cloth (B) to avoid scattering metal fragments or oil.
Using hacksaw slowly make 2 holes in the back door stay, in numerical order as shown in the figure.
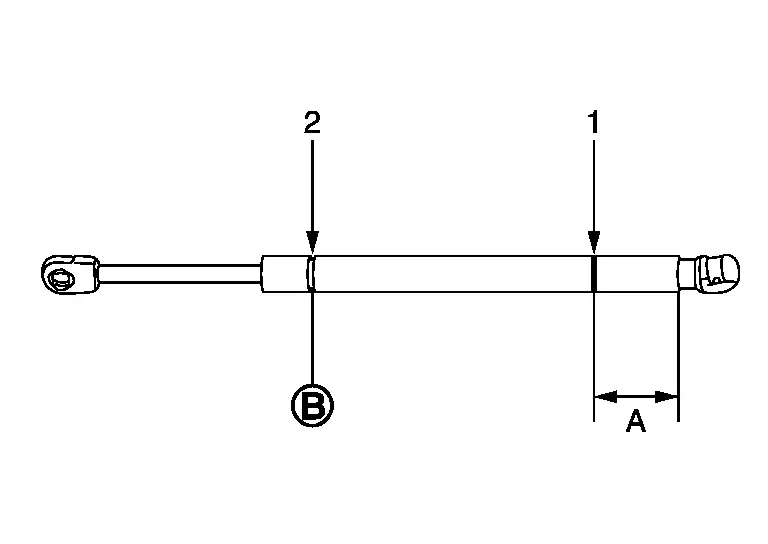
| A: | 20.0 mm (0.787 in) |
 : : |
Cut at the groove. |
Other materials
Hood
1. To open the hood of the Nissan Armada, pull the hood release handle 1 located
beneath the driver’s side instrument panel. This action will cause the hood to pop
up slightly.
2. Move to the front of the Nissan Armada and locate the secondary safety lever
2. Slide it sideways with your ...
Second Seat Cushion
Disassembly and Assembly
DISASSEMBLYRemove seatback trim and pad. Refer to Disassembly and Assembly.
Disengage seat cushion trim fixing retainers .
Disengage seat cushion trim fixing retainers .
Disengage harness fixing clip of seat cushion, and then disconnect harness connector.
CAUTION:
Before ...
Roof Antenna
Exploded View
Roof antenna
: N·m (kg-m, in-lb)
Removal and Installation
REMOVALRemove the headlining assembly. Refer to Removal and Installation.
Disconnect the antenna feeder connector.
Remove the mounting nut.
Remove the roof antenna from the vehicle.INSTALLATIONNote the following, ...