Removal and Installation
CAUTION:
Never damage the body panel.
REMOVAL
Remove front kicking plate. Refer to Removal and Installation.
Remove rear kicking plate. Refer to Removal and Installation.
Disengage center pillar lower escutcheon fixing pawls, and then remove center pillar lower escutcheon.
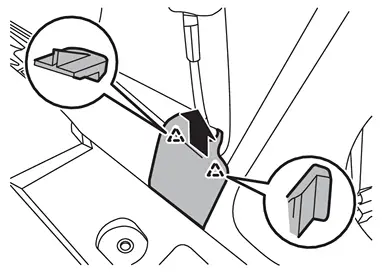
 |
: Pawl |
Disengage center pillar lower garnish upper side fixing pawls according to numerical order 1→2 indicated by arrows as shown in the figure.
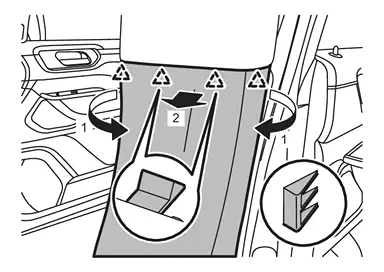
|
: Pawl |
Disengage center pillar lower garnish fixing clips, and then remove center pillar lower garnish.
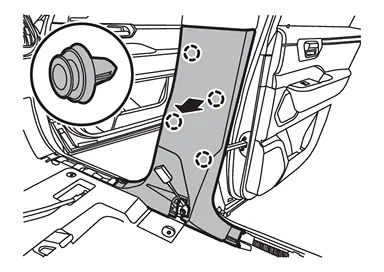
 |
: Clip |
INSTALLATION
Note the following items, and then install in the reverse order of removal.
CAUTION:
-
Visually check clips for deformation and damage during installation. Replace with new ones if necessary.
-
Check in advance that pawls and clips are accurately aligned with the portions on center pillar upper garnish and body panel, and then install by pressing in.
-
After installation, check that the lip of body side welt covers. Refer to Inspection.
Other materials
Front Oil Seal
Exploded View
Front output shaft
Front oil seal
Front case
Snap ring
Sprockets with chain
Snap ring
Rear case
: Always replace after every disassembly.
: N·m (kg-m, ft-lb)
: Apply transfer fluid.
: Apply Genuine Liquid Gasket, Lo ...
Front Door Outside Molding
Removal and Installation
REMOVALCAUTION:
Never damage the front door panel.Fully open front door glass.
Remove door mirror assembly. Refer to Removal and Installation.
Apply protective tape (A) on the part to protect it from damage.
Disengage front door outside molding fixing pawl using remover to ...
Advanced Ambient Light (front Door Upper)
Exploded View
Advanced ambient light (front door upper) is integrated structure with front door finisher. For exploded view of front door finisher, refer to Exploded View.
Replacement
CAUTION:
Disconnect the battery negative terminal or remove power circuit fuse when performing the operation for p ...