Removal and Installation
REMOVAL
CAUTION:
-
Perform lubricant return operation before each refrigeration system disassembly. However, if a large amount of refrigerant or lubricant leak is detected, never perform lubricant return operation. Refer to Perform Lubricant Return Operation.
-
When disconnect the A/C piping related parts, cap or wrap the joint of those parts with suitable material such as vinyl tape to avoid the entry of air.
Use a refrigerant collecting equipment (for HFO-1234yf) to discharge the refrigerant. Refer to Recycle Refrigerant.
Remove front grille. Refer to the following.
-
Off road models: Removal and Installation
-
City models: Removal and Installation
Remove front bumper fascia. Refer to the following.
-
Off road models: Removal and Installation
-
City models: Removal and Installation
Remove radiator air guide upper. Refer to Removal and Installation.
Remove condenser inlet pipe. Refer to Removal and Installation.
Remove condenser outlet pipe. Refer to Removal and Installation.
Remove radiator core support. Refer to Removal and Installation.
Remove radiator air guide (RH and LH). Refer to Removal and Installation.
Disconnect refrigerant pressure sensor harness connector. Refer to Removal and Installation.
Remove mounting bolt  .
.
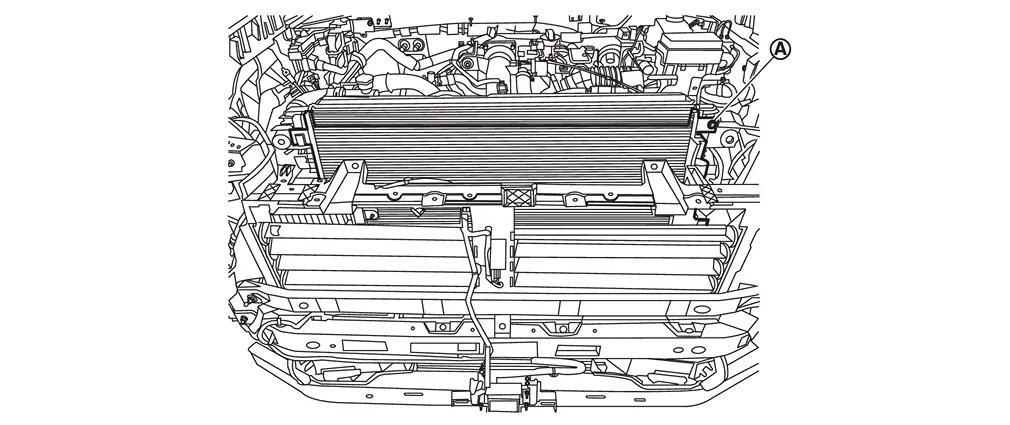
Disengage fixing pawl, and then lift the condenser & liquid tank assembly upwards and remove condenser & liquid tank assembly from radiator.
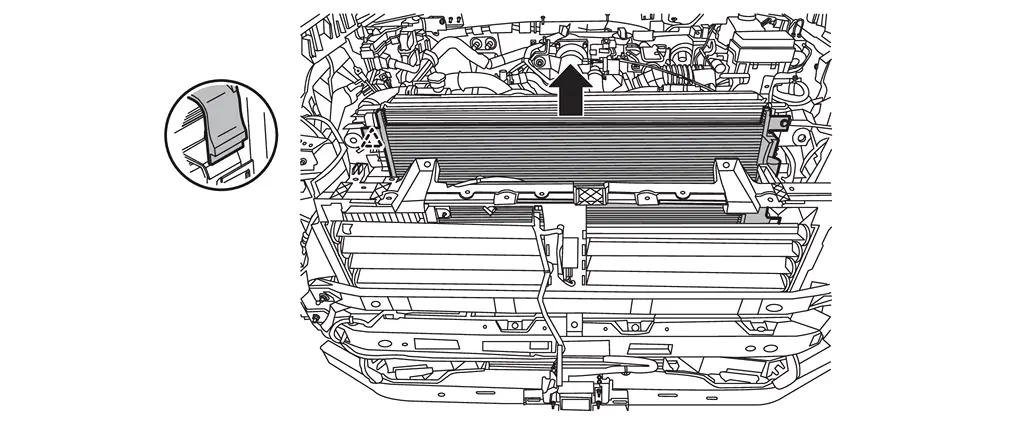
CAUTION:
Never damage core surface of condenser & liquid tank assembly and radiator.
 |
: Pawl |
INSTALLATION
Note the following items, and then install in the reverse order of removal.
CAUTION:
-
Perform lubricant adjusting procedure before installing new condenser & liquid tank assembly. Refer to Lubricant Adjusting Procedure for Components Replacement Except A/C compressor.
-
Use a refrigerant collecting equipment (for HFO-1234yf) to charge the refrigerant. Refer to Charge Refrigerant.
-
Perform a check for refrigerant leakage when charging with refrigerant. Refer to Leak Test.
Other materials
Precautions
Precaution for Supplemental Restraint System (SRS) "AIR BAG" and "SEAT BELT PRE-TENSIONER"
The Supplemental Restraint System such as “AIR BAG� and “SEAT BELT PRE-TENSIONER�, used along with a front seat belt, helps to reduce the risk or severity of injury to the driver and front passenger fo ...
High-Pressure Pipe
Removal and Installation
WARNING:
Jacking up or lifting up the vehicle may the vehicle height to go down which cause a personal injury and/or damage to the air suspension component parts. Refer to Precaution for when Jacking and Lifting Up the vehicle with Electronic Air Suspension System (With ele ...
Fuel Filler Lid
Exploded View
Fuel filler base assembly
Fuel filler lid
Fuel filler lid lock assembly
Fuel filler base mask
: Pawl
: Always replace after every disassembly.
Fuel Filler Lid
Removal and Installation
REMOVAL Fully open fuel filler base assembly.
Diseng ...