Exploded View
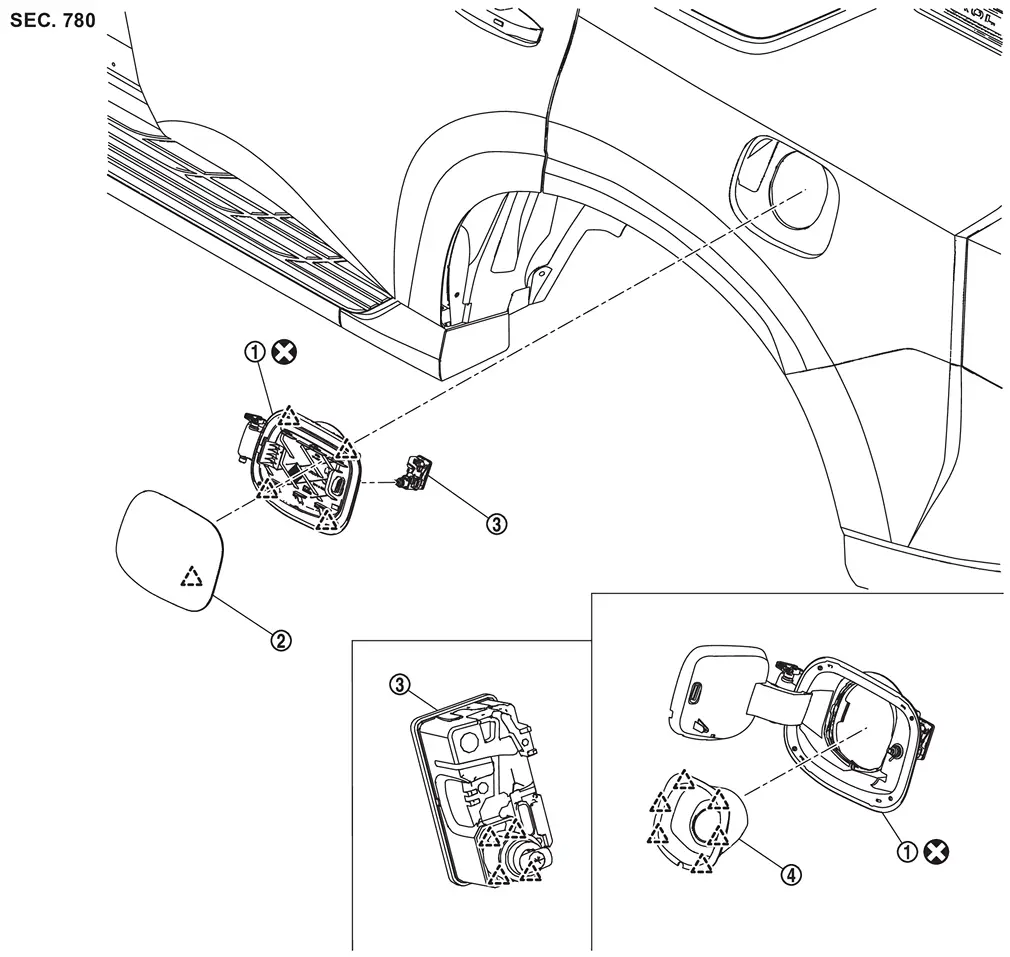
 |
Fuel filler base assembly |  |
Fuel filler lid |  |
Fuel filler lid lock assembly |
 |
Fuel filler base mask | ||||
 |
: Pawl | ||||
 |
: Always replace after every disassembly. | ||||
Fuel Filler Lid
Removal and Installation
REMOVAL
Fully open fuel filler base assembly.
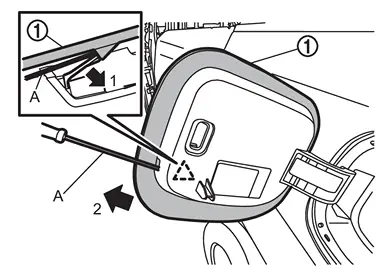
Disengage fuel filler lid fixing pawl using a removal tool (A), and then remove fuel filler lid according to numerical order 1→2 indicated by arrows as shown in figure.
|
: Pawl |
INSTALLATION
Note the following items, and then install in the reverse order of removal.
CAUTION:
After installation, check fuel filler lid assembly open/close, lock/unlock operation.
 NOTE:
NOTE:
-
The following table shows the specified values for checking normal installation status.
-
Fitting adjustment cannot be performed.
Unit: mm [in]
| Portion | Clearance | Evenness |
|---|---|---|
| Fuel filler lid – Body side outer |
3.0 ± 1.0 [0.118 ± 0.039] |
0.0 ± 1.0 [0.000 ± 0.039] |
Fuel Filler Base Assembly
Removal and Installation
CAUTION:
Never reuse fuel filler base assembly. Always replace it with a new one when it is removed.
REMOVAL
Remove fuel filler lid. Refer to Removal and Installation.
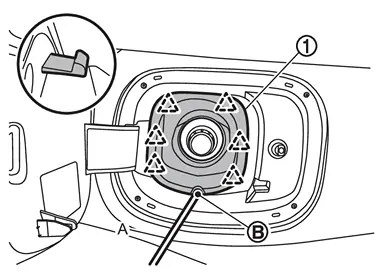
Disengage fuel filler base mask fixing pawls using a remover tool (A) into drain hole  , and then remove fuel filler base mask.
|
: Pawl |
Drill holes at recessed parts  of fuel filler base.
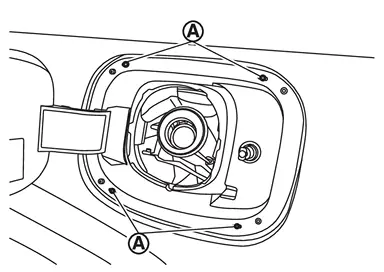
CAUTION:
-
Use a drill bit of Φ3.0 - 4.0 mm (Φ0.118 - 0.157 in) not to damage the vehicle body.
-
Never insert over 3.5 mm (0.138 in) from tip of drill bit not to break and/or damage pawl of fuel filler base assembly.
Insert a remover tool (B) into drill holes of fuel filler base assembly , and pull fuel filler base assembly to outside of vehicle while disengage fuel filler base assembly fixing pawls.
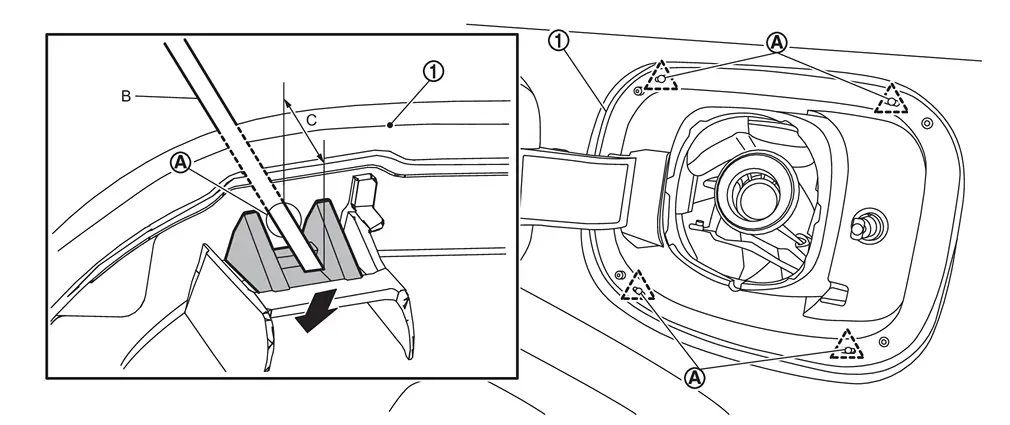
|
: Pawl |
NOTE:
-
Insert a removal tool into drill hole by approximately 12 mm (0.47 in) (C), and push down fixing pawl using principle of leverage.
-
It is easy to work with remover tool that has the same thickness as drill hole diameter.
Remove fuel filler base assembly from vehicle body according to the numerical order 1→2 indicated by arrows as shown in figure.
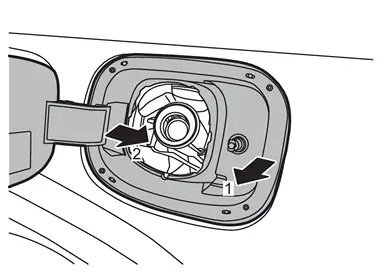
CAUTION:
Never damage vehicle body.
Remove fuel filler lid lock assembly. Refer to Removal and Installation.
INSTALLATION
Install fuel filler lid lock assembly. Refer to Removal and Installation.
Install fuel filler base assembly to vehicle body according to the numerical order 1→2 indicated by arrows as shown in figure.
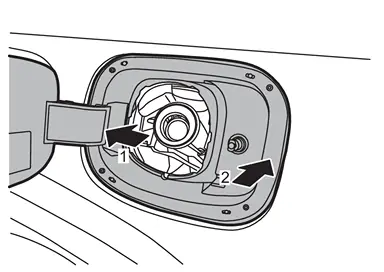
CAUTION:
Never damage vehicle body.
Install fuel filler base to rear wheel outer panel LH and body side inner panel .
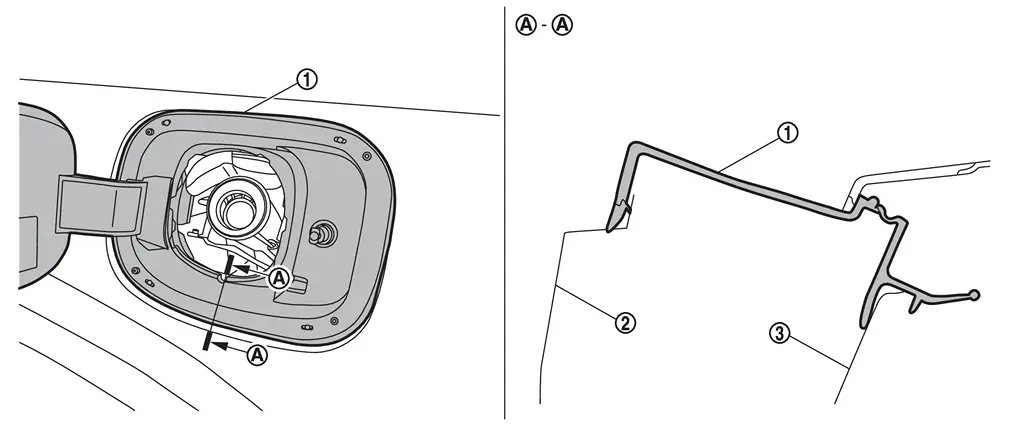
Install fuel filler base mask to fuel filler base.
Install fuel filler lid to fuel filler base assembly. Refer to Removal and Installation.
CAUTION:
After installation, check fuel filler base assembly open/close, lock/unlock operation.
Fuel Filler Lid Lock Assembly
Removal and Installation
REMOVAL
Remove fuel filler base assembly. Refer to Removal and Installation.
Rotate and disengage fuel filler lid lock assembly fixing pawls according to the numerical order 1→2 indicated by arrows as shown in the figure, and then remove fuel filler lid lock assembly.
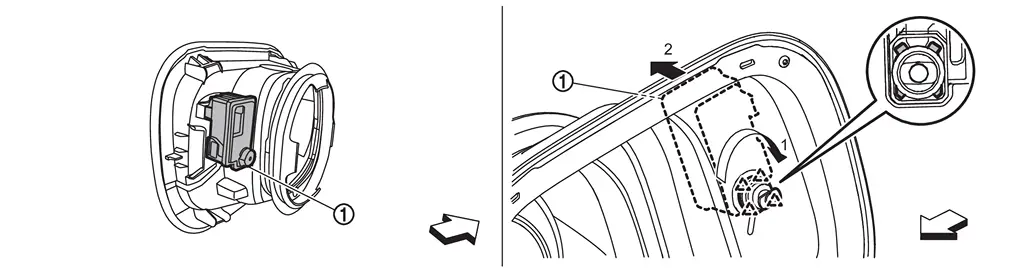
|
: Pawl |
| : vehicle front |
INSTALLATION
Note the following item, and then install in the reverse order of removal.
CAUTION:
After installation, check fuel filler lid base assembly open/close operation.
Other materials
Front
Exploded View
ABS actuator and electric unit (control unit)
Electrical brake control unit
Brake tube
Connector
Bracket
Lock plate
Brake hose
Union bolt
Copper washer
To rear brake tube. Refer to Exploded View.
: vehicle front
: N·m ...
Driver Monitor Camera Control Unit
Exploded View
Driver monitor camera control unit
: N·m (kg-m, in-lb)
Removal and Installation
REMOVALRemove the front speaker grille. Refer to Removal and Installation.
Remove the mounting nuts, and remove the driver monitor camera control unit.
Disconnect the d ...
Brake Fluid
Inspection
WARNING:
Jacking up or lift up the vehicle may the vehicle height to go down which cause a personal injury and/or damage to the air suspension component parts. Refer to Precaution for when Jacking and Lifting Up the vehicle with Electronic Air Suspension System.
BRAKE FLUID LEVEL
C ...