Exploded View
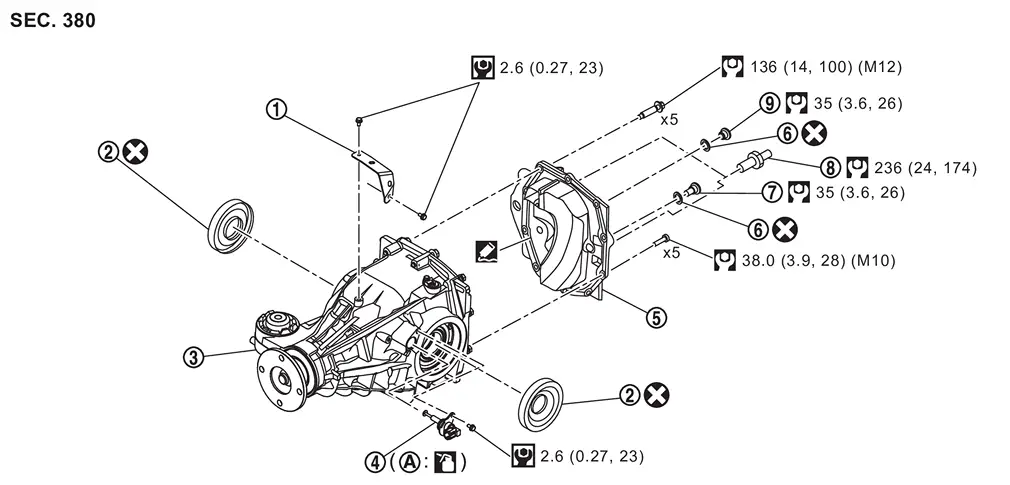
 |
Bracket |  |
Side oil seal |  |
Rear final drive assembly |
 |
Differential lock position switch |  |
Rear cover |  |
Gasket |
 |
Drain plug |  |
Stud bolt |  |
Filler plug |
 |
O-ring | ||||
 : N·m (kg-m, in-lb) : N·m (kg-m, in-lb) |
|||||
 : N·m (kg-m, ft-lb) : N·m (kg-m, ft-lb) |
|||||
 : Always replace after every disassembly. : Always replace after every disassembly. |
|||||
 : Apply gear oil. : Apply gear oil. |
|||||
 : Apply Genuine Liquid Gasket, Three Bond 1217 or equivalent. Refer to Recommended Chemical Products and Sealants. : Apply Genuine Liquid Gasket, Three Bond 1217 or equivalent. Refer to Recommended Chemical Products and Sealants. |
|||||
Disassembly and Assembly
DISASSEMBLY
Remove bracket from rear final drive assembly.
Remove drain plug and gasket from rear cover and drain gear oil.
Remove filler plug and gasket from rear cover.
Remove differential lock position switch. Refer to Removal and Installation.
Remove the side oil seals. Refer to Removal and Installation.
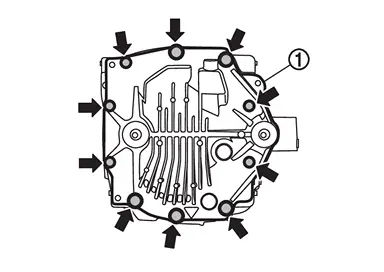
Remove rear cover mounting bolts ( ) and remove the rear cover .
Remove stud bolt from rear cover.
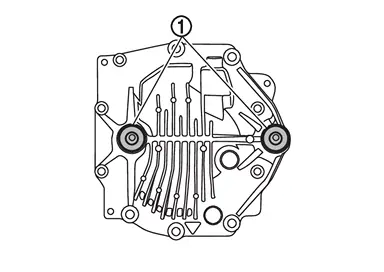
 NOTE:
NOTE:
It is not necessary to remove stud bolt except when it is replaced.
ASSEMBLY
Install stud bolt to rear cover.
-
For tightening torque, refer to Exploded View.
Apply liquid gasket to mating surface of rear cover.
-
For applying liquid gasket, refer to Exploded View.
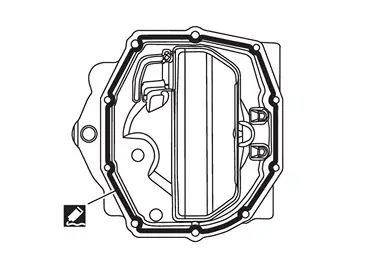
CAUTION:
-
Remove old gasket adhering to the mounting surfaces. Also remove any moisture, oil, or foreign material adhering to the mounting surfaces.
-
The width of sealant bead is approximately 3 mm (0.12 in). Apply sealant evenly.
Install rear cover, and tighten rear cover mounting bolts to the specified torque.
-
For tightening torque, refer to Exploded View.
CAUTION:
-
Install the mounting bolts of rear cover according to the following standards.
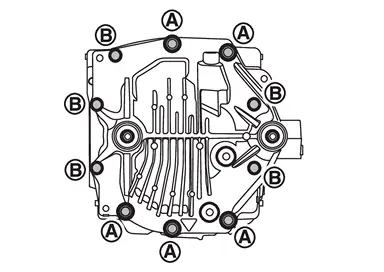
| Bolt symbol | |  |
|---|---|---|
| Number of bolt | 5 | 5 |
| Bolt size | M12 | M10 |
Install the side oil seals. Refer to Removal and Installation.
Install differential lock position switch. Refer to Removal and Installation.
Install drain plug, as per the following procedure.Install gasket to drain plug, and then install them to rear cover.
CAUTION:
Never reuse gasket.
Tighten drain plug to the specified torque.-
For tightening torque, refer to Exploded View.
Install filler plug, as per the following procedure.Install gasket to filler plug, and then install them to rear cover.
CAUTION:
Never reuse gasket.
Tighten filler plug to the specified torque.-
For tightening torque, refer to Exploded View.
CAUTION:
Fill with gear oil before tightening filler plug to the specified torque.
Install bracket, and tighten bracket mounting bolts to the specified torque.
-
For tightening torque, refer to Exploded View.
Other materials
Front Stabilizer
Exploded View
Stabilizer bar
Stabilizer bushing
Stabilizer clamp
Stabilizer connecting rod
Lower link
: N·m (kg-m, ft-lb)
Removal and Installation
WARNING:
Jacking up or lift up the vehicle may the vehicle height to go down which cause a personal injury and/or d ...
Back Door Assembly
Removal and Installation
CAUTION:
Perform work with 2 workers, because it is heavy weight.
Support back door with a proper material and use protective tape or shop cloth to protect back door and body from falling and damage when removing and installing back door assembly.
REMOVALRemove roof rea ...
Moonroof and Sunshade Does Not Operate Properly
Description
Moonroof and sunshade does not operate normally.
Moonroof Tilt UP/DOWN, OPEN/CLOSE or sunshade OPEN/CLOSE does not operate.
Moonroof Tilt UP/DOWN, OPEN/CLOSE or sunshade OPEN/CLOSE operation is slow.
Judder occurs during OPEN/CLOSE operation of moonroof and sunshade.
Diagnosis Pr ...