Exploded View
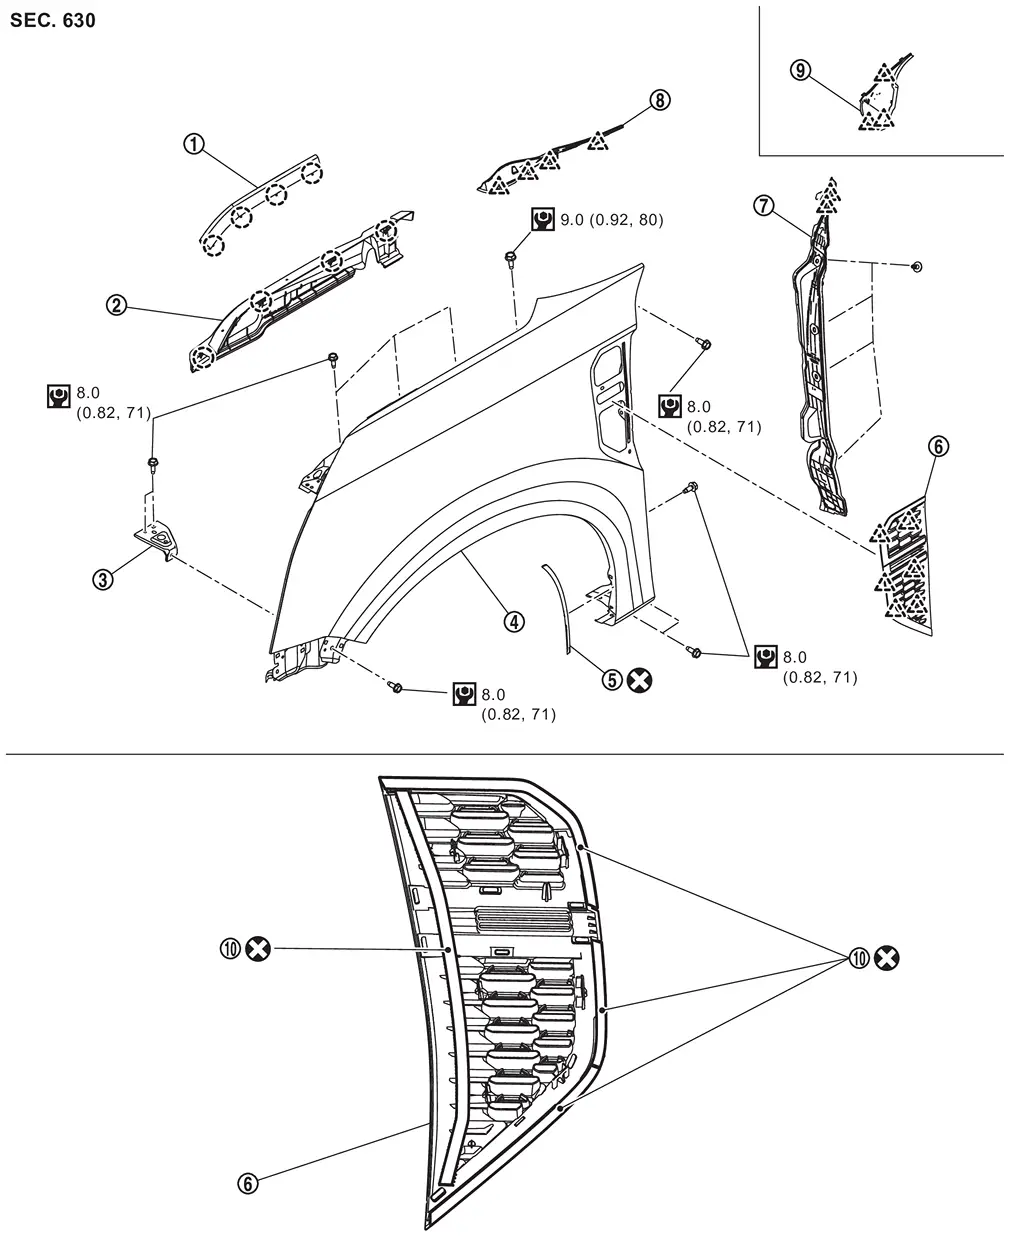
 |
Hood side seal |  |
Front fender drip cover |  |
Front fender bracket |
 |
Front fender assembly |  |
Front fender protector tape |  |
Front fender duct |
 |
Front fender baffle |  |
Fender cover LH |  |
Fender cover RH |
 |
Double-sided tape [t: 0.8 mm (0.031 in)] | ||||
 |
: Clip | ||||
 |
: Pawl | ||||
 |
: Always replace after every disassembly | ||||
 |
: N·m (kg-m, in-lb) | ||||
Front Fender
Removal and Installation
REMOVAL
Remove fender cover. Refer to Removal and Installation.
Remove front fender drip cover. Refer to Removal and Installation.
Remove front combination lamp and head lamp. Refer to Removal and Installation.
Remove front fender protector. Refer to Removal and Installation.
Remove front door assembly. Refer to Removal and Installation.
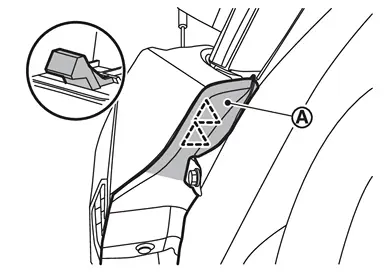
Disengage front fender baffle upper part  fixing pawls, and then remove front fender baffle upper part from front fender assembly.
|
: Pawl |
Remove front fender baffle fixing clips, and then remove front fender baffle.
Remove front fender assembly mounting bolts, and then front fender assembly.
Remove front fender bracket mounting bolts, and then remove front fender bracket.
INSTALLATION
Note the following items, and then install in the reverse order of removal.
CAUTION:
-
When installation, adjust the following part.
-
Hood assembly: Refer to Adjustment.
-
Front door panel: Refer to Adjustment.
-
-
After installation, apply the touch-up paint (the body color) onto the head of front fender mounting bolts.
Fender Cover
Removal and Installation
REMOVAL
Fully open hood assembly.
Disengage fender cover fixing pawls.
-
LH side
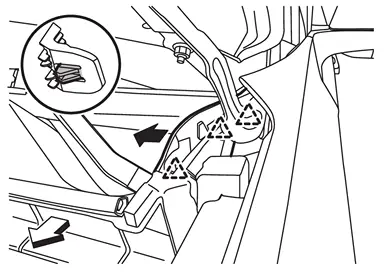
: Pawl : vehicle front -
RH side
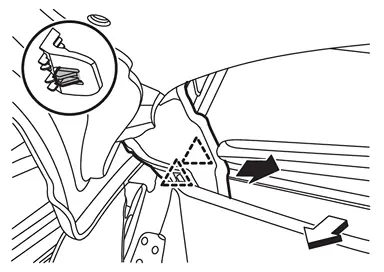
: Pawl : vehicle front
Disengage fender cover fixing pawl, and then remove fender cover.
-
LH side
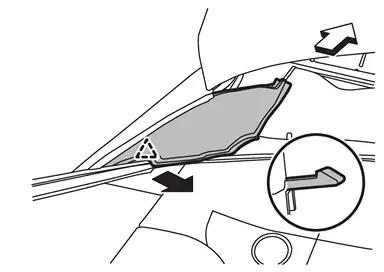
: Pawl : vehicle front -
RH side
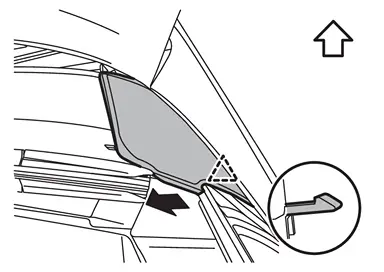
: Pawl : vehicle front
CAUTION:
After removing fender cover, cover the end of windshield with urethane, etc. to prevent damage to windshield.
INSTALLATION
Note the following item, and then install in the reverse order of removal.
CAUTION:
Install so that there is no clearance between windshield and cowl top cover.
Front Fender Drip Cover
Removal and Installation
REMOVAL
Remove cowl top side seal between cowl top cover and fender drip cover. Refer to Removal and Installation.
Disengage fixing clips, and then remove front fender drip cover.
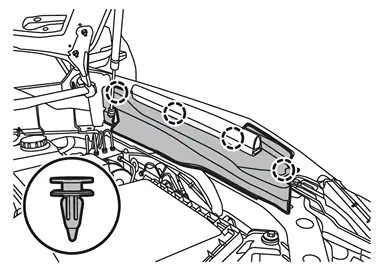
|
: Clip |
Disengage fixing clips, and then remove hood side seal.
INSTALLATION
Install in the reverse order of removal.
Front Fender Duct
Removal and Installation
REMOVAL
Apply protective tapes (A) on the part to protect it from damage.
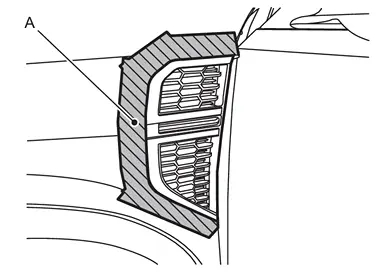
Disengage fixing pawls and peel off double-sided tapes using a remover tool (A), and then remove front fender duct .
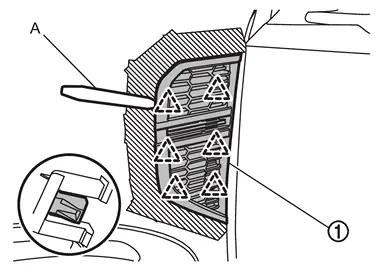
|
: Pawl |
Remove double-sided tape with a double-sided tapes remover from front fender duct and front fender assembly.
INSTALLATION
Note the following items, and then install in the reverse order of removal.
CAUTION:
Never reuse double-sided tape. Always replace it with a new one when it is removed.
 NOTE:
NOTE:
-
The following table shows the specified values for checking normal installation status.
-
Fitting adjustment cannot be performed.
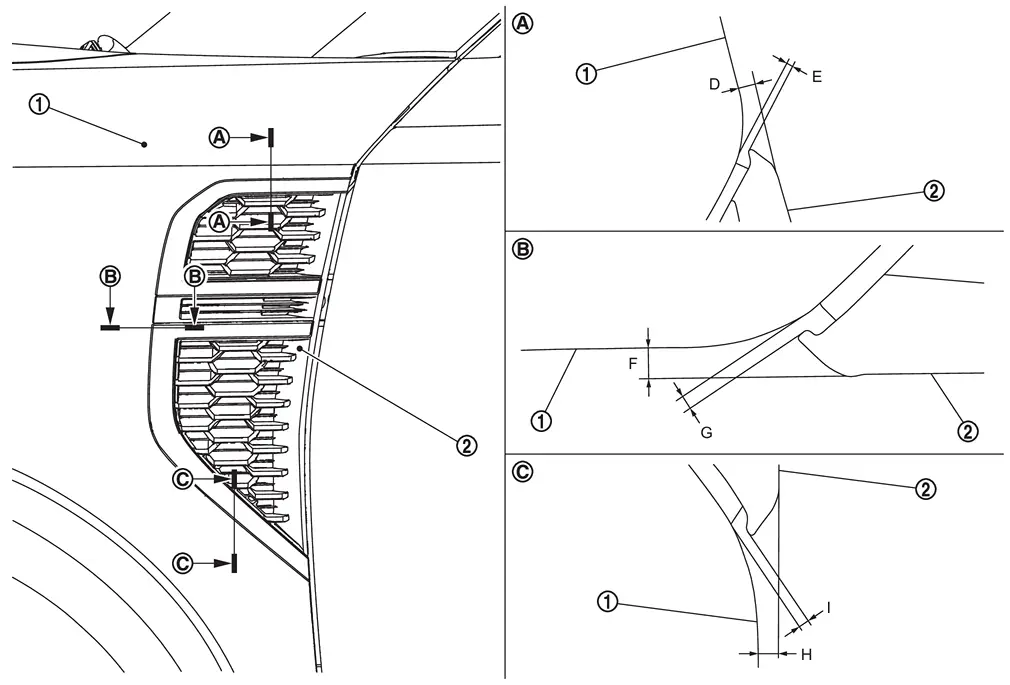
|
Front fender assembly | |
Front fender duct |
Unit: mm [in]
| Portion | Standard | |||
|---|---|---|---|---|
| Front fender assembly – Front fender duct | – |
D | Surface height |
1.0 ± 1.0 [0.039 ± 0.039] |
| E | Clearance |
0.5 ± 0.5 [0.020 ± 0.020] |
||
 – – |
F | Surface height |
1.0 ± 1.0 [0.039 ± 0.039] |
|
| G | Clearance |
0.5 ± 0.5 [0.020 ± 0.020] |
||
 – – |
H | Surface height |
1.0 ± 1.0 [0.039 ± 0.039] |
|
| I | Clearance |
0.5 ± 0.5 [0.020 ± 0.020] |
||
Front Fender Protector Tape
Removal and Installation
REMOVAL
Remove front fender protector tape from front fender assembly.
INSTALLATION
Note the following items, and then install in the reverse order of removal.
CAUTION:
-
Never reuse front fender protector tape. Always replace it with a new one when it is removed.
-
Degrease front fender protector tape mounting surface of front fender assembly.
-
When installing, refer to the figure front fender protector tape position.
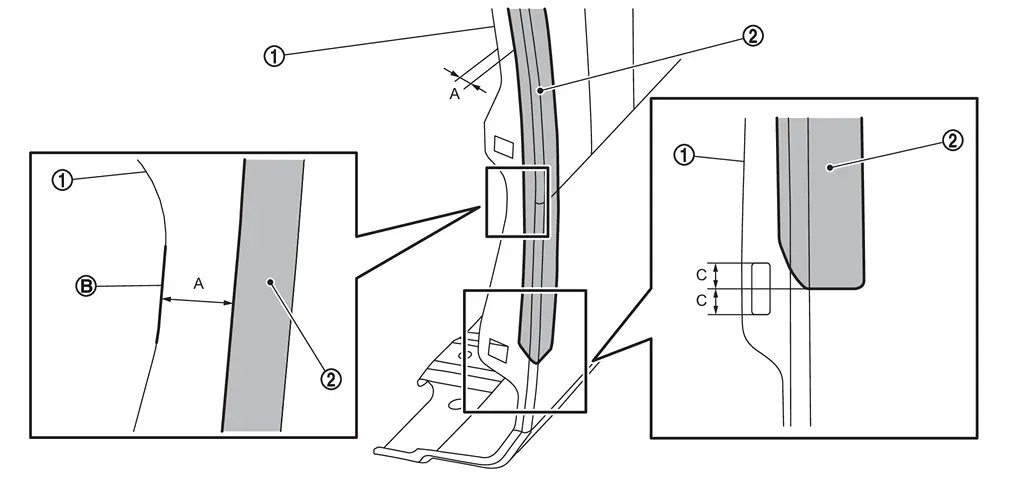
Front fender assembly Front fender protector tape : Flange edge A : 8.0 mm (0.315 in) C : 4.25 mm (0.1673 in)
Other materials
Difference between predictive and actual distances
Basic information
The Nissan Armada display guide lines and their projected positions on the ground
are intended as approximate references only and should not be relied upon as exact
measurements.
Due to factors such as road incline, uneven terrain, and objects that extend
outward, the actua ...
Basic information
The Idling Stop System in the Nissan Armada is designed to enhance fuel efficiency,
reduce exhaust emissions, and minimize unnecessary engine noise during short stops
such as traffic lights or congestion.
When the Nissan Armada comes to a complete stop, the system automatically
shuts off ...
Inspection and Adjustment
Additional Service When Replacing Sonar Control Unit
Description
CAUTION:
When replacing the sonar control unit, always replace it with a new one. Sonar system does not operate properly in case of reuse of the sonar control unit from another vehicle.
When before writing the sonar control unit c ...