Adjustment
PREPARATION BEFORE ADJUSTING
 NOTE:
NOTE:
For details, refer to the regulations in your own country.
Before performing aiming adjustment, check the following.
-
Adjust the tire pressure to the specification.
-
Fill with fuel, engine coolant, and each oil.
-
Maintain the unloaded vehicle condition. (Remove luggage from the passenger compartment and the luggage room.)
NOTE:
Never remove the temporary tire, jack, and on-vehicle tool.
-
Wipe out dirt on the front fog lamp.
CAUTION:
Never use organic solvent (thinner, gasoline, etc).
-
Ride alone on the driver seat.
AIMING ADJUSTMENT SCREW
Turn the aiming adjusting screw for adjustment.
-
City model
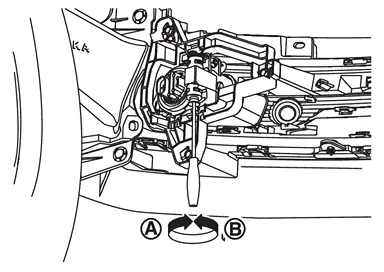
 : UP
: UP  : DOWN
 -
Off road model
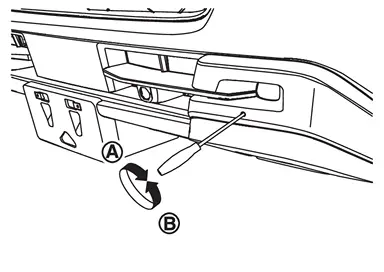 : UP : DOWN
AIMING ADJUSTMENT PROCEDURE
Place the screen.
NOTE:
-
Stop the vehicle facing the wall.
-
Place the board on a plain road vertically.
Face the vehicle with the screen. Maintain 10 m (32.8 ft) between the front fog lamp center and the screen.
Start the engine. Turn the front fog lamp ON.
CAUTION:
Never cover the lens surface with a tape, etc. The lens is made of resin.
NOTE:
Shut off the headlamp light with the board to prevent from illuminating the adjustment screen.
Adjust the cutoff line with the aiming adjustment screw so that the distance (X) between the horizontal center line of front fog lamp (H) and cutoff line becomes 100 mm (3.94 in).
Front fog lamp light distribution on the screen
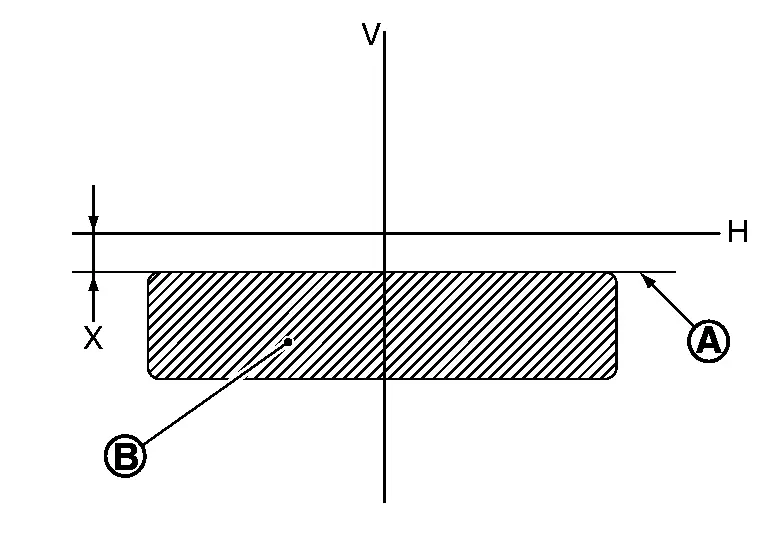
|
: Cutoff line |
|
: High illuminance area |
| H | : Horizontal center line of front fog lamp |
| V | : Vertical center line of front fog lamp |
| X | : Cutoff line height |
Other materials
Brake Caliper Assembly
Exploded View
REMOVAL
Brake caliper assembly
: N·m (kg-m, ft-lb)
DISASSEMBLY
Cap
Bleeder valve
Cylinder body
Sliding pin
Bushing
Sliding pin boot
Piston seal
Piston
Piston boot
Torque member
: vehicle ...
For Rear Collision
When SRS is not activated in a collision
CAUTION:
Due to varying models and option levels, not all parts listed in the chart below apply to all Nissan Armada vehicles.WORK PROCEDUREBefore performing any of the following steps, ensure that all vehicle body and structural repairs have been completed.
...
Back Door Auto Closure Function Does Not Operate
Automatic Back Door Control Unit
Diagnosis Procedure
CHECK DTC WITH AUTOMATIC BACK DOOR CONTROL UNIT
Check that DTC is not detected with automatic back door control unit.
Is the inspection result normal?
YES>>
GO TO 2.
NO>>
Refer to DTC Index.
CHECK OPEN SWITCH
Check open switch.
Refe ...