Disassembly and Assembly
CAUTION:
When disassemble, always use a remover tool that is made of plastic to prevent damage.
OUTSIDE SEAT CUSHION FINISHER OUTER
Disassembly
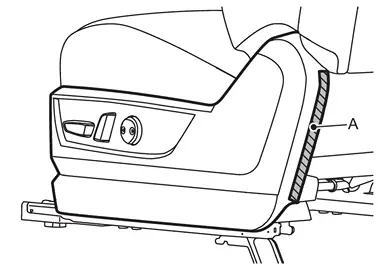
Apply protective tape (A) to prevent damage.
Disengage fixing clip(s) and pawls using a remover tool (A), and then remove outside seat cushion finisher outer.
-
With 4way power seat system
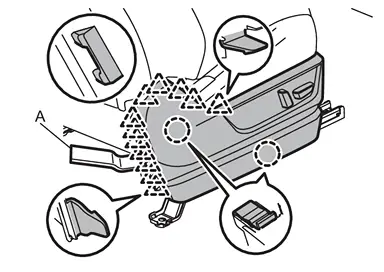

: Clip 
: Pawl -
With 8way power seat system
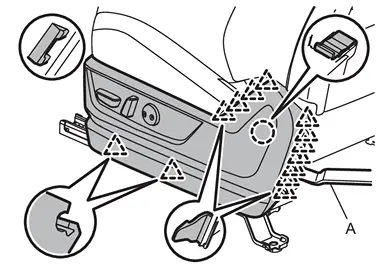
|
: Clip |
|
: Pawl |
Disengage harness fixing clips from outside seat cushion finisher outer, and then disconnect harness connectors.
CAUTION:
Before performing removal operation, check the installation position of harness fixing clips.
Remove the following parts after removing outside seat cushion finisher outer.
-
Power seat switch. Refer to Removal and Installation.
-
Lumbar support switch (if equipped). Refer to Removal and Installation.
-
Massage switch (if equipped). Refer to Removal and Installation.
Assembly
Assemble in the reverse order of disassembly.
INSIDE SEAT CUSHION FINISHER OUTER (WITH 4WAY POWER SEAT SYSTEM)
Disassembly
Remove seat cushion trim and pad. Refer to Disassembly and Assembly.
Remove seat belt buckle. Refer to Removal and Installation.
Apply protective tape (A) to prevent damage.
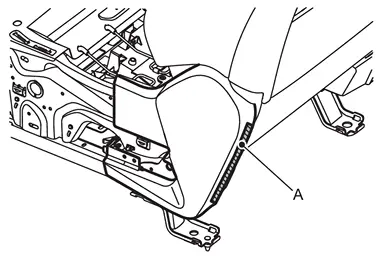
Disengage fixing clips and pawls using a remover tool (A), and then remove inside seat cushion finisher outer.
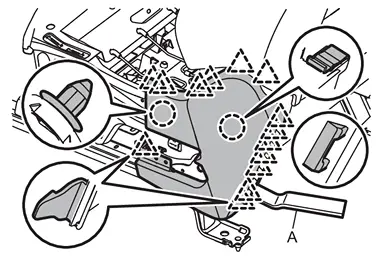
|
: Clip |
|
: Pawl |
Assembly
Assemble in the reverse order of disassembly.
INSIDE SEAT CUSHION FINISHER OUTER (WITH 8WAY POWER SEAT SYSTEM)
Disassembly
Remove seat belt buckle. Refer to Removal and Installation.
Apply protective tape (A) to prevent damage.
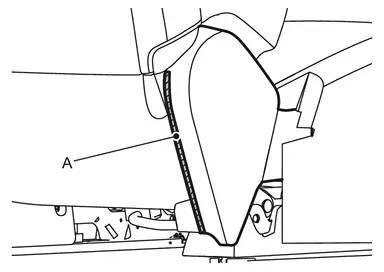
Disengage fixing clips and pawls using a remover tool (A), and then remove inside seat cushion finisher outer.
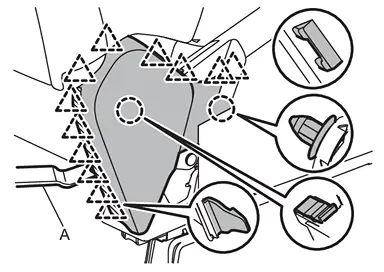
|
: Clip |
|
: Pawl |
Assembly
Assemble in the reverse order of disassembly.
INSIDE / OUTSIDE SEAT CUSHION FINISHER INNER
Disassembly
Remove seat cushion trim and pad. Refer to Disassembly and Assembly.
Remove inside and outside seat cushion finisher inner.
-
With 4way power seat system
Disengage fixing clip, and then remove inside and outside seat cushion finisher inner.
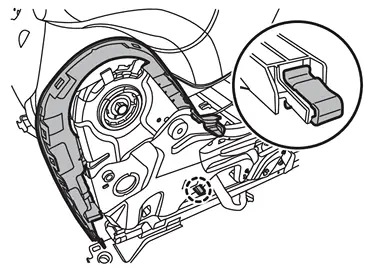
: Clip -
With 8way power seat system
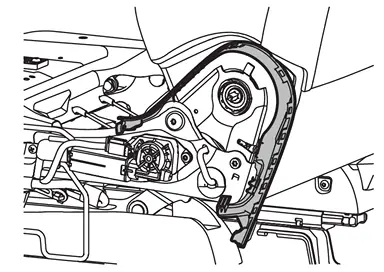
Assembly
Assemble in the reverse order of disassembly.
SLIDING MOTOR COVER
Disassembly
Disengage harness fixing clip of sliding motor cover.
CAUTION:
Before performing removal operation, check the installation position of harness fixing clip.
Disengage fixing pawls, and then remove sliding motor cover.
-
With 4way power seat system
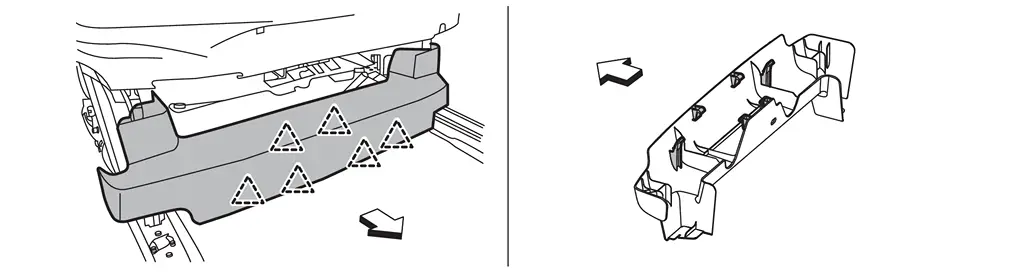
: Pawl : vehicle front -
With 8way power seat system
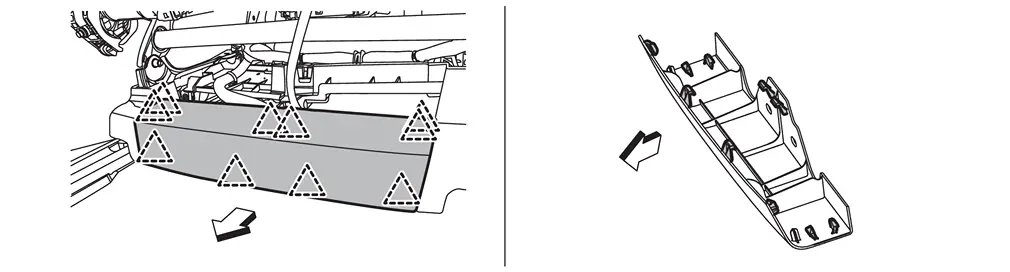
|
: Pawl |
| : vehicle front |
Assembly
Assemble in the reverse order of disassembly.
OUTSIDE SLIDE FINISHER
Disassembly
Remove outside seat cushion finisher outer.
Remove sliding motor cover.
Remove outside slide finisher fixing screws.
Disengage fixing clips according to numerical order 1→3 indicated by arrows as shown in the figure, and then remove outside slide finisher.
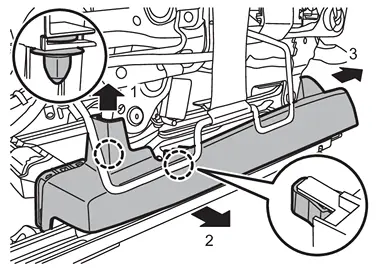
|
: Clip |
Assembly
Assemble in the reverse order of disassembly.
INSIDE SLIDE FINISHER
Disassembly
Remove sliding motor cover.
Disengage harness fixing clip of inside slide finisher, and then disconnect harness connector.
CAUTION:
Before performing removal operation, check the installation position of harness fixing clip.
Remove inside slide finisher fixing screws.
Disengage fixing clip according to numerical order 1→2 indicated by arrows as shown in the figure, and then remove inside slide finisher.
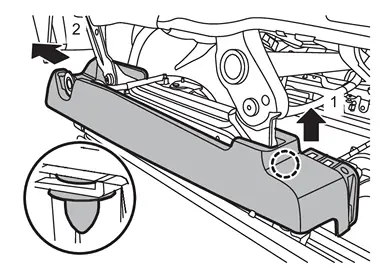
|
: Clip |
Assembly
Assemble in the reverse order of disassembly.
Other materials
Rear Suspension Assembly
Inspection
WARNING:
Jacking up or lift up the vehicle may the vehicle height to go down which cause a personal injury and/or damage to the air suspension component parts. Refer to Precaution for when Jacking and Lifting Up the vehicle with Electronic Air Suspension System.
COMPONENT PARTCheck ...
Back Door Opener Switch
Description
Automatic back door open/close function does not operate using back door opener switch.
Diagnosis Procedure
CHECK AUTO OPEN/CLOSE FUNCTION
Check auto open/close function using automatic back door switch.
Is the inspection result normal?
YES>>
GO TO 2.
NO>>
Refer to Diagnosi ...
Intelligent Rear View Mirror System Does Not Operate
Diagnosis Procedure
INTELLIGENT REAR VIEW MIRROR FUNCTIONAL INSPECTION
Ignition switch ON.
Check the intelligent rear view mirror system is operating normally after setting power supply lever of intelligent rear view mirror lower part to ON.
Is the inspection result normal?
YES>>
GO TO ...