
Nissan Armada 2025-2026 Service and Repair Manual: Front Floor
WARNING:
Work after lower side dash assembly (LH), outer sill, and inner sill (LH) are removed.
Remove the lower side dash assembly (RH, reusable) from the vehicle for easier installation.
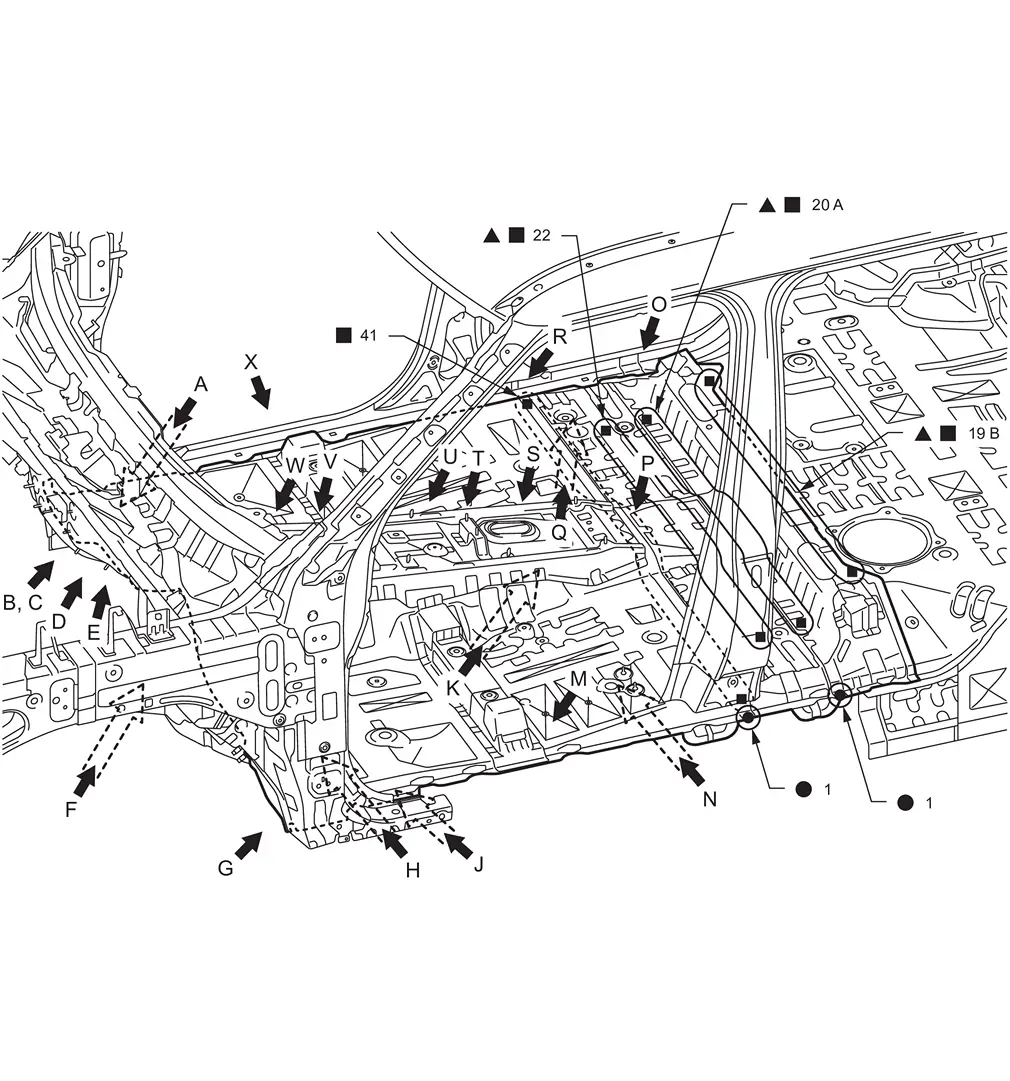
 : Drill φ6 mm (0.24 in) hole for the plug welding hole (ultra high strength steel). : Drill φ6 mm (0.24 in) hole for the plug welding hole (ultra high strength steel). | |||||
 : Weld the parts onto the back of the component part. : Weld the parts onto the back of the component part. | |||||
| Replacement part | |||||
| • | Front floor assembly | • | 2nd crossmember assembly (RH & LH) | • | Front floor reinforcement assembly |
| • | Rear floor front extension | • | Front side member assembly (RH & LH) | • | Front seat mounting rear crossmember assembly |
| • | 4th crossmember assembly | ||||
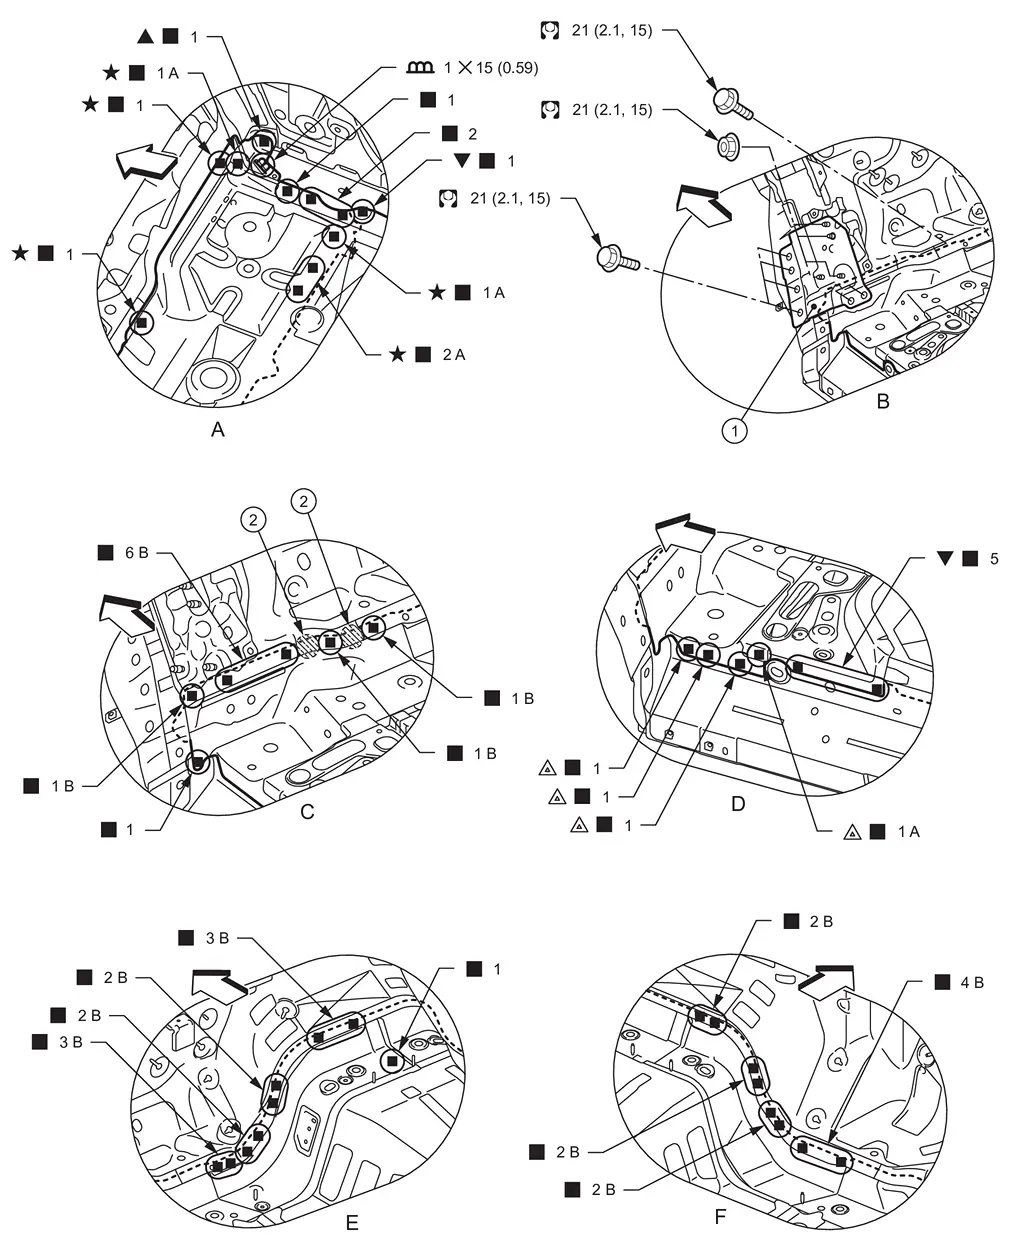
 | Lower side dash assembly (RH, reusable) |  | Adhesive | ||
| Unit: mm (in) | |||||
 : Vehicle front : Vehicle front | |||||
| : Drill φ6 mm (0.24 in) hole for the plug welding hole (ultra high strength steel). | |||||
 : Drill φ7 mm (0.28 in) hole for the plug welding hole (ultra high strength steel). : Drill φ7 mm (0.28 in) hole for the plug welding hole (ultra high strength steel). | |||||
 : Drill φ14 mm (0.55 in) hole for the plug welding hole (ultra high strength steel). : Drill φ14 mm (0.55 in) hole for the plug welding hole (ultra high strength steel). | |||||
 : Welding method and the number of welding points apply to both sides of the vehicle. : Welding method and the number of welding points apply to both sides of the vehicle. | |||||
 : N•m (kg-m, ft-lb) : N•m (kg-m, ft-lb) | |||||
View C and D: Before installing lower side dash assembly
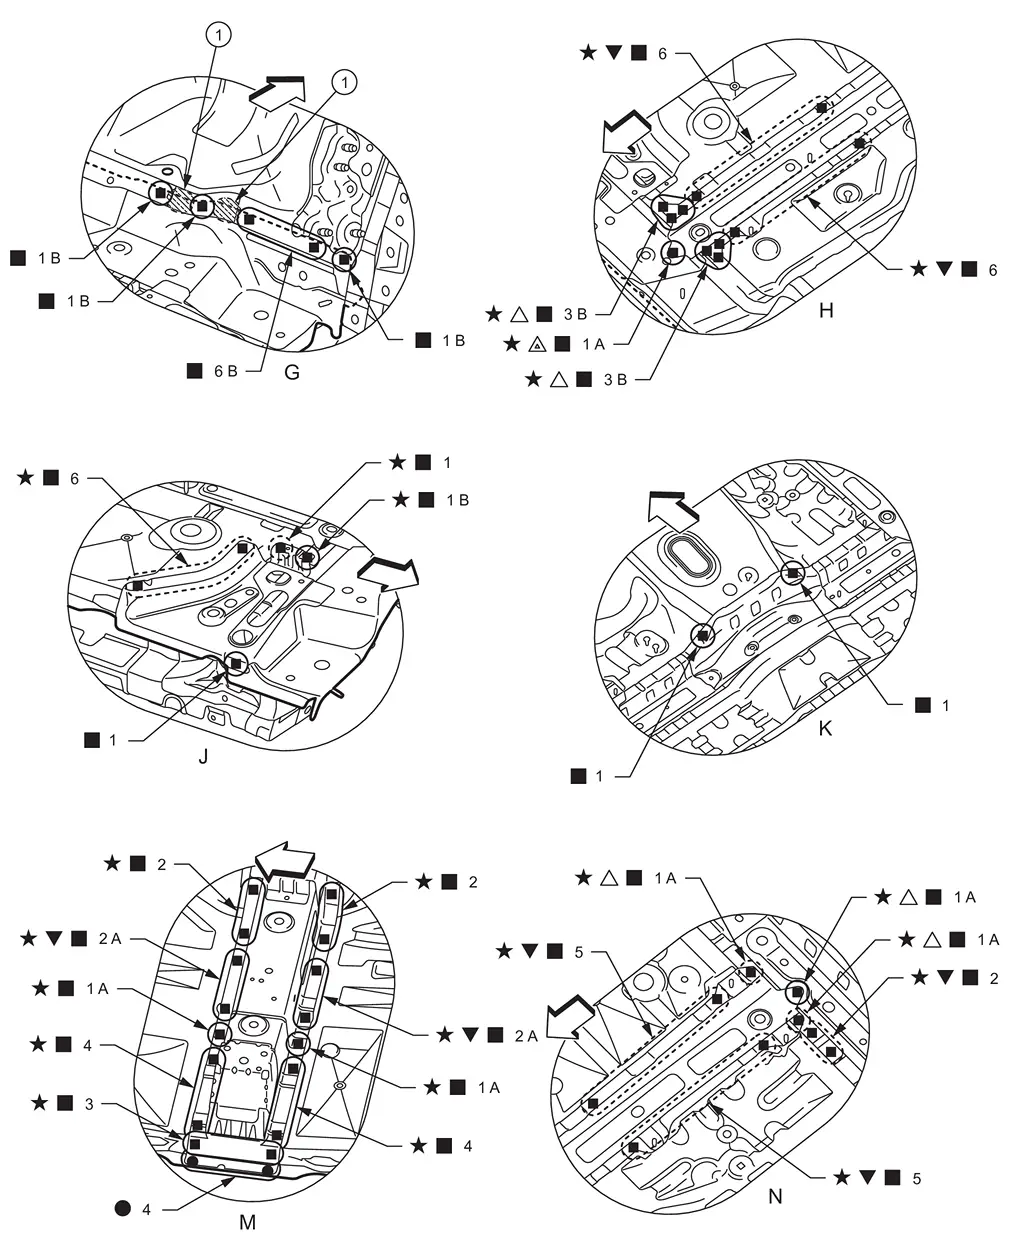
| Adhesive | ||||
| : Vehicle front | |||||
| : Drill φ7 mm (0.28 in) hole for the plug welding hole (ultra high strength steel). | |||||
 : Drill φ8 mm (0.31 in) hole for the plug welding hole (ultra high strength steel). : Drill φ8 mm (0.31 in) hole for the plug welding hole (ultra high strength steel). | |||||
| : Drill φ14 mm (0.55 in) hole for the plug welding hole (ultra high strength steel). | |||||
| : Weld the parts onto the back of the component part. | |||||
| : Welding method and the number of welding points apply to both sides of the vehicle. | |||||
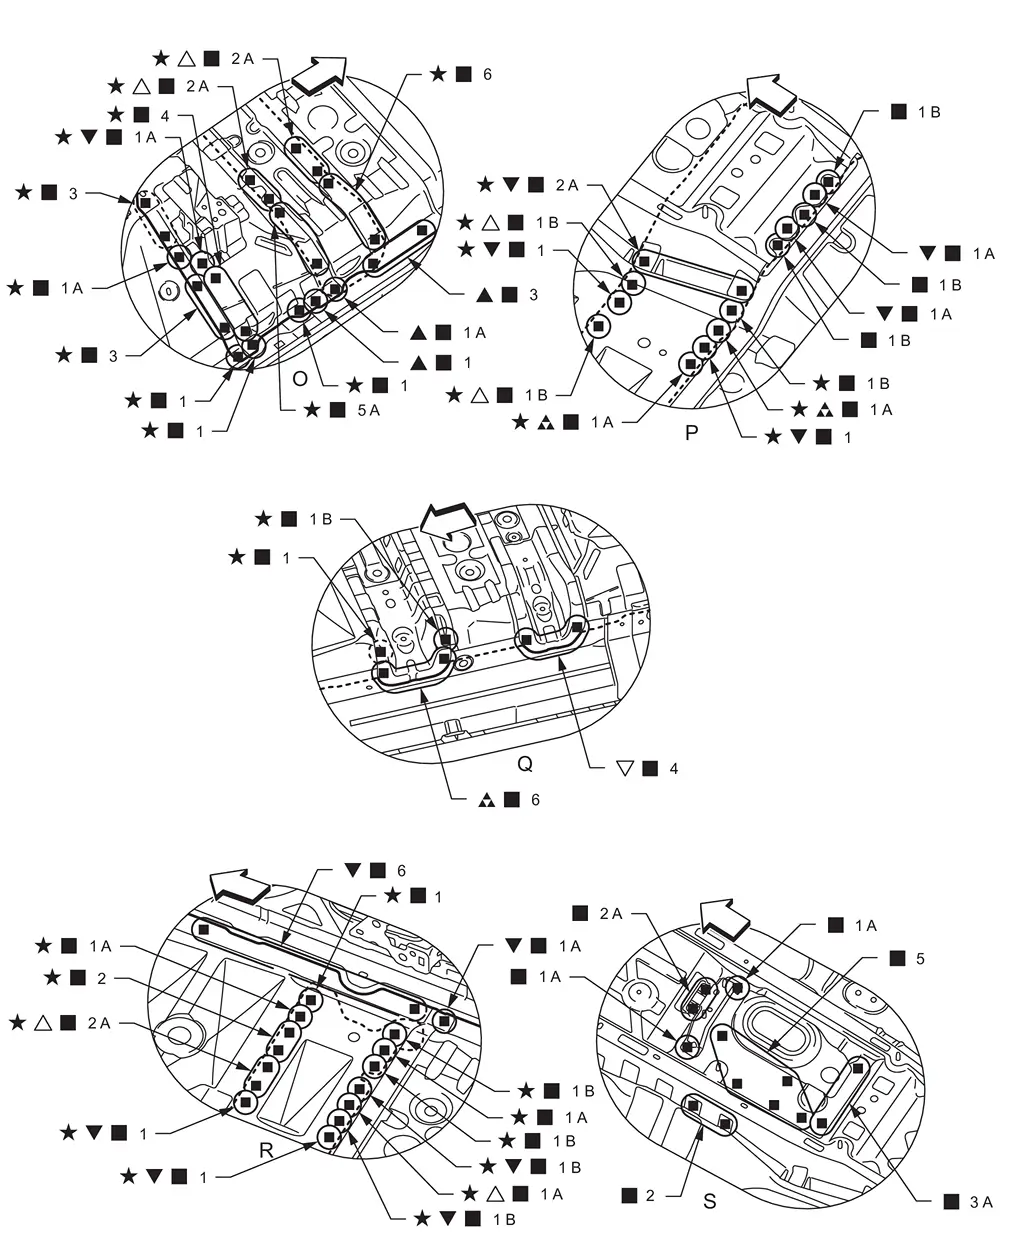
| : Vehicle front | |||||
| : Drill φ6 mm (0.24 in) hole for the plug welding hole (ultra high strength steel). | |||||
| : Drill φ7 mm (0.28 in) hole for the plug welding hole (ultra high strength steel). | |||||
| : Drill φ8 mm (0.31 in) hole for the plug welding hole (ultra high strength steel). | |||||
 : Drill φ9 mm (0.35 in) hole for the plug welding hole (ultra high strength steel). : Drill φ9 mm (0.35 in) hole for the plug welding hole (ultra high strength steel). | |||||
 : Drill φ10 mm (0.39 in) hole for the plug welding hole (ultra high strength steel). : Drill φ10 mm (0.39 in) hole for the plug welding hole (ultra high strength steel). | |||||
| : Weld the parts onto the back of the component part. | |||||
| : Welding method and the number of welding points apply to both sides of the vehicle. |
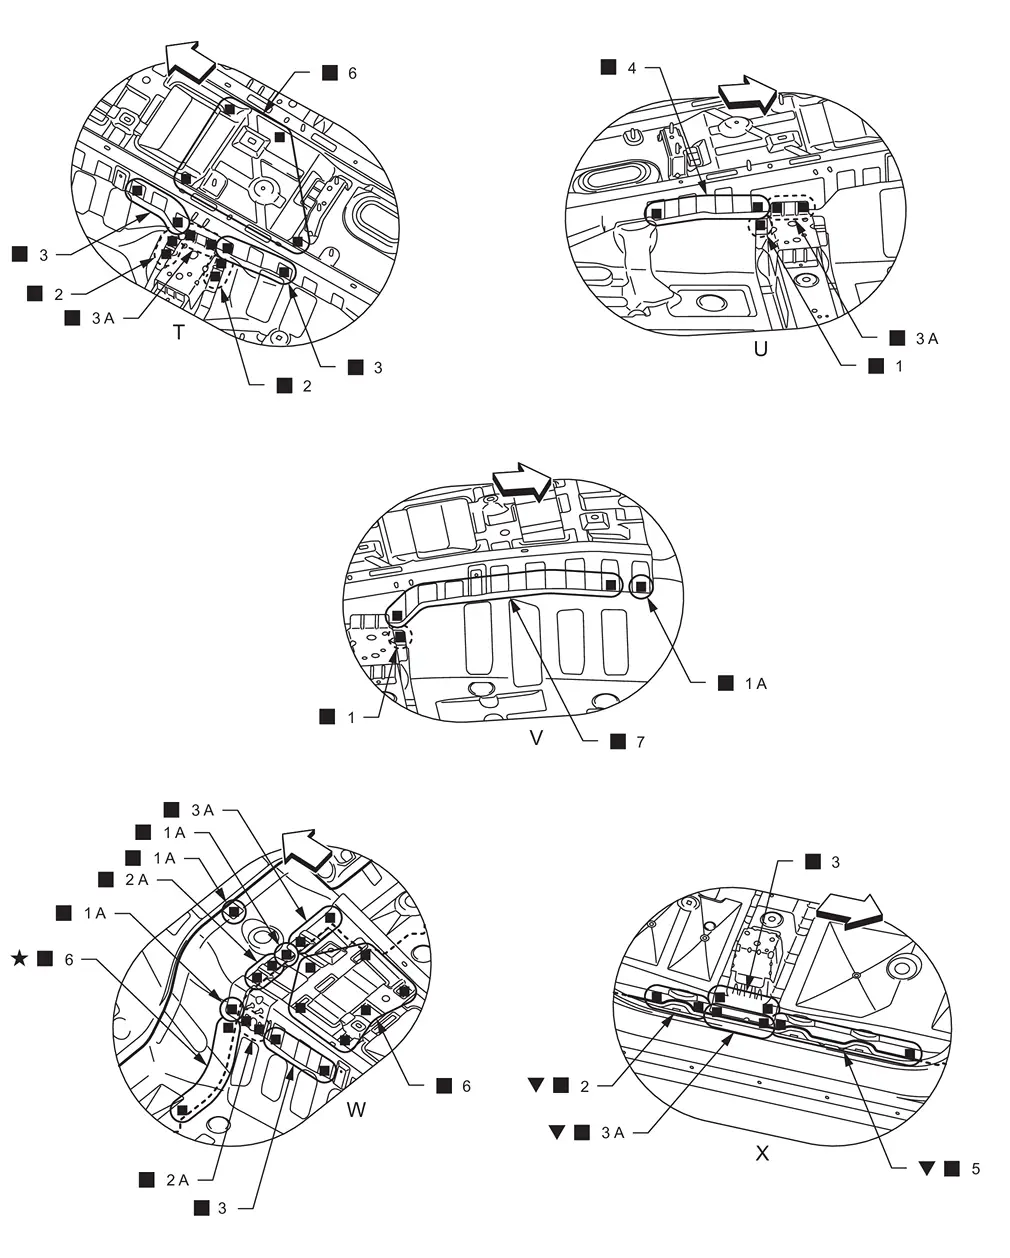
| : Vehicle front | |||||
| : Drill φ7 mm (0.28 in) hole for the plug welding hole (ultra high strength steel). | |||||
| : Weld the parts onto the back of the component part. | |||||
| : Welding method and the number of welding points apply to both sides of the vehicle. |
 Inner Sill
WARNING:
Work after lower side dash assembly, center pillar, outer sill, and inner center pillar are removed.
Unit: mm (in) : Vehicle front : Drill φ7 mm (0.28 in) hole for the plug welding hole (u ...
 Rear Floor Front
WARNING:
Work after rear fender, outer rear sill reinforcement, outer rear wheelhouse, and inner rear wheelhouse are removed.
Remove the welding point for easier installation.
: Vehicle front : Dril ...
Other materials:
Principle
A special highly elastic resin has been combined with a conventional clear coat to increase the paint's flexibility. This has also increased its strength by raising the resin density.
The paint does not self-repair if scratches are deep enough to sever the bonds within the clear coat or if the clea ...
Removal and Installation
CAUTION:
Never damage the back door panel.
REMOVAL
Fully open back door.
Disengage back door pull handle fixing pawls, and then remove back door pull handle.
: Pawl
INSTALLATION
Note the following item, and then install in the reverse order of removal.
CAUTION:
Check in advance that pawls are a ...
Exploded View
FRONT
Front heater & cooling unit assembly Front air mix door motor (driver side) Front mode door motor Front blower unit assembly Intake door motor Front air mix door motor (passenger side) : Vehicle front
REAR
Rear A/C unit assembly Rear mode door motor Rear air mix door motor : ...

0.0053