Exploded View
REMOVAL
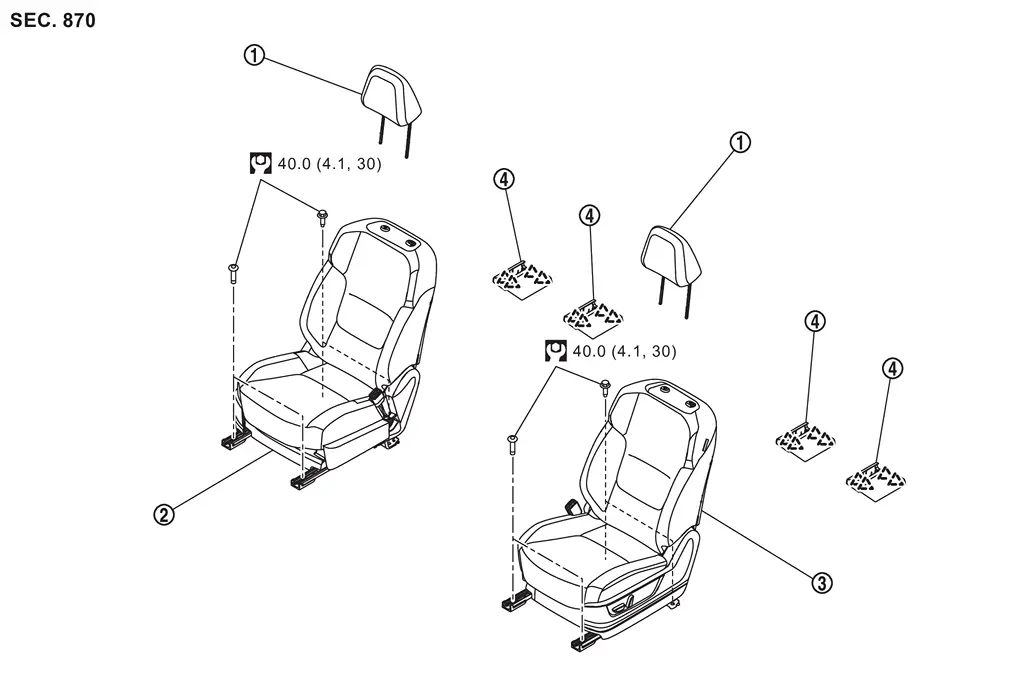
 |
Headrest |  |
Front seat assembly (passenger seat) |
 |
Front seat assembly (driver seat) |
 |
Seat leg cover | ||||
 |
: Pawl | ||||
 |
: N·m (kg-m, ft-lb) | ||||
DISASSEMBLY
Driver Seat
WITH 8WAY POWER SEAT SYSTEM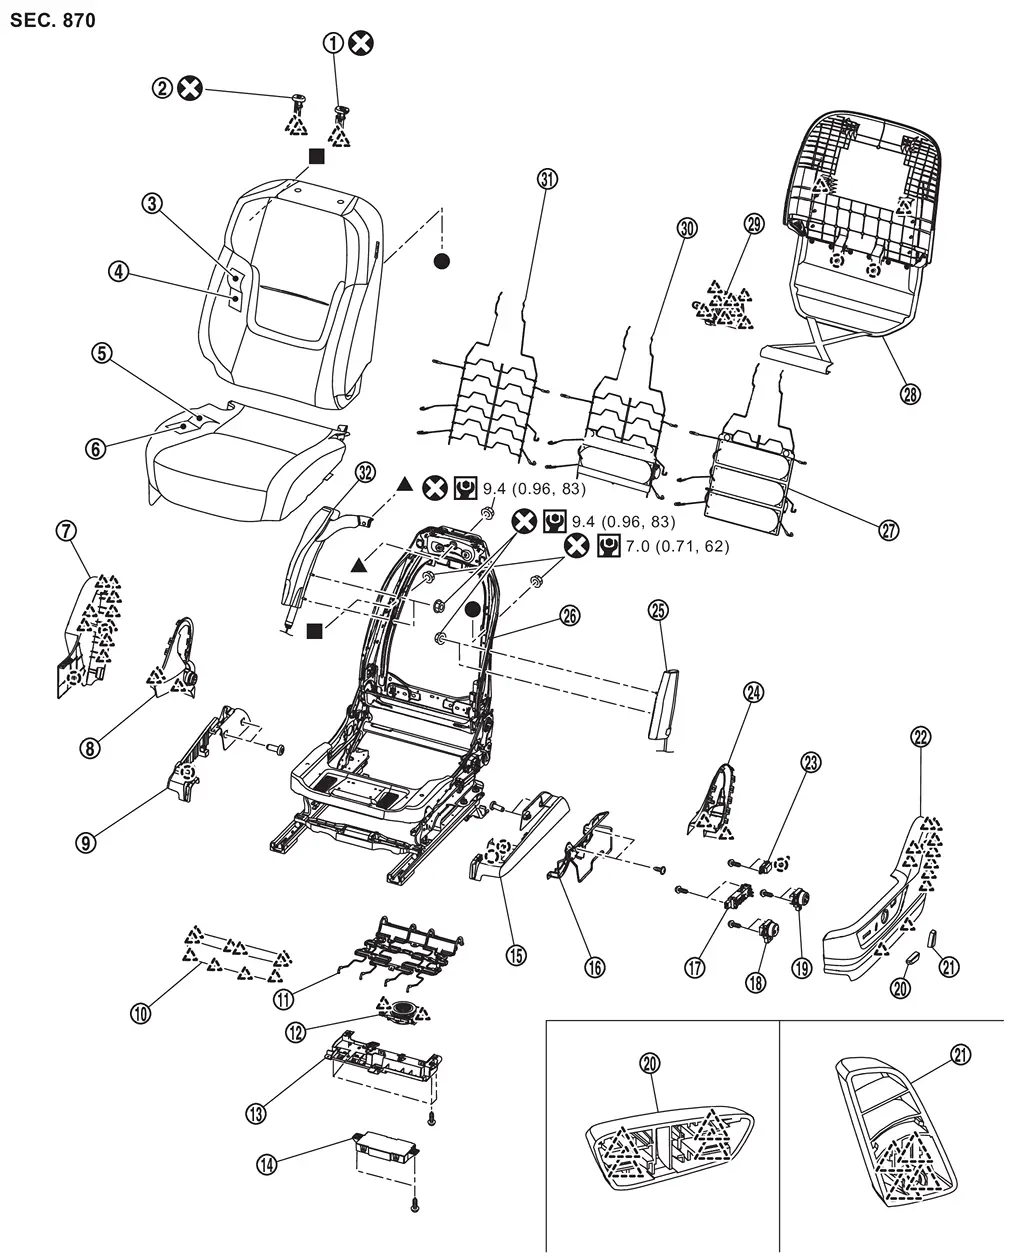
|
Headrest holder (lock) | |
Headrest holder (free) | |
Seatback trim |
|
Seatback pad |  |
Seat cushion trim |  |
Seat cushion pad |
 |
Inside seat cushion finisher outer |  |
Inside seat cushion finisher inner |  |
Inside slide finisher |
 |
Sliding motor cover |  |
Seat cushion suspension |  |
Seat cushion blower motor*1 |
 |
Seat cushion harness bracket |  |
Driver seat control unit*2 |  |
Outside slide finisher |
 |
Seat cushion trim bracket |  |
Power seat switch |  |
Lumbar support switch*3 |
 |
Lumbar support switch*4 |  |
Sliding switch knob |  |
Reclining switch knob |
 |
Outside seat cushion finisher outer |  |
Massage switch*5 |  |
Outside seat cushion finisher inner |
 |
Front side air bag module |  |
Seat frame assembly |  |
Lumbar support unit*4 |
 |
Seatback board |  |
Seatback blower motor*1 |  |
Lumbar support unit*3 |
 |
Seatback suspension*6 |  |
Front center air bag module*5 | ||
 |
: Clip | ||||
|
: Pawl | ||||
 |
: Always replace after every disassembly. | ||||
 |
: N·m (kg-m, in-lb) | ||||
 , , , ,  : Indicates that the part is connected at points with same symbol in actual vehicle. : Indicates that the part is connected at points with same symbol in actual vehicle. |
|||||
*1: With front heater and ventilation seat system
*2: With automatic drive positioner system
*3: With 2way lumbar support system
*4: With 4way lumbar support system
*5: With front center air bag module
*6: Without lumbar support system
Passenger Seat
WITH 4WAY POWER SEAT SYSTEM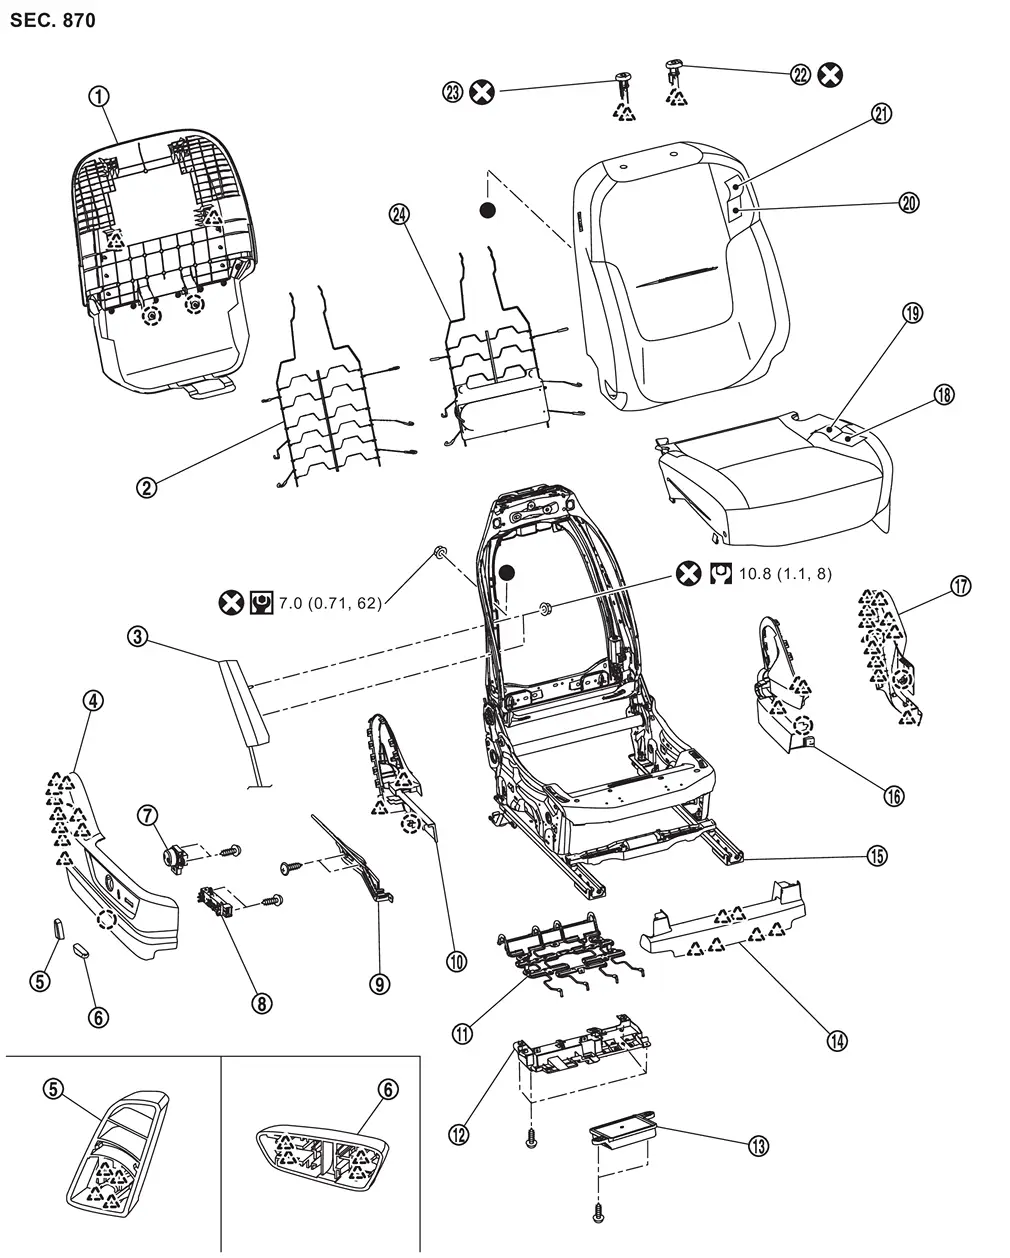
|
Seatback board | |
Seatback suspension*1 | |
Front side air bag module |
|
Outside seat cushion finisher outer | |
Reclining switch knob | |
Sliding switch knob |
|
Lumbar support switch*2 | |
Power seat switch | |
Seat cushion trim bracket |
|
Outside seat cushion finisher inner | |
Seat cushion suspension | |
Seat cushion harness bracket |
|
Occupant detection system control unit | |
Sliding motor cover | |
Seat frame assembly |
|
Inside seat cushion finisher inner | |
Inside seat cushion finisher outer | |
Seat cushion pad |
|
Seat cushion trim | |
Seatback pad | |
Seatback trim |
|
Headrest holder (lock) | |
Headrest holder (free) | |
Lumbar support unit*2 |
|
: Clip | ||||
|
: Pawl | ||||
|
: Always replace after every disassembly. | ||||
|
: N·m (kg-m, in-lb) | ||||
|
: N·m (kg-m, ft-lb) | ||||
| : Indicates that the part is connected at points with same symbol in actual vehicle. |
|||||
*1: Without 2way lumbar support system
*2: With 2way lumbar support system
WITH 8WAY POWER SEAT SYSTEM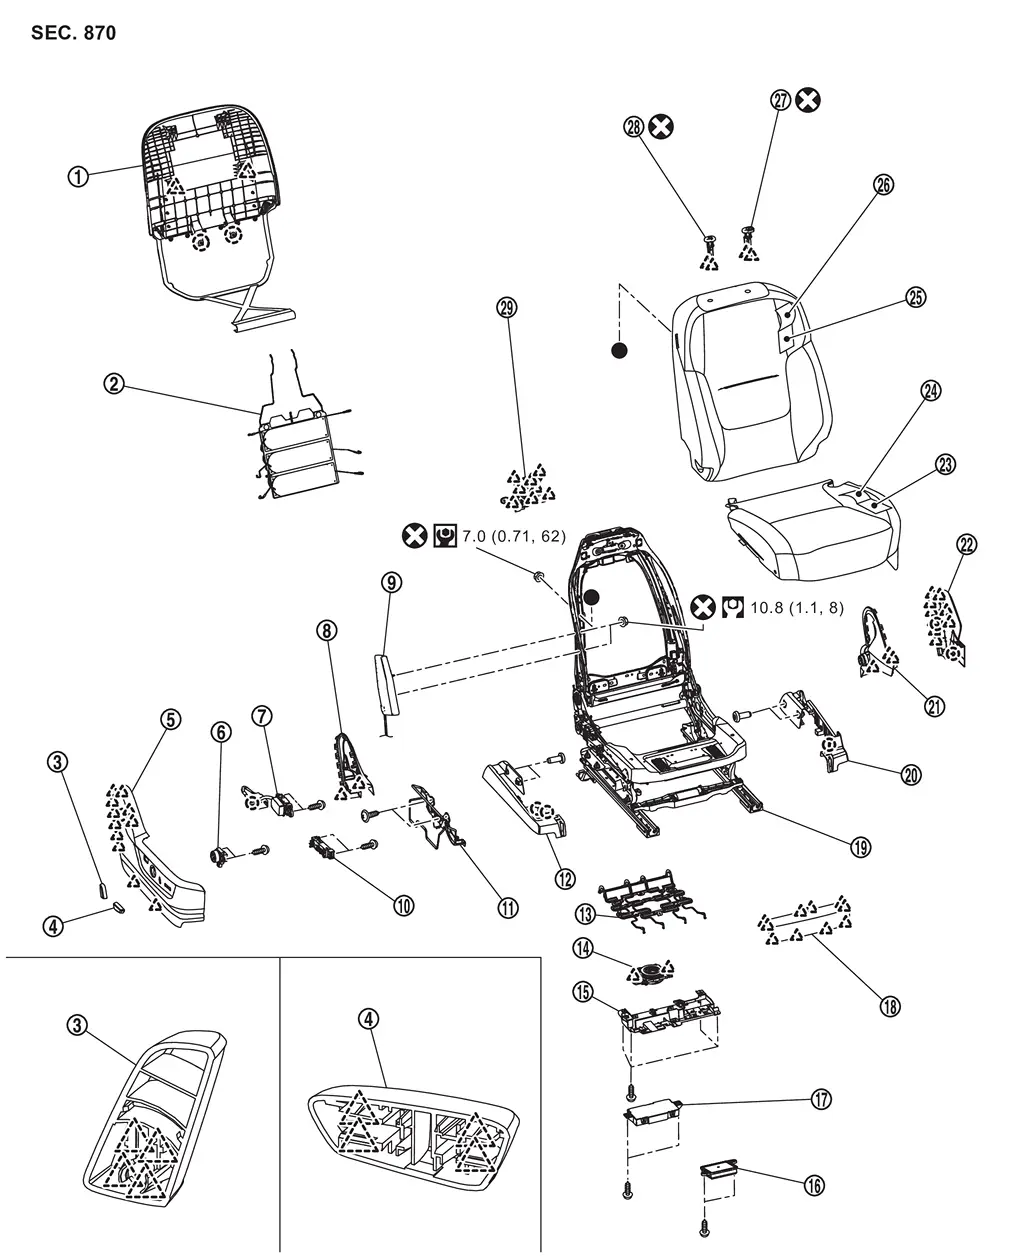
|
Seatback board | |
Lumbar support unit | |
Reclining switch knob |
|
Sliding switch knob | |
Outside seat cushion finisher outer | |
Lumbar support switch |
|
Massage switch* | |
Outside seat cushion finisher inner | |
Front side air bag module |
|
Power seat switch | |
Seat cushion trim bracket | |
Outside slide finisher |
|
Seat cushion suspension | |
Seat cushion blower motor | |
Seat cushion harness bracket |
|
Occupant detection system control unit | |
Passenger seat control unit* | |
Sliding motor cover |
|
Seat frame assembly | |
Inside slide finisher | |
Inside seat cushion finisher inner |
|
Inside seat cushion finisher outer | |
Seat cushion pad | |
Seat cushion trim |
|
Seatback pad | |
Seatback trim | |
Headrest holder (lock) |
|
Headrest holder (free) | |
Seatback blower motor | ||
|
: Clip | ||||
|
: Pawl | ||||
|
: Always replace after every disassembly. | ||||
|
: N·m (kg-m, in-lb) | ||||
|
: N·m (kg-m, ft-lb) | ||||
| : Indicates that the part is connected at points with same symbol in actual vehicle. |
|||||
*: With massage function
Removal and Installation
WARNING:
When working, be careful to prevent accidental explosion front side air bag module and front center air bag module (with front center air bag module). Refer to Precaution for Supplemental Restraint System (SRS) "AIR BAG" and "SEAT BELT PRE-TENSIONER".
CAUTION:
-
When removing and installing the passenger seat, perform the zero point reset. Refer to Description.
-
When removing and installing, use shop cloths to protect parts and vehicle from damage.
-
Always work with 2 workers, because it is heavy weight.
REMOVAL
Remove headrest.
Slide front seat to front most position.
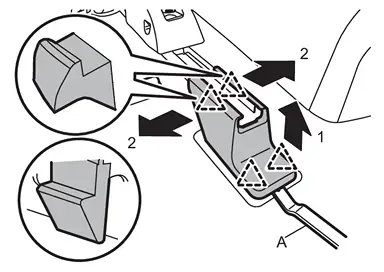
Disengage fixing pawls using a remover tool (A) according to numerical order 1→2 indicated by arrows as shown in the figure, and then remove seat leg covers.
|
: Pawl |
Remove rear side mounting bolts of front seat assembly.
Slide front seat to rear most position.
Fully lift down front seat (with 8way power seat system).
Remove front side mounting bolts of front seat assembly.
Disconnect battery negative terminal.
WARNING:
When removing battery negative terminal. Refer to Precautions for Removing Battery Terminal.
 NOTE:
NOTE:
If disassemble front seat after removing, fully lift up front seat to ensure the workspace for disassembling seat cushion finisher (with 8way power seat system).
Pull up front seat to rearward.
Disengage body harness fixing clips, and then disconnect harness connectors.
WARNING:
Never insert remover tool which is made of metal to front side air bag module and front center air bag module (with front center air bag module) harness connector. (To prevent accidental explosion the inflator by static electricity.)
CAUTION:
Before performing removal operation, check the installation position of harness connectors and harness fixing clips.
Remove front seat assembly from vehicle.
INSTALLATION
Note the following items, and then install in the reverse order of removal.
CAUTION:
-
Before tightening seat mounting bolt, check that carpet is not caught in seat mounting bolt hole.
-
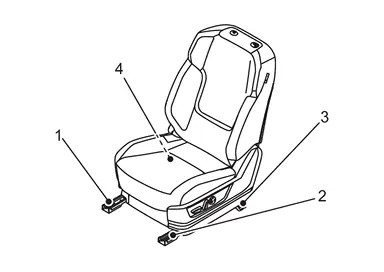
When installing, tighten mounting bolts according to the numerical order 1→4 as shown in the figure. (Figure indicate the driver seat, passenger seat is symmetrical.)
-
Tighten seat mounting bolts to the specified torque. Refer to Exploded View.
-
Perform self-diagnosis using CONSULT and confirm if the system is normal. Refer to CONSULT Function.
Other materials
Cold weather driving
Freeing a frozen door lock
To avoid door lock freezing in cold conditions, it is recommended to apply a
suitable deicer into the keyhole of your Nissan Armada before temperatures drop
significantly.
If the lock on your Nissan Armada becomes frozen, gently warm the key before
inserting it int ...
Front Seatback
Disassembly and Assembly
WARNING:
When working, be careful to prevent accidental explosion front side air bag module and front center air bag module (with front center air bag module). Refer to Precaution for Supplemental Restraint System (SRS) "AIR BAG" and "SEAT BELT PRE-TENSIONER".CAUTION:
When d ...
Hands Free Control Unit
Removal and Installation
REMOVALRemove rear bumper fascia. Refer to Removal and Installation.
Remove bracket cover fixing screws, and then remove bracket cover.
Disconnect hands free sensor harness connectors.
Remove hands free control unit fixing screws, and then remove hands free control unit.
Rem ...