Disassembly and Assembly
CAUTION:
When disassemble, always use a remover tool that is made of plastic to prevent damage.
OUTSIDE SEAT CUSHION FINISHER OUTER
Disassembly
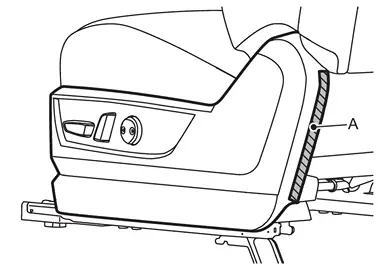
Apply protective tape (A) to prevent damage.
Disengage fixing clip(s) and pawls using a remover tool (A), and then remove outside seat cushion finisher outer.
-
With 4way power seat system
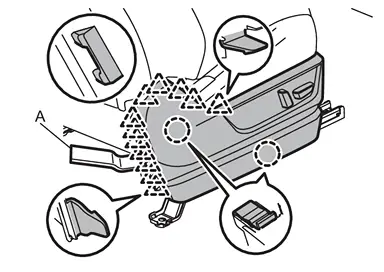

: Clip 
: Pawl -
With 8way power seat system
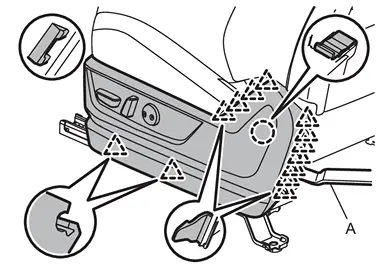
|
: Clip |
|
: Pawl |
Disengage harness fixing clips from outside seat cushion finisher outer, and then disconnect harness connectors.
CAUTION:
Before performing removal operation, check the installation position of harness fixing clips.
Remove the following parts after removing outside seat cushion finisher outer.
-
Power seat switch. Refer to Removal and Installation.
-
Lumbar support switch (if equipped). Refer to Removal and Installation.
-
Massage switch (if equipped). Refer to Removal and Installation.
Assembly
Assemble in the reverse order of disassembly.
INSIDE SEAT CUSHION FINISHER OUTER (WITH 4WAY POWER SEAT SYSTEM)
Disassembly
Remove seat cushion trim and pad. Refer to Disassembly and Assembly.
Remove seat belt buckle. Refer to Removal and Installation.
Apply protective tape (A) to prevent damage.
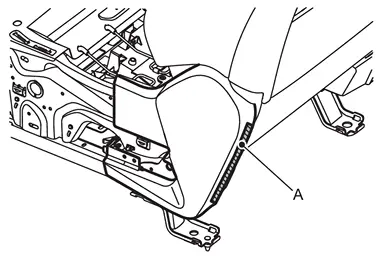
Disengage fixing clips and pawls using a remover tool (A), and then remove inside seat cushion finisher outer.
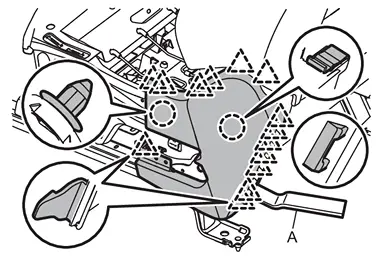
|
: Clip |
|
: Pawl |
Assembly
Assemble in the reverse order of disassembly.
INSIDE SEAT CUSHION FINISHER OUTER (WITH 8WAY POWER SEAT SYSTEM)
Disassembly
Remove seat belt buckle. Refer to Removal and Installation.
Apply protective tape (A) to prevent damage.
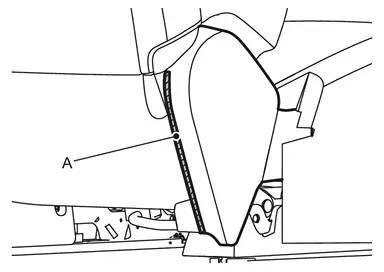
Disengage fixing clips and pawls using a remover tool (A), and then remove inside seat cushion finisher outer.
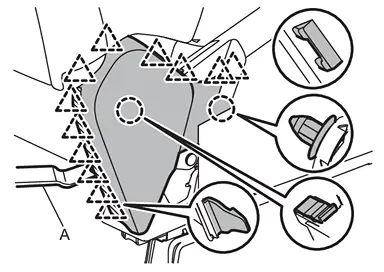
|
: Clip |
|
: Pawl |
Assembly
Assemble in the reverse order of disassembly.
INSIDE / OUTSIDE SEAT CUSHION FINISHER INNER
Disassembly
Remove seat cushion trim and pad. Refer to Disassembly and Assembly.
Remove inside and outside seat cushion finisher inner.
-
With 4way power seat system
Disengage fixing clip, and then remove inside and outside seat cushion finisher inner.
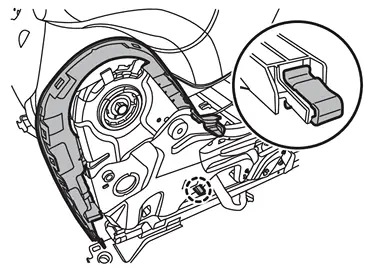
: Clip -
With 8way power seat system
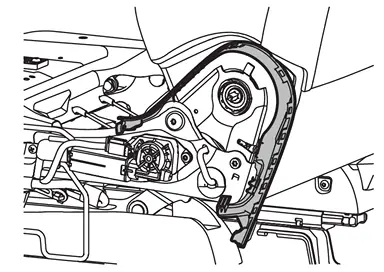
Assembly
Assemble in the reverse order of disassembly.
SLIDING MOTOR COVER
Disassembly
Disengage harness fixing clip of sliding motor cover.
CAUTION:
Before performing removal operation, check the installation position of harness fixing clip.
Disengage fixing pawls, and then remove sliding motor cover.
-
With 4way power seat system
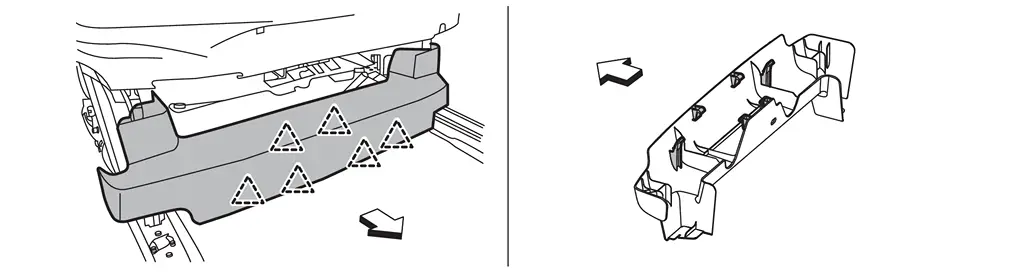
: Pawl : vehicle front -
With 8way power seat system
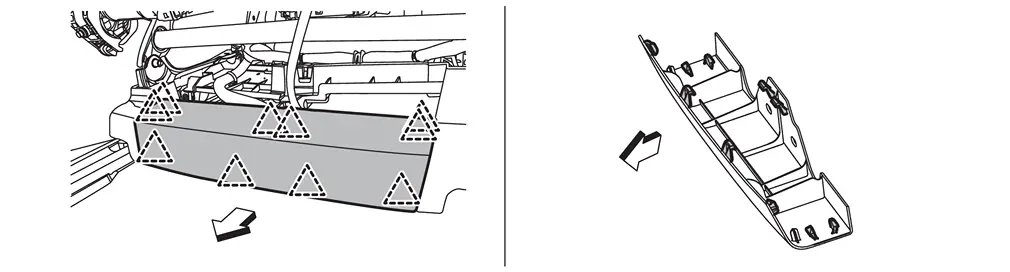
|
: Pawl |
| : vehicle front |
Assembly
Assemble in the reverse order of disassembly.
OUTSIDE SLIDE FINISHER
Disassembly
Remove outside seat cushion finisher outer.
Remove sliding motor cover.
Remove outside slide finisher fixing screws.
Disengage fixing clips according to numerical order 1→3 indicated by arrows as shown in the figure, and then remove outside slide finisher.
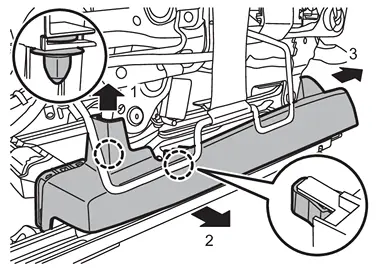
|
: Clip |
Assembly
Assemble in the reverse order of disassembly.
INSIDE SLIDE FINISHER
Disassembly
Remove sliding motor cover.
Disengage harness fixing clip of inside slide finisher, and then disconnect harness connector.
CAUTION:
Before performing removal operation, check the installation position of harness fixing clip.
Remove inside slide finisher fixing screws.
Disengage fixing clip according to numerical order 1→2 indicated by arrows as shown in the figure, and then remove inside slide finisher.
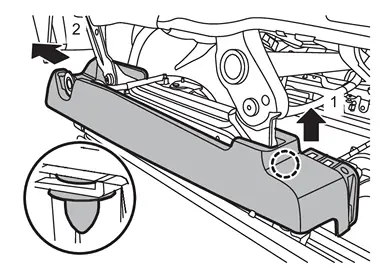
|
: Clip |
Assembly
Assemble in the reverse order of disassembly.
Other materials
Heavy Tight-Corner Braking Symptom Occurs
Description
Heavy tight-corner braking symptom occurs when the vehicle is driven and the steering wheel is turned fully to either side after the engine is started.NOTE:
Light tight-corner braking symptom may occur depending on driving conditions. This is not malfunction.
Diagnosis Procedure
PERFORM ...
Intake Sensor
Exploded View
Refer to Exploded View.
Removal and Installation
REMOVALRemove front evaporator. Refer to Removal and Installation.
Disconnect sub harness connector from intake sensor harness connector.
Remove intake sensor harness connector from front case upper.
Remove intake sensor from front ...
Front Door Weather-Strip
Removal and Installation
REMOVALApply protective tape (A) to front door panel around front door weather-strip fixing clips for preventing damage.
Disengage fixing clips on the reverse side of front door weather-strip using a remover tool (A).
: Clip
CAUTION:
Never damage front door pane ...