Basic information
The head restraints/headrests in the Nissan Armada are an essential part of the overall safety system, designed to work together with seat belts and airbags to provide enhanced protection for occupants. Proper use and adjustment of head restraints in the Nissan Armada can significantly reduce the risk of neck injuries during rear-end collisions.
WARNING
Head restraints/headrests in the Nissan Armada are designed to supplement other safety systems and should always be used correctly.
They provide additional protection against injury, particularly in rear-end impacts. Adjustable head restraints/headrests must be set according to the guidelines described in this section. Always recheck the adjustment after another person has used the seat in the Nissan Armada. Do not attach any objects to the head restraint/headrest posts except genuine NISSAN accessories specifically approved for use. Never remove the head restraint/headrest while the seat is in use. Operating the Nissan Armada without properly installed head restraints/headrests may reduce occupant protection.
If the head restraint/headrest has been removed, it must be correctly reinstalled and adjusted before using the seat. Failure to follow these safety precautions in the Nissan Armada can significantly increase the risk of serious injury or even death in the event of a collision.
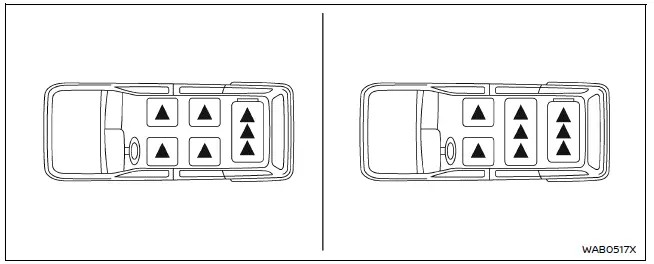
The illustration above shows all seating positions in the Nissan Armada that are equipped with head restraints/headrests.
 Indicates that the seating position is equipped with a head restraint.
- The Nissan Armada is equipped with head restraints/headrests that may be integrated, adjustable, or non-adjustable depending on the seating position.
- Adjustable head restraints/headrests in the Nissan Armada feature multiple locking notches along the support rods, allowing precise positioning for optimal comfort and safety.
- Non-adjustable head restraints/headrests include a single locking notch to secure them firmly to the seat structure.
- Proper Adjustment:
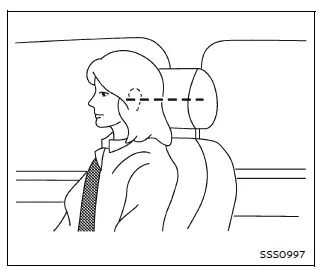
- For adjustable types, align the center of the head restraint/headrest with the level of your ears when seated in the Nissan Armada.
- If your ear level is above the recommended position, raise the head restraint/headrest to its highest setting to maintain protection.
- If a head restraint/headrest has been removed, always reinstall it securely and ensure it is properly locked before using that seat in the Nissan Armada.
Adjustable head restraint/headrest components
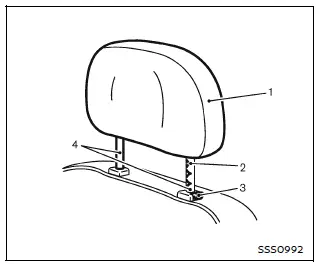
- Removable head restraint/headrest
- Multiple notches
- Lock knob
- Stalks
These components allow flexible adjustment in the Nissan Armada, ensuring that each occupant can achieve the correct seating position for maximum safety and comfort.
Non-adjustable head restraint/headrest components
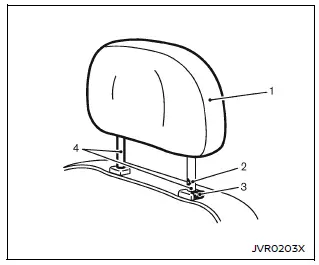
- Removable head restraint/headrest
- Single notch
- Lock knob
- Stalks
Even though non-adjustable head restraints in the Nissan Armada have a fixed structure, they still provide essential support and protection for occupants when properly installed.
Remove
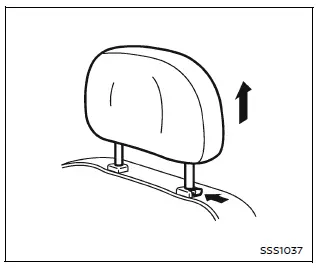
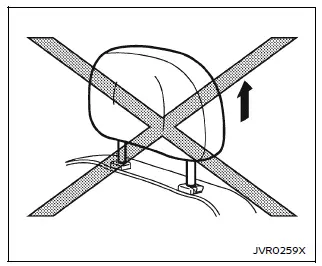
To remove the head restraint/headrest in the Nissan Armada, follow the correct procedure as illustrated. Always store removed components safely and reinstall them before driving to maintain full safety functionality.
CAUTION
- The front head restraints in the Nissan Armada that are equipped with integrated speakers are not designed to be removed. Attempting to pull them out forcibly may result in damage to the speaker system and compromise functionality.
- The outer head restraints of the 3rd row seats in the Nissan Armada are also not intended to be removed. Forcing removal may lead to damage or improper reinstallation.
Follow the procedure below to safely remove the head restraint/headrest in the Nissan Armada.
1. Raise the head restraint/headrest to its highest position.
2. Press and hold the lock knob.
3. Carefully pull the head restraint/headrest upward and remove it from the seat.
4. Store the head restraint/headrest securely in the Nissan Armada to prevent it from moving freely inside the cabin and causing injury or damage.
5. Before using the seat again, reinstall and properly adjust the head restraint/headrest to ensure maximum safety.
Install
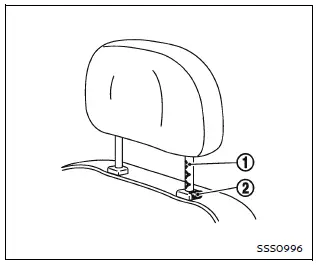
1. Align the head restraint/headrest posts with the corresponding openings in the seat of the Nissan Armada. Ensure correct orientation during installation. The post with the adjustment notch 1 must align with the opening containing the lock knob 2.
2. Press and hold the lock knob, then push the head restraint/headrest downward until it locks securely into place.
3. Adjust the head restraint/headrest to the appropriate height before the seating position is used.
Adjust
Basic information
For adjustable head restraints/headrests in the Nissan Armada, position them so that the center aligns with the middle of your ears when seated properly.
If your ear level is above the recommended alignment, raise the head restraint/headrest to its highest possible position to maintain adequate protection.
For non-adjustable head restraint/headrest
Ensure that the head restraint/headrest in the Nissan Armada is correctly positioned and that the lock knob is fully engaged in the notch before using the seat.
Raise
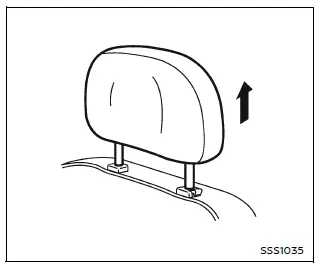
To raise the head restraint/headrest in the Nissan Armada, simply pull it upward until it reaches the desired position.
Always confirm that the lock mechanism is properly engaged before driving.
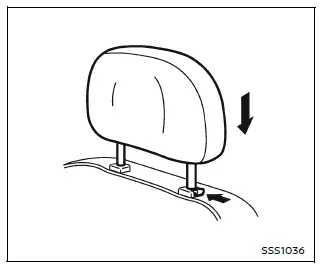
Lower
To lower the head restraint/headrest, press and hold the lock knob while gently pushing the head restraint downward.
Ensure that the head restraint/headrest is securely locked in place before occupying the seat in the Nissan Armada, as proper positioning is critical for safety.
This adjustment system in the Nissan Armada is designed to provide optimal head and neck support, helping to reduce injury risk and improve overall driving comfort.
Other materials
RAB system limitations
WARNING
The following limitations apply to the Rear Automatic Braking (RAB) system
in the Nissan Armada. Failure to fully understand and follow these limitations may
result in serious injury or even fatal accidents.
When the Nissan Armada approaches an obstacle while the accelerator or
b ...
Front Drive Shaft Boot
Exploded View
Circular clip
Dust shield
Housing
Snap ring
Ball cage/steel ball/inner race assembly
Stopper ring
Boot band
Boot
Shaft
Circular clip
Joint sub-assembly
: Wheel side
: Always replace after every disassembly.
1: NISSAN Genuine ...
Action Test
Ldw
Work Procedure
Perform action test to verify the customer's concern.
Perform action test and check the system operation after system diagnosis.
WARNING:
Be careful of traffic conditions and safety around the vehicle when performing road test.CAUTION:
Fully understand the following items ...