Basic information
The Nissan Armada is equipped with a memory system for 3rd row power seats, allowing them to retain their original positions. However, under certain conditions such as power interruption, the stored position may be lost and require recalibration.
WARNING
During the reset procedure in the Nissan Armada, the auto-reverse safety function is disabled because the system cannot detect obstructions.
Ensure that the seat movement path is completely clear of any objects or body parts before starting the reset process.
If the 3rd row seat in the Nissan Armada loses its position (for example, due to a power supply interruption during operation), it may stop incorrectly or behave unpredictably, including improper activation of the auto-reverse function.
If the seat stops in an incorrect position during operation, press and hold the corresponding seat adjustment switch for more than 1 second to manually reposition it.
- During reclining (backward)
Before driving the Nissan Armada, always reset the seat positions to ensure proper operation and safety.
How to reset the original seat positions
The reset procedure can only be performed while the engine is running in the Nissan Armada.
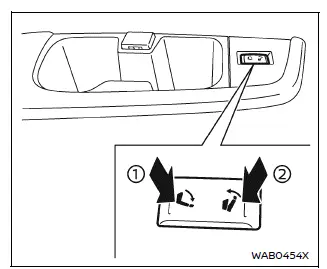
First, press side 2 of the switch, then press side 1 within 1 second. Repeat this sequence 10 times in total:
2 → 1 → 2 → 1 → 2 → 1 → 2 → 1 → 2 → 1
After completing the sequence, the seat will begin moving automatically (reclining). Do not exit the Nissan Armada during this process, as the seat operates automatically.
If the reset procedure is completed successfully, two audible beeps will confirm proper calibration.
If the system does not function correctly after resetting, the seat control system in the Nissan Armada may require professional inspection. It is recommended to have the vehicle checked by an authorized NISSAN dealer.
Other materials
Rear Differential Gear Oil
Inspection
WARNING:
Jacking up or lift up the vehicle may the vehicle height to go down which cause a personal injury and/or damage to the air suspension component parts. Refer to Precaution for when Jacking and Lifting Up the vehicle with Electronic Air Suspension System.
OIL LEAKAGEMake sure ...
Rear Axle Service Data and Specifications
Wheel Bearing
Item Standard
Axial end play
0.05 mm (0.002 in) or less
Drive Shaft
With differential lock Item Standard
Grease quantity
Wheel side
155 - 175 g (5.47 – 6.17 oz)
Final drive side
310 - 330 g (10.94 – 11.63 oz)
Boots installed length
Wheel side
143.6 mm (5 ...
A/c Compressor
Exploded View
A/C compressor
: N·m (kg-m, ft-lb)
Removal and Installation
WARNING:
Jacking up or lifting up the vehicle may the vehicle height to go down which cause a personal injury and/or damage to the air suspension component parts. Refer to Precaution for when Jacking and Lifting Up the ...