Basic information
The HomeLink Universal Transceiver in the Nissan Armada offers a practical and streamlined solution by combining the functions of up to three separate handheld remote controls into one integrated system.
With the Nissan Armada HomeLink system, you can conveniently operate a wide range of Radio Frequency (RF) devices directly from your vehicle.
HomeLink Universal Transceiver:
- In the Nissan Armada, it supports most RF-controlled devices, including garage doors, security gates, home lighting systems, door locks, and alarm systems.
- It is powered directly by the Nissan Armada vehicle battery, eliminating
the need for separate batteries.
Even if the vehicle battery is disconnected or discharged, the Nissan Armada HomeLink system retains all stored programming data.
Once the Nissan Armada HomeLink Universal Transceiver is programmed, always keep the original remote transmitter for future reprogramming needs, such as when purchasing a new vehicle or replacing equipment.
For security reasons, it is strongly recommended to erase all programmed HomeLink buttons in the Nissan Armada before selling or transferring ownership of the vehicle.
WARNING
- Do not use the Nissan Armada HomeLink system with garage door openers that do not have a safety stop and reverse feature as required by safety regulations. Systems without this feature may pose a serious risk of injury or death.
- During the programming process in the Nissan Armada, the garage door
or gate may move automatically. Ensure that no people, pets, or objects are
in the path of the moving system.
This precaution is essential to prevent accidents.
- Always turn off the Nissan Armada engine while programming the HomeLink
system.
Do not perform programming in enclosed spaces with the engine running, as exhaust gases contain carbon monoxide, which is highly dangerous and potentially fatal.
Programming HomeLink
The following instructions describe the general procedure for programming a HomeLink button in the Nissan Armada.
If you encounter any difficulties or need additional guidance, refer to the official HomeLink website or contact customer support for assistance.
NOTE:
For faster and more reliable programming in the Nissan Armada, it is recommended to install a fresh battery in the handheld transmitter before starting the process.
1. Hold the handheld transmitter approximately 1–3 inches (26–76 mm) away from the Nissan Armada HomeLink surface, ensuring that the indicator light 1 remains visible.
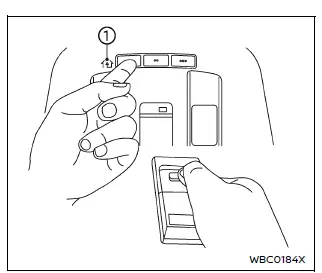
2. Using both hands, press and hold the desired Nissan Armada HomeLink button and the handheld transmitter button simultaneously.
Continue holding both buttons until the HomeLink indicator light changes from slow flashing to rapid flashing.
Once rapid flashing occurs, release both buttons—this indicates successful programming in the Nissan Armada system.
NOTE:
Some devices, including certain gate openers, may require an alternative cycling method described in specific programming instructions for regional compatibility.
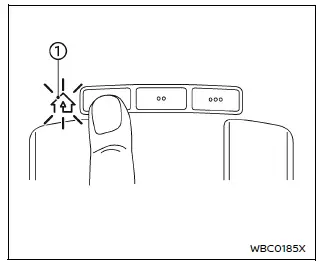
3. Press and hold the programmed Nissan Armada HomeLink button and observe the indicator light behavior.
- If the indicator light 1 remains solid, programming is complete and the device should activate when the button is pressed.
- If the indicator light 1 blinks rapidly for approximately two seconds and then stays solid, additional steps are required for rolling code devices.
For rolling code systems in the Nissan Armada, you may need assistance from another person. Use a stable ladder if necessary, but never stand on the vehicle to complete programming.
The Nissan Armada HomeLink system significantly enhances convenience by allowing seamless control of home automation devices directly from your vehicle, reducing the need for multiple remotes.
4. In the Nissan Armada setup process, locate the receiver unit on your garage door opener motor. Identify the "learn" or "smart" button—its name and color may vary depending on the manufacturer, but it is typically positioned near the antenna wire connection point. If you cannot find it, consult the garage door opener manual for accurate guidance.
5. Press and release the "learn" or "smart" button on the receiver unit.
NOTE:
After pressing the button, you will have approximately 30 seconds to complete the next step in the Nissan Armada HomeLink programming sequence.
6. Return to your Nissan Armada and firmly press and hold the previously programmed HomeLink button for about two seconds, then release it.
Repeat this press/hold/release sequence up to three times. This process allows the Nissan Armada HomeLink system to synchronize with rolling code devices.
Once completed, the Nissan Armada HomeLink system should successfully operate your garage door or gate.
7. If you encounter any issues while programming your Nissan Armada HomeLink buttons, refer to the official HomeLink website or contact support for further assistance.
Programming HomeLink for Canadian customers and gate openers
Due to Canadian radio-frequency regulations, transmitter signals automatically stop after a few seconds. This limitation may prevent the Nissan Armada HomeLink system from capturing the signal during standard programming.
Similarly, some U.S. gate operators are designed with the same signal timeout feature.
If you are located in Canada or experience difficulties programming a gate system with your Nissan Armada, replace Step 2 of the standard procedure with the following method:
NOTE:
When programming devices such as garage door openers, temporarily unplug the device during the cycling process to prevent potential damage to its components.
Step 2: Using both hands, press and hold the desired Nissan Armada HomeLink button together with the handheld transmitter button.
During programming, the handheld transmitter may stop transmitting automatically. Continue holding the Nissan Armada HomeLink button while repeatedly pressing (cycling) the transmitter button every two seconds until the signal is successfully learned.
The Nissan Armada HomeLink indicator light will first flash slowly and then rapidly once programming is successful. Do not release the buttons until this rapid flashing occurs.
Once the indicator flashes rapidly, release both buttons. This confirms that the Nissan Armada HomeLink system has been successfully programmed.
Continue with Step 3 of the standard procedure to complete the setup.
After finishing, remember to reconnect the garage door opener or device to power.
Operating the HomeLink Universal Transceiver
After programming is complete, the Nissan Armada HomeLink Universal Transceiver can be used to control the connected device.
To operate, simply press and release the corresponding HomeLink button inside the Nissan Armada. The amber indicator light will illuminate while the signal is being transmitted.
For added flexibility, the original handheld transmitter can still be used at any time alongside the Nissan Armada system.
Programming troubleshooting
If your Nissan Armada HomeLink system does not learn the transmitter signal properly, consider the following recommendations:
- Replace the handheld transmitter batteries with new ones to ensure strong signal transmission.
- Position the transmitter so that the battery side faces away from the Nissan Armada HomeLink surface.
- Press and hold both the Nissan Armada HomeLink button and the transmitter button continuously without interruption.
- Keep the transmitter approximately 1–3 inches (26–76 mm) from the Nissan Armada HomeLink surface and maintain that position for up to 15 seconds.
- If programming fails, slightly reposition the transmitter while keeping the indicator light visible at all times.
The Nissan Armada HomeLink system is designed to provide seamless integration with your home automation devices, enhancing everyday convenience and reducing the need for multiple remote controls.
If you experience any difficulties while programming your Nissan Armada HomeLink buttons or have additional questions, you can visit the official HomeLink website or contact customer support for detailed assistance and guidance.
Clearing the programmed information
Basic information
In the Nissan Armada, the HomeLink system allows you to erase all previously stored programming data and reset it to factory state.
Please note that individual HomeLink buttons in the Nissan Armada cannot be cleared separately using this method.
However, you can reprogram individual buttons without affecting others by following the reprogramming procedure described below.
To clear all programming
1. Press and hold the two outer Nissan Armada HomeLink buttons simultaneously until the indicator light begins to flash (this typically takes about 10 seconds). Do not continue holding the buttons for more than 20 seconds.
2. Release both buttons.
The Nissan Armada HomeLink system is now reset and ready to be programmed again starting from Step 1 of the programming procedure.
Reprogramming a single HomeLink button
To reprogram a specific Nissan Armada HomeLink button without affecting others, follow these steps:
1. Press and hold the selected HomeLink button in your Nissan Armada. Do not release it.
2. After approximately 20 seconds, the indicator light will begin flashing. While continuing to hold the button, proceed with the standard HomeLink programming procedure starting from Step 1.
For additional support or troubleshooting related to the Nissan Armada HomeLink system, refer to the official HomeLink website or contact customer service.
Once reprogramming is complete, the Nissan Armada HomeLink button will control the newly assigned device, while other programmed buttons remain unchanged.
If your vehicle is stolen
If your Nissan Armada is stolen, it is strongly recommended to immediately change the access codes of all non-rolling code devices that were programmed into the HomeLink system.
Refer to the owner's manual of each device or contact the manufacturer or dealer for instructions on resetting access codes.
After recovering your Nissan Armada, you will need to reprogram the HomeLink Universal Transceiver using new transmitter data to ensure continued security.
NOTE:
FCC Notice:
For USA:
This Nissan Armada HomeLink device complies with Part 15 of the FCC Rules. Operation is subject to the following conditions: (1) the device must not cause harmful interference, and (2) it must accept any interference received, including interference that may result in undesired operation.
NOTE:
Any unauthorized changes or modifications to the Nissan Armada HomeLink system may void the user’s authority to operate the equipment.
For Canada:
This Nissan Armada system contains licence-exempt transmitters/receivers that comply with Innovation, Science and Economic Development Canada standards. Operation is subject to the conditions that the device does not cause interference and must accept any interference received, including interference that may affect operation.
The Nissan Armada HomeLink system provides a secure and flexible solution for managing access to your home devices, enhancing both convenience and safety in everyday use.
Other materials
Intelligent Key System Symptoms
Diagnosis Procedure
NOTE:
Perform the self-diagnosis with CONSULT before the symptom diagnosis. Perform the trouble diagnosis if any DTC is detected.SYMPTOM TABLE 1 (BOTH INTELLIGENT KEYS HAVE THE SAME SYMPTOMS) No. Door lock operation (remote keyless entry) Door lock operation (one touch sensor o ...
Intelligent Key Warning Buzzer
Removal and Installation
REMOVALDisconnect Intelligent Key warning buzzer harness connector.
Disengage clip of frame, and then remove Intelligent Key warning buzzer .
: Clip
INSTALLATIONInstall in the reverse order of removal. ...
Telematics Antenna
Removal & Installation
REMOVALRemove the instrument panel assembly. Refer to Removal and Installation.
Remove the screw and clips to remove the telematics antenna .
: Clips
INSTALLATIONInstall in the reverse order of removal.
Feeder Layout
Telematics antenna
TCU
: Crip
...