Exploded View
Refer to Exploded View.
Removal and Installation
REMOVAL
Remove glove box lid inner. Refer to Removal and Installation.
Disengage fixing pawls, and then remove filter cover.
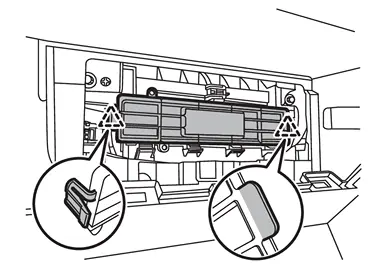
 |
: Pawl |
Remove in-cabin microfilter.
INSTALLATION
Note the following items, and then install in the reverse order of removal.
CAUTION:
-
If the filter is deformed/damaged when removing, replace it with a new one. Deformed/damaged filter may deteriorate the dust collecting performance.
-
When installing, handle the filter with extreme care to avoid deforming/damaging.
Replacement
Replace in-cabin microfilter. Refer to Removal and Installation.
 NOTE:
NOTE:
-
Replace in-cabin microfilter according to replacement interval. Refer to In-cabin microfilter.
-
Even before the replacement interval, if the air conditioner is not working or the window becomes cloudy, replace it.
Other materials
Transfer Cam Position Sensor
Exploded View
Transfer assembly
Transfer cam position sensor
: N·m (kg-m, in-lb)
Removal and Installation
WARNING:
Jacking up or lift up the vehicle may the vehicle height to go down which cause a personal injury and/or damage to the air suspe ...
Electronic Air Suspension System Symptoms
Symptom Table
WARNING:
Jacking up or lift up the vehicle may the vehicle height to go down which cause a personal injury and/or damage to the air suspension component parts. Refer to Precaution for when Jacking and Lifting Up the vehicle with Electronic Air Suspension System.
Perform self-diag ...
With Vdc Tools and Preparation
Preparation
Special Service Tool
The actual shapes of the TechMate tools may differ from those of the special service tools illustrated here.
Tool number
(TechMate No.)
Tool name
Description
KV991J0080
(NI-45741-A)
ABS active wheel sensor tester
Checking operation of wheel sensors
...