Removal and Installation
REMOVAL
CAUTION:
-
Perform lubricant return operation before each refrigeration system disassembly. However, if a large amount of refrigerant or lubricant leak is detected, never perform lubricant return operation. Refer to Perform Lubricant Return Operation.
-
When disconnect the A/C piping related parts, cap or wrap the joint of those parts with suitable material such as vinyl tape to avoid the entry of air.
Use a refrigerant collecting equipment (for HFO-1234yf) to discharge the refrigerant. Refer to Recycle Refrigerant.
Remove air cleaner body. Refer to Removal and Installation.
Remove mounting bolt  , and then disconnect low-pressure flexible hose from low-pressure pipe.
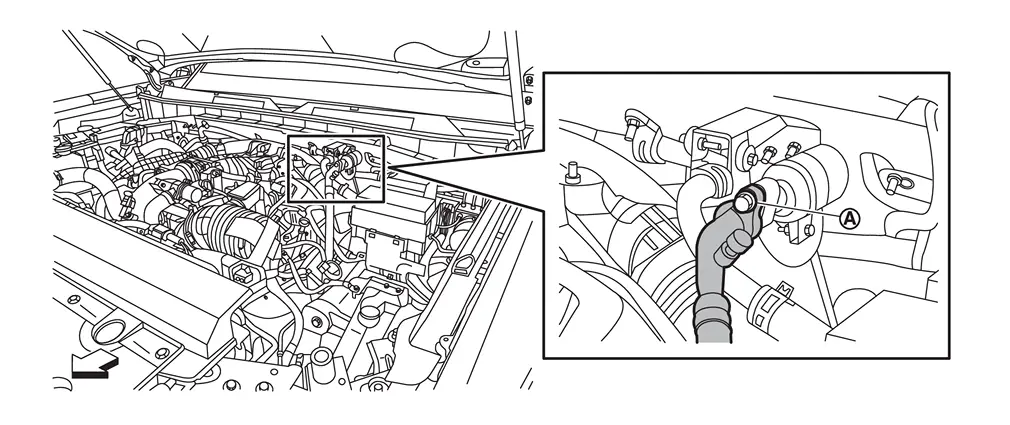
| : vehicle front |
Remove mounting bolt , and then remove low-pressure flexible hose from A/C compressor.
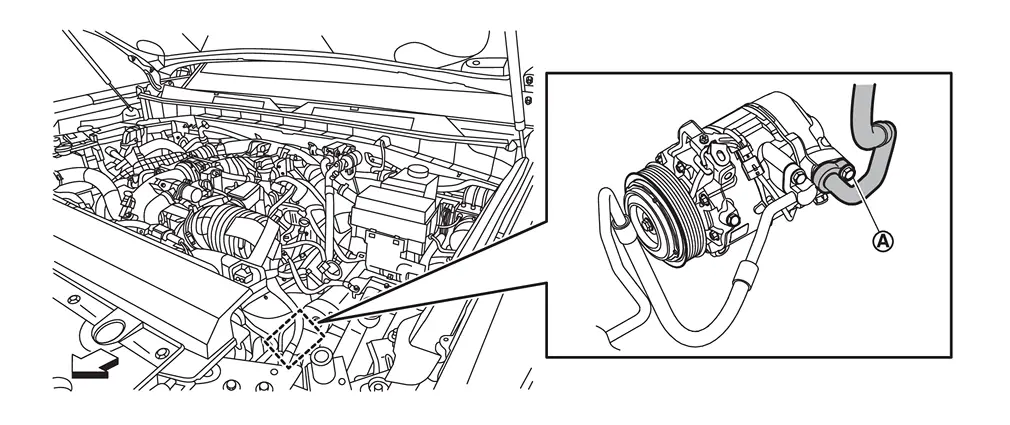
| : vehicle front |
Remove low-pressure flexible hose from vehicle.
INSTALLATION
Note the following items, and then install in the reverse order of removal.
CAUTION:
-
To prevent leakage of refrigerant, replace the O-ring and washer seal with a new one. Apply a coat of compressor oil to the O-ring prior to installation.
-
Use a refrigerant collecting equipment (for HFO-1234yf) to charge the refrigerant. Refer to Charge Refrigerant.
-
Perform a check for refrigerant leakage when charging with refrigerant. Refer to Leak Test.
Other materials
Starting the engine
Basic information
1. Apply the parking brake.
2. Confirm that the Nissan Armada is in the P (Park) position.
The Intelligent Key must be inside the Nissan Armada when operating the ignition
system.
3. Press the ignition switch to the ON position. Then depress the brake pedal
and press the ig ...
Rear Door Regulator
Exploded View
For exploded view of rear door regulator, refer to Exploded View.
Removal and Installation
REMOVALCAUTION:
Never damage rear door glass and rear door panel.Remove rear door glass. Refer to Removal and Installation.
Disengage fixing portion using a remover tool (A) according to numeric ...
Pre-Inspection for Diagnosis
Work Procedure
CHECK CAMERA LENS AND WINDSHIELD
Are camera lens and windshield contaminated with foreign materials?
YES (When the camera lens is contaminated with foreign materials.)>>
Replace front camera unit 【Refer to Removal and Installation (Without ProPILOT Assist 2.1) or Removal and ...