Removal and Installation
CAUTION:
Never damage the body panel.
REMOVAL
CAUTION:
When removing, always use a remover tool that is made of plastic to prevent damage to the parts.
Remove rear pillar finisher. Refer to Removal and Installation.
Remove back pillar garnish. Refer to Removal and Installation.
Apply protective tape (A) on luggage side upper finisher to protect it from damage.
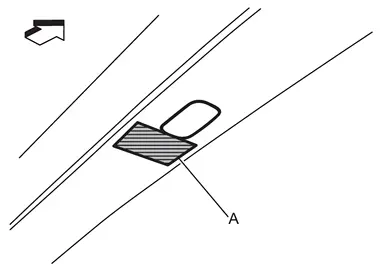
| : vehicle front |
Disengage bolt cap fixing pawls using a remover tool (A), and then remove bolt cap.
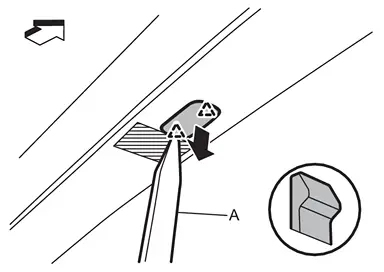
 |
: Pawl |
| : vehicle front |
Remove luggage side upper finisher mounting bolt.
Disengage luggage side upper finisher fixing clips using a remover tool (A), and then remove luggage side upper finisher.
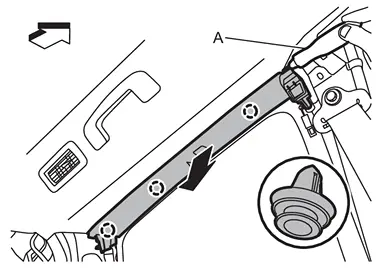
 |
: Clip |
| : vehicle front |
INSTALLATION
Note the following items, and then install in the reverse order of removal.
CAUTION:
-
Visually check clips for deformation and damage during installation. Replace with new ones if necessary.
-
Check in advance that clips are accurately aligned with the portions on body panel, and then install by pressing in.
Other materials
Push-button ignition switch operation
CAUTION
Avoid leaving your Nissan Armada with the ignition switch in the ON position
while the engine is not running for extended periods, as this can drain the
battery.
Use electrical accessories in your Nissan Armada primarily when the engine
is running. If accessories must be used ...
Front Under Cover
Exploded View
Off Road Models
Front under cover
Splash guard RH
Splash guard LH
N·m (kg-m, in-lb)
N·m (kg-m, ft-lb)
, : Indicates that the part is connected at points with same symbol in actual vehicle.
City Models
Front under cover
Splash guard RH
Splash guard LH
N· ...
Precautions
Precaution for Supplemental Restraint System (SRS) "AIR BAG" and "SEAT BELT PRE-TENSIONER"
The Supplemental Restraint System such as “AIR BAG� and “SEAT BELT PRE-TENSIONER�, used along with a front seat belt, helps to reduce the risk or severity of injury to the driver and front passenger fo ...