Exploded View
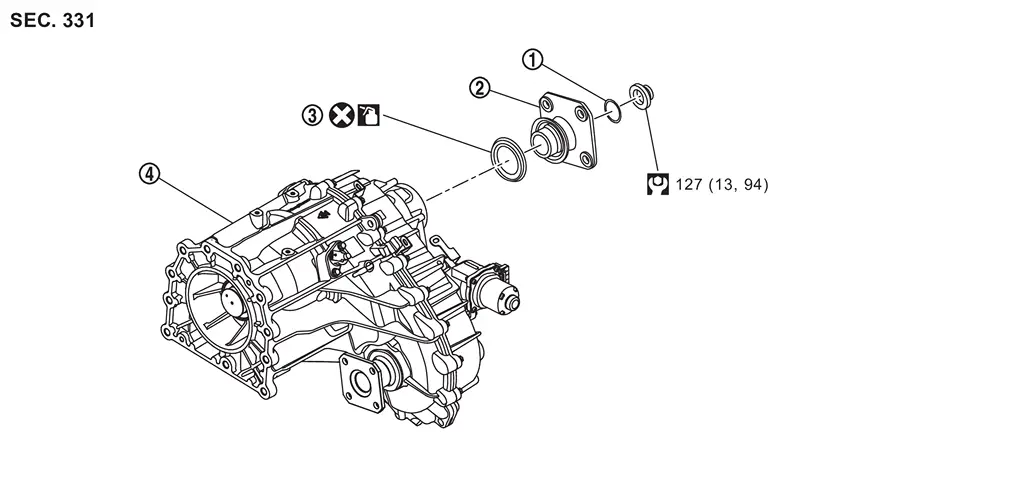
 |
O-ring |  |
Rear companion flange |  |
Rear oil seal |
 |
Transfer assembly | ||||
 |
: N·m (kg-m, ft-lb) | ||||
 |
: Always replace after every disassembly. | ||||
 |
: Apply transfer fluid. | ||||
Removal and Installation
WARNING:
-
Jacking up or lift up the vehicle may the vehicle height to go down which cause a personal injury and/or damage to the air suspension component parts. Refer to Precaution for when Jacking and Lifting Up the vehicle with Electronic Air Suspension System.
REMOVAL
Remove the drain plug to drain the transfer fluid. Refer to Draining.
Remove the rear propeller shaft. Refer to Removal and Installation.
Remove main muffler. Refer to EXHAUST SYSTEM : Removal & Installation.
Remove the rear companion flange and remove the o-ring.
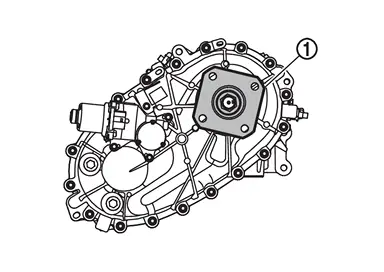
Remove the rear oil seal.
CAUTION:
Never damage rear case and output shaft.
INSTALLATION
Install rear oil seal with a drift (A) (commercial service tool) within the dimension (L) shown as follows.
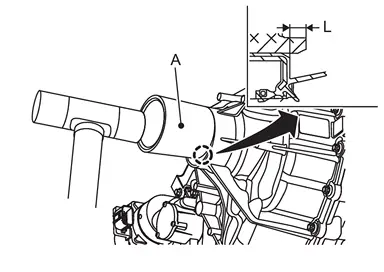
| L | : 3.45 – 4.55 mm (0.1358 – 0.1791 in) |
CAUTION:
-
Never reuse rear oil seal.
-
Apply transfer fluid onto circumference of oil seal.
-
When installing, never incline rear oil seal.
-
Never handle the oil seal inner periphery and oil seal lip.
Install the o-ring and install the rear companion flange .
Install the rear propeller shaft. Refer to Removal and Installation.
Fill with new transfer fluid. Refer to Refilling.
Inspection
INSPECTION AFTER INSTALLATION
Check fluid leakage and the fluid level. Refer to Inspection.
Other materials
Heated seats
Basic information
WARNING
In the Nissan Armada, avoid using seat heaters if occupants are unable to
sense temperature changes or pain. Improper use may result in overheating and serious
injury.
CAUTION
Do not operate the heated seats in the Nissan Armada for extended periods
when not i ...
Basic information
The Vehicle Dynamic Control (VDC) system in the Nissan Armada is an advanced
stability and traction management system that continuously monitors driver inputs
and vehicle behavior through multiple sensors. By analyzing steering input, wheel
speed, and vehicle motion, the Nissan Armada VDC syst ...
Front Wheel Hub and Knuckle
Inspection
WARNING:
Jacking up or lift up the vehicle may the vehicle height to go down which cause a personal injury and/or damage to the air suspension component parts. Refer to Precaution for when Jacking and Lifting Up the vehicle with Electronic Air Suspension System.
COMPONENT PARTMake s ...