Removal and Installation
REMOVAL
CAUTION:
-
Perform lubricant return operation before each refrigeration system disassembly. However, if a large amount of refrigerant or lubricant leak is detected, never perform lubricant return operation. Refer to Perform Lubricant Return Operation.
-
When disconnect the A/C piping related parts, cap or wrap the joint of those parts with suitable material such as vinyl tape to avoid the entry of air.
Use a refrigerant collecting equipment (for HFO-1234yf) to discharge the refrigerant. Refer to Recycle Refrigerant.
Remove front grille. Refer to the following.
-
Off road models: Removal and Installation
-
City models: Removal and Installation
Remove front bumper side finisher LH. Refer to the following.
-
Off road models: Removal and Installation
-
City models: Removal and Installation
Remove horn high. Refer to Removal & Installation.
Remove radiator air guide LH. Refer to Removal and Installation.
Clean refrigerant pressure sensor and its surrounding area, and then remove dust and rust from refrigerant pressure sensor.
CAUTION:
Be sure to clean carefully.
Disconnect refrigerant pressure sensor connector  .
.
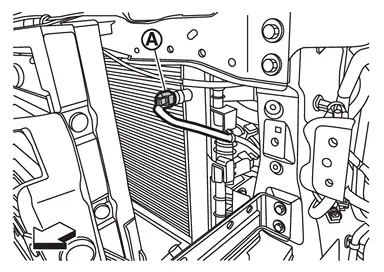
| : vehicle front |
Use a adjustable wrench or other tool to hold the refrigerant pressure sensor mounting block, and then remove the refrigerant pressure sensor from condenser & liquid tank assembly.
INSTALLATION
Note the following items, and then install in the reverse order of removal.
CAUTION:
-
To prevent leakage of refrigerant, replace the O-ring with a new one. Apply a coat of compressor oil to the O-ring prior to installation.
-
Use a refrigerant collecting equipment (for HFO-1234yf) to charge the refrigerant. Refer to Charge Refrigerant.
-
Perform a check for refrigerant leakage when charging with refrigerant. Refer to Leak Test.
Other materials
With Vdc Tools and Preparation
Preparation
Special Service Tool
The actual shapes of the TechMate tools may differ from those of the special service tools illustrated here.
Tool number
(TechMate No.)
Tool name
Description
KV991J0080
(NI-45741-A)
ABS active wheel sensor tester
Checking operation of wheel sensors
...
Headlining
Exploded View
Without Moonroof Models
Roof rear garnish
Room lamp bracket
Headlining assembly
Third assist grip RH
Personal lamp bracket
Personal lamp
Second assist grip RH
Vanity mirror lamp bracket
Front assist grip RH
Vanity mirror lamp
Map lamp bracket
Sun v ...
Diagnosis and Repair Work Flow
Work Flow
OVERALL SEQUENCEDETAILED FLOWGET INFORMATION FOR SYMPTOM
Get detailed information from the customer about the symptom (the condition and the environment when the incident/malfunction occurs).
Check operation condition of the function that is malfunctioning.
>>
GO TO 2.
CHECK ...