
Nissan Armada 2025-2026 Service and Repair Manual: Removal and Installation
WARNING:
REMOVAL
 NOTE:
NOTE:
The mass air flow sensor can be removed while still installed on the air cleaner cover.
Remove engine cover. Refer to Removal and Installation.
Disconnect mass air flow sensor harness connector  .
.
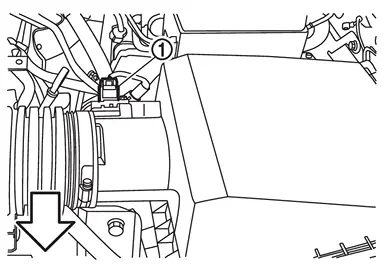
 | : Vehicle front |
Remove mass air flow sensor from air cleaner cover if necessary.
CAUTION:
Handle mass air flow sensor according to the following instructions.
Never shock mass air flow sensor.
Never disassemble mass air flow sensor.
Never touch mass air flow sensor.
Remove air cleaner filter. Refer to Removal & Installation.
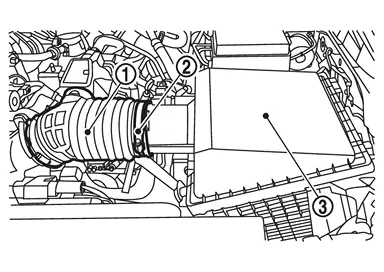
Loosen clamp  of the air duct 1 and remove the air duct 1 from the air cleaner cover
  .
.
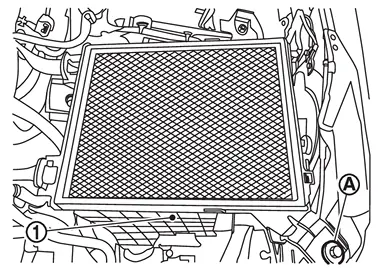
Remove mounting bolt  of air cleaner body and remove air cleaner body.
Loosen clamp of the air duct 1 and separate the air duct 1 and resonator .
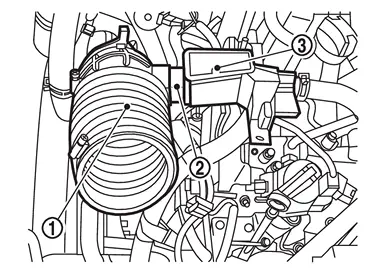
If necessary, loosen clamp of the air duct 1 and remove the air duct 1 from the inlet air duct 2 .
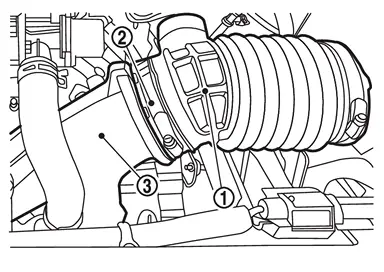
Remove air inlet tube 2. Refer to Removal & Installation.
Remove reservoir tank tube mounting clip from inlet air duct 2. Refer to RADIATOR : Exploded View.
Loosen connection between the inlet air duct 2 and the air duct 2 (bank 1). Refer to Exploded View.
Loosen connection between the inlet air duct 2 and the air duct 2 (bank 2). Refer to Exploded View.
Remove inlet air duct 2 mounting bolt and remove the inlet air duct 2. Refer to Exploded View.
Remove air duct 2 (bank 1) and air duct 2 (bank 2) if necessary.
INSTALLATION
Note the following, and install in the reverse order of removal.
CAUTION:
Never reuse gasket.
Align and install each connection part. Make sure the screw clamp is firmly fixed.
Fixing clips shall be fixed after inserting air cleaner body assembly protrusion to air cleaner case botch hole.
Make sure whether air cleaner body has been firmly installed by shaking it.
If a mass air flow sensor is replaced, carry out the teach of “Idle Air Volume Learning�. Refer to Work Procedure.
 Exploded View
Crankcase ventilation valve* Crankcase ventilation valve bolt* Resonator* Air duct 1 Gasket Air duct 3 (bank 1) Air duct 2 (bank 1) Inlet air duct 2 Bracket 1 Bracket 2 Air duct 2 (bank 2) ...
 Inspection
INSPECTION AFTER REMOVAL
Inspect air duct and resonator assembly for crack or tear.
If anything is found, replace air duct and resonator assembly
...
Other materials:
Removal and Installation
CAUTION:
Never damage the body panel.
REMOVAL
CAUTION:
Remove luggage side lower finisher. Refer to Removal and Installation.
Apply protective tape (A) on rear pillar finisher to protect it from damage.
Disengage seat belt finisher fixing pawls using a remover tool (A).
: Pawl
Apply protectiv ...
General Specifications
Applied model 4WD VR35DDTT Final drive model R240 (DL) Gear ratio 3.357 Number of teeth (Drive gear/Drive pinion) 47/14 Number of pinion gears 4 Drive pinion adjustment spacer type Collapsible Oil capacity Refer to Fluids and Lubricants. ...
Removal and Installation
WARNING:
REMOVAL
Remove fender protector RH. Refer to Removal and Installation.
Remove 12V sub battery (lithium ion battery) harness 1 bracket. Refer to Exploded View (If necessary).
Release clip and remove air breather hose assembly from bracket .
Separate the air breather hose from air breath ...

0.0067