
Nissan Armada 2025-2026 Service and Repair Manual: Removal and Installation
WARNING:
REMOVAL
WARNING:
Never get burn yourself, as engine oil and engine coolant may be hot.
Remove engine under cover, using a power tool (commercial service tool). Refer to Removal and Installation.
Drain engine oil. Refer to Draining.
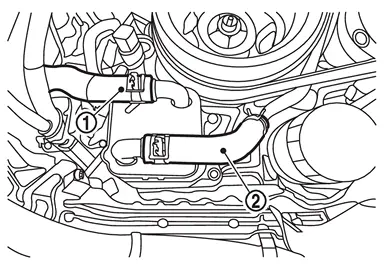
Disconnect A/T fluid cooler hose  and oil cooler hose 2
  .
.
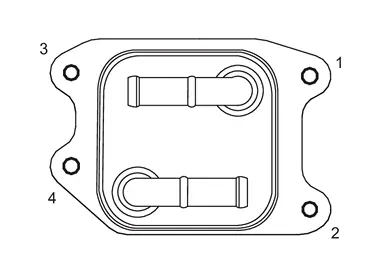
Loosen oil cooler mounting bolts in the reverse order of the figure and remove the oil cooler.
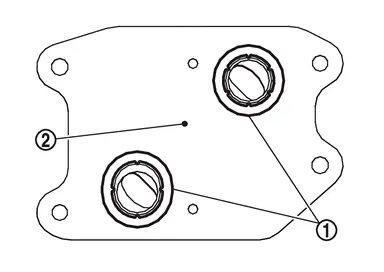
Remove O-ring from oil cooler .
INSTALLATION
Note the following, and install in the reverse order of removal.
CAUTION:
Do not reuse O-ring.
Tighten oil cooler mounting bolts to the specified torque in the order shown in the figure.
 : 10.0 N·m (1.0 kg-m, 89 in-lb) : 10.0 N·m (1.0 kg-m, 89 in-lb) |
 Exploded View
Oil cooler O-ring Oil filter Connector bolt Oil catch plate Clamp Oil cooler hose 2 Oil cooler hose 3 Oil cooler pipe 2 Oil cooler hose 1 Oil cooler pipe 1 Comply with the installation pr ...
 Inspection
WARNING:
INSPECTION AFTER REMOVAL
Oil Cooler
Check oil cooler for cracks. Check oil cooler for clogging by blowing through engine coolant inlet. If necessary, replace oil cooler.
Relief Valve
Check re ...
Other materials:
Special Service Tools
The actual shape of the tools may differ from those illustrated here.Tool number
(TechMate No.)
Tool name Description   —
(J-46534)
Trim Tool Set
Removing trim components —
(1–20–2851–1)
ICC alignment kit*
Uses for radar alignment
* NOTE: Tools 1–20–2721–1–IF, 1–20–27 ...
Heating Repair
While hammering work is being performed during the rough repair stage, the area needs to be heated. First, cover your hand with a glove (cloth material), and then place hand on the reverse side of the panel near the repair area. Apply heat to the entire repair area using a gas burner (oxy-acetylene ...
Removal and Installation
REMOVAL
Remove instrument panel assembly. Refer to Removal and Installation.
Disconnect intake door motor harness connector .
Remove fixing screws , and then remove intake door motor.
INSTALLATION
Install in the reverse order of removal. ...

0.005