
Nissan Armada 2025-2026 Service and Repair Manual: Removal and Installation
REMOVAL
Remove the following parts:
VTC. Refer to Removal & Installation.
Front cover. Refer to Removal & Installation.
Timing chain. Refer to Removal and Installation.
Oil pan (lower). Refer to Removal and Installation.
Oil pan (upper). Refer to Disassembly and Assembly.
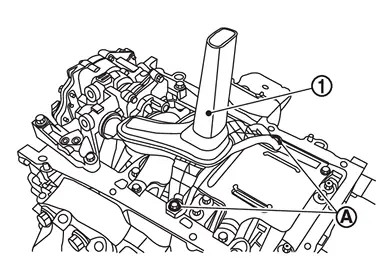
Remove oil strainer mounting bolt  and remove the oil strainer
  .
.
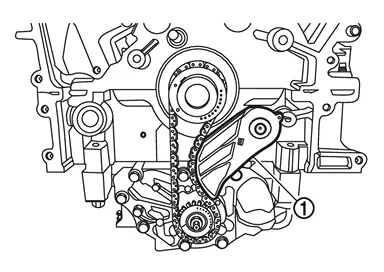
Remove oil pump drive related parts with the following procedure.Remove oil pump drive chain tensioner .
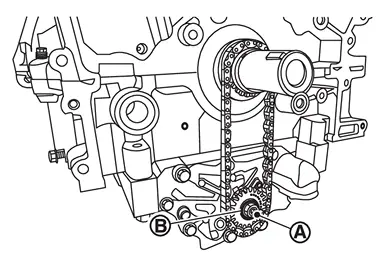
of the oil pump shaft with a Torx socket (commercial service tool) and loosen and remove the oil pump drive sprocket nut  .
.
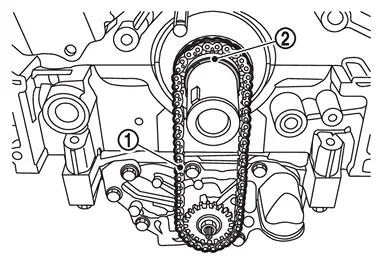
and the oil pump sprocket  as a set.
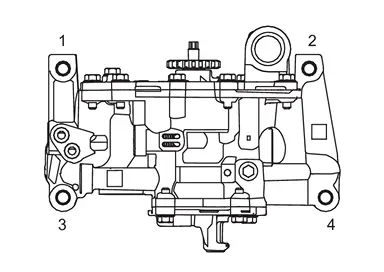
Loosen oil pump mounting bolts in the reverse order of the figure and remove the oil pump.
INSTALLATION
CAUTION:
Check that oil pump chain is correctly install on the oil pump sprocket.
Before crank the engine, rotate crankshaft by hand to be sure that oil pump chain is correctly.
Do not reuse O-ring.
Tighten mounting bolts of the oil pump assembly to the specified torque in the order shown in the figure.
 : 28.0 N·m (2.9 kg-m, 21 ft-lb) : 28.0 N·m (2.9 kg-m, 21 ft-lb) |
Install oil strainer.
Install the oil pump drive related parts with the following procedure:Install oil pump drive chain and the oil pump sprocket as a set.
 NOTE:
NOTE:
There is no matching mark in the oil pump drive related parts.
Oil pump drive chain cannot be installed after installing the oil pump sprocket.
of the oil pump shaft with a Torx socket (commercially available service tool) and tighten the oil pump sprocket nut to the specified torque.
| : 28.0 N·m (2.9 kg-m, 21 ft-lb) |
.
| : 16.7 N·m (1.7 kg-m, 12 ft-lb) |
Check that the tension is applied to the oil pump drive chain after installing.
Install the following in the reverse order of removal.
 Exploded View
Oil pump drive chain Oil pump sprocket Oil pump drive sprocket Oil pump drive chain tensioner Oil pump assembly O-ring Oil pump seal O-ring Oil strainer Comply with the installation procedu ...
 Inspection
INSPECTION AFTER INSTALLATION
Check the engine oil level. Refer to Inspection.
Start the engine, and check there is no leakage of engine oil.
Stop the engine and wait for 10 minutes.
Check the engine ...
Other materials:
Refilling
WARNING:
The ignition switch OFF.
Recommended fluid and capacity: Refer to Fluids and Lubricants.
CAUTION:
Carefully fill the fluid. (Fill up for approximately 3 minutes.)
Leave the vehicle for 3 minutes, and check the fluid level again.
Install filler plug on transfer and tighten to the specif ...
NVH Troubleshooting Chart
Use chart below you find the cause of the symptom. If necessary, repair or replace these parts.
Possible cause and SUSPECTED PARTS Symptom Reference DRIVE SHAFT REAR AXLE Noise Shake Noise Shake Vibration Shimmy Judder Poor quality ride or Excessive joint angle × × — — — ...
Precautions for removing battery terminal
NOTE:
NOTE:
NOTE:
The removal of 12V battery may cause a DTC detection error.
HOW TO DISCONNECT 12V BATTERY TERMINAL
Disconnect 12V battery terminal according to instruction described below.
Open the hood.
Turn ignition switch to the ON position.
Turn ignition switch to the OFF position with the d ...

0.0051