
Nissan Armada 2025-2026 Service and Repair Manual: Removal and Installation
REMOVAL
CAUTION:
Never damage rear door glass and rear door panel.
Remove rear door glass. Refer to Removal and Installation.
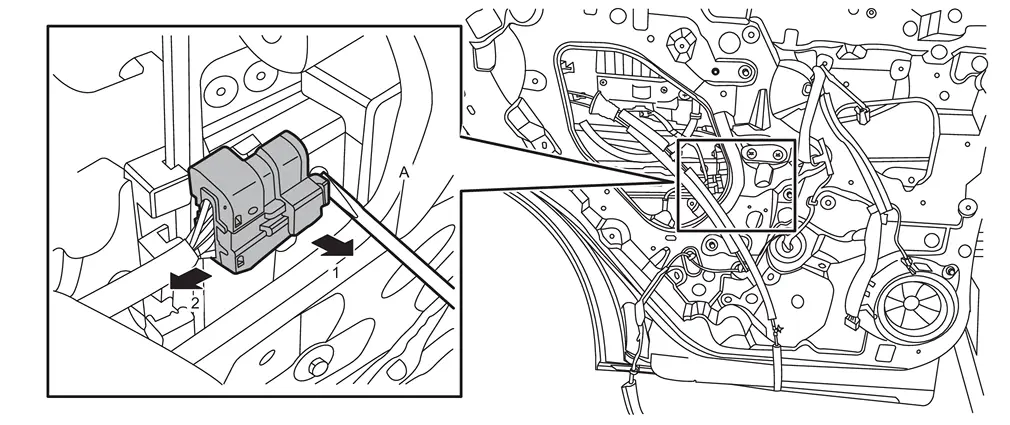
Disengage fixing portion using a remover tool (A) according to numerical order 1→2 as shown in the figure, and then disconnect rear door power window motor harness connector.
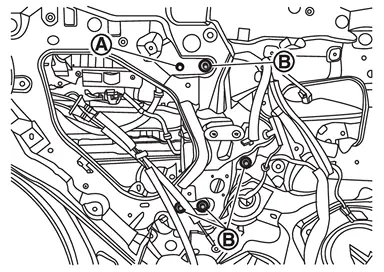
Remove mounting nut  and bolts
  , and then remove rear door regulator assembly.
INSTALLATION
Note the following items, and then install in the reverse order of removal.
CAUTION:
Check rear door regulator parts for lubrication. If necessary, apply body grease.
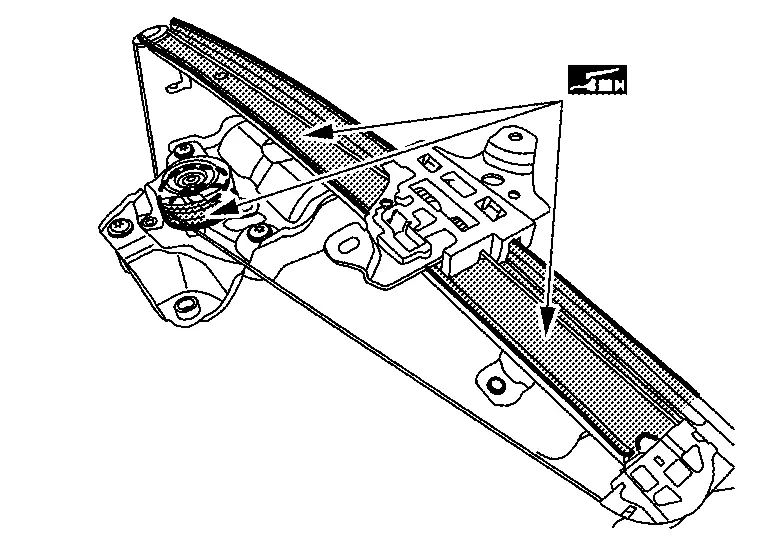

: Body grease Tighten rear door regulator assembly mounting bolts to the specified torque. Refer to Exploded View.
After installing rear door regulator, perform inspection and adjustment. Refer to Inspection and Adjustment.
 Exploded View
For exploded view of rear door regulator, refer to Exploded View. ...
 Disassembly and Assembly
DISASSEMBLY
Remove rear door regulator assembly. Refer to Removal and Installation.
Remove rear door power window motor mounting bolts, and then remove rear door power window motor.
ASSEMBLY
Note the ...
Other materials:
Work Procedure
DRIVING VIDEO RECORDER CONTROL MODULE REPLACEMENT
Replace driving video recorder control module. Refer to Removal and Installation.
>>
GO TO 2.
WRITING OF VIN DATA TO DRIVING VIDEO RECORDER CONTROL MODULE
With CONSULT
Ignition switch ON and wait at least 5 seconds.
Select “Write vehicle id ...
Diagnosis Procedure
CHECK HEAD UP DISPLAY BRIGHTNESS ADJUSTMENT SIGNAL
With CONSULT
Select "Display brightness" in "Data Monitor" mode of "Head Up Display� using CONSULT.
Check "Display brightness" indication as per the following condition.
Monitor item Condition Indication Display brightness Press brightness ad ...
Commercial Service Tools
Tool name
(TechMate No.) Description Pressure gauge
Checking fuel pressure Quick connector release
Removing fuel tube quick connectors in engine room
(Available in SEC. 164 of PARTS CATALOG: Parts No. 16441 6N210) Leak detector
i.e.: (NI-41416)
Locates the EVAP leak EVAP service port adapte ...

0.0053