
Nissan Armada 2025-2026 Service and Repair Manual: Removal and Installation
CAUTION:
When removing and installing 12V Battery, because of the heavy battery, please be careful about the working posture and use the ladder as required.
After the battery of a vehicle equipped with the Stop/Start System is replaced, the cumulative battery discharge current value stored in IPDM E/R must be erased, using CONSULT. Refer to Work Procedure.
 NOTE:
NOTE:
The cumulative battery discharge current value is used for 12 V battery inspection.
If the cumulative value is not erased when replacing the battery, the accurate diagnoses cannot be made because it was added to the cumulative value before the battery replacement.
REMOVAL
Remove reservoir tank support bracket. Refer to RADIATOR : Removal & Installation.
Disconnect the 12V battery cable from the negative terminal.
CAUTION:
To prevent damage to the parts, disconnect the 12V battery cable from the negative terminal first.
Disconnect the 12V battery cable from the positive terminal.
Remove battery fix frame mounting nuts  and battery fix frame
  .
.
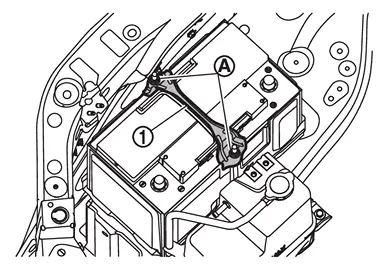
Remove 12V battery.
Remove battery tray mounting bolts .
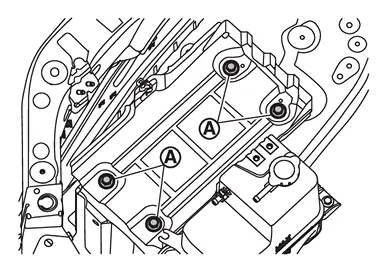
Remove battery tray.
INSTALLATION
Install in the reverse order of removal.
CAUTION:
To install the 12V battery, carefully read the following instructions.
To prevent damage to the parts, connect the 12V battery cable to the positive terminal first.
After connecting 12V battery cables, to securely supply 12V battery voltage, ensure that they are tightly clamped to 12V battery terminals for good contact.
To securely supply 12V battery voltage, check 12V battery terminal for poor connection caused by corrosion.
 Exploded View
Without ProPILOT ASSIST 2.1
Battery fix frame Battery cover Negative cable Battery current sensor 12V battery Battery fix rod Battery fix rod clip Battery tray Battery positive terminal Bat ...

Other materials:
Work Flow
Without ProPILOT Assist 2.1
OVERALL SEQUENCE
DETAILED FLOW
INTERVIEW FOR MALFUNCTION
It is important to clarify the customer’s concerns before starting the inspection. Interview the customer about the concerns carefully and understand the symptoms fully.
NOTE:
The customers are not professionals ...
Upper Dash
WARNING:
Work after radiator core main support, side radiator core support, and hoodledge are removed.
: Vehicle front
: Weld the parts onto the back of the component part. Replacement part • Upper dash assembly • Cowl top assembly
: Vehicle front
: Weld the parts onto the back of the co ...
Removal and Installation
REMOVAL
Remove rear moonroof glass. Refer to Removal and Installation.
Disengage sunshade stay using a remover tool (B) from sunshade slider as shown by the arrow in the figure.
CAUTION:
Apply protective tape (C) on remover tool to protect parts from damage.
Push sunshade stay according to nume ...

0.0064