Exploded View
REMOVAL
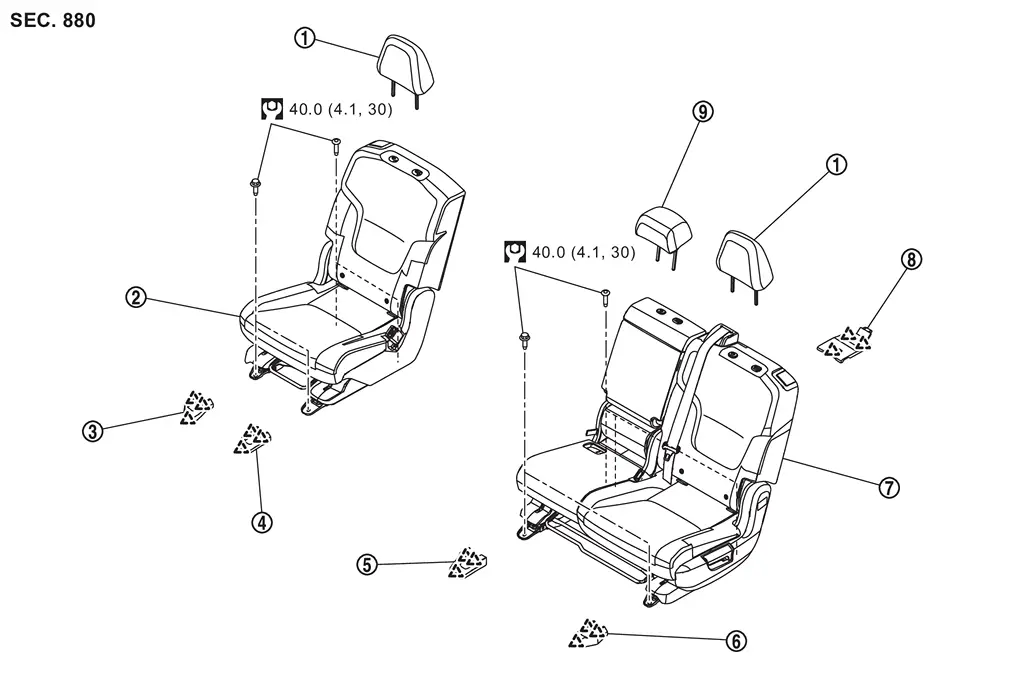
 |
Outer headrest |  |
Second seat assembly (RH seat) |
 |
Outside seat leg cover (RH seat) |
 |
Inside seat leg cover (RH seat) |  |
Inside seat leg cover (LH seat) |  |
Outside seat leg cover (LH seat) |
 |
Second seat assembly (LH seat) |
 |
Center rail finisher |  |
Center headrest |
 |
: Pawl | ||||
 |
: N·m (kg-m, ft-lb) | ||||
DISASSEMBLY
LH Seat
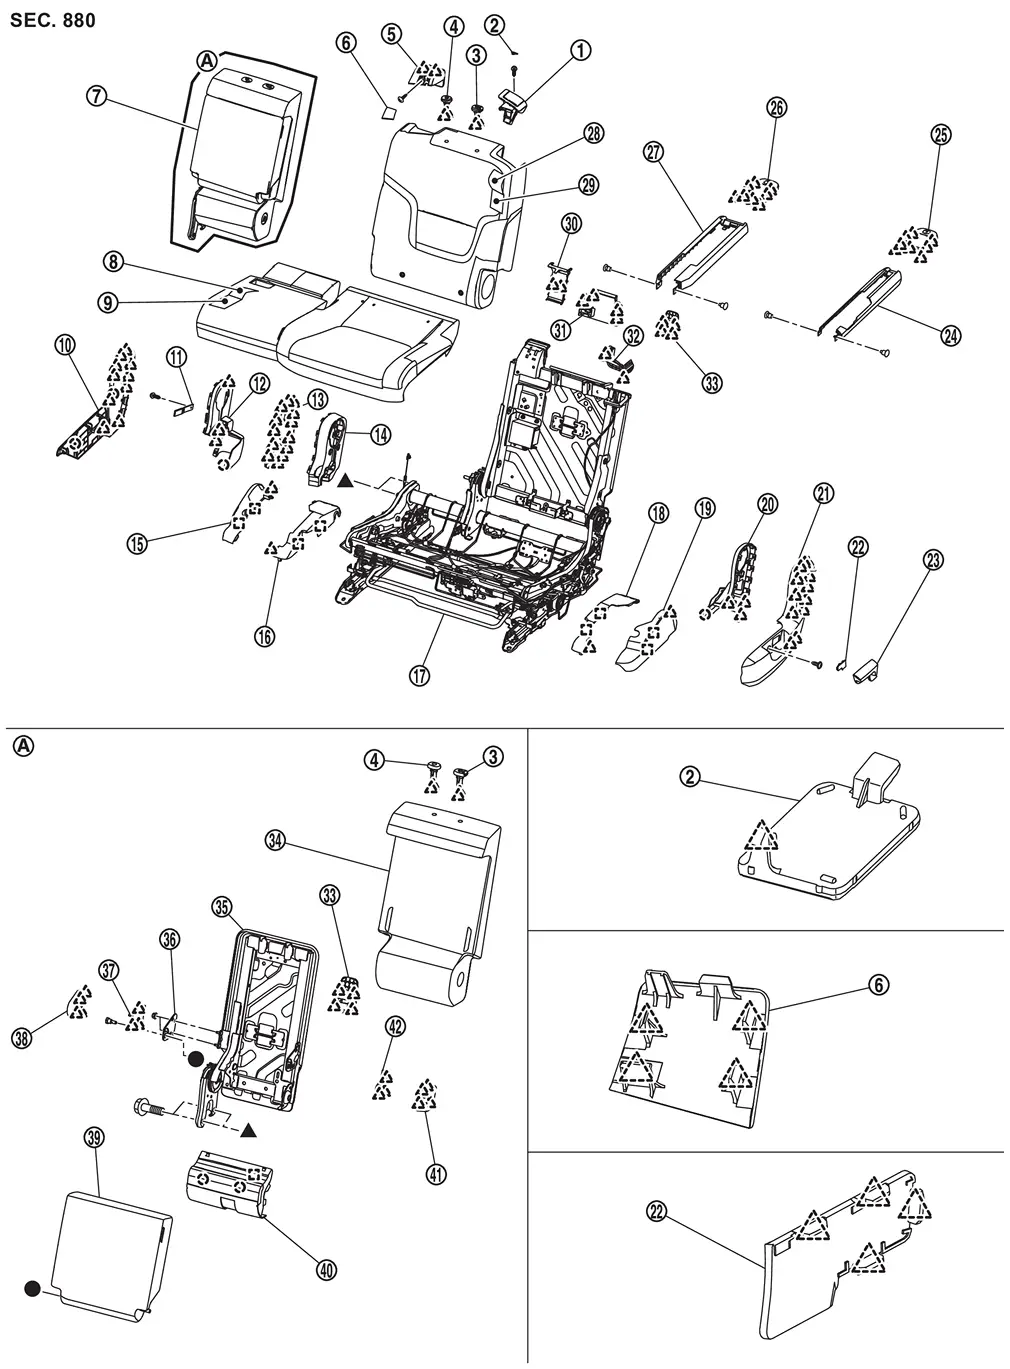
|
Seatback lever unit | |
Seatback lever unit cap | |
Headrest holder (lock) |
|
Headrest holder (free) | |
Seat belt retractor cover | |
Seat belt retractor cover cap |
|
Center seatback assembly | |
Seat cushion trim | |
Seat cushion pad |
 |
Inside seat cushion finisher outer |  |
Reclining strap |  |
Inside seat cushion finisher inner |
 |
Center seatback hinge cover RH |  |
Center seatback hinge cover LH |  |
Inside seat cushion lower cover outer |
 |
Inside seat cushion lower cover inner |  |
Seat frame assembly |  |
Outside seat cushion lower cover inner |
 |
Outside seat cushion lower cover outer |  |
Outside seat cushion finisher inner |  |
Outside seat cushion finisher outer |
 |
Reclining knob cap |  |
Reclining knob |  |
Outside slide finisher |
 |
Outside striker cover |  |
Inside striker cover |  |
Inside slide finisher |
 |
Seatback trim |  |
Seatback pad |  |
Center seat belt guide |
 |
Seat belt guide cap |  |
Seatback lever unit escutcheon |  |
Tether anchor finisher |
 |
Center seatback trim assembly |  |
Center seatback frame |  |
Armrest hinge |
 |
Armrest hinge bracket RH |  |
Armrest hinge cover RH |  |
Armrest |
 |
Center seatback panel |  |
Armrest hinge cover LH |  |
Armrest hinge bracket LH |
 |
: Clip | ||||
|
: Pawl | ||||
 |
: Metal clip | ||||
 , : Indicates that the part is connected at points with same symbol in actual vehicle. , : Indicates that the part is connected at points with same symbol in actual vehicle. |
|||||
RH Seat
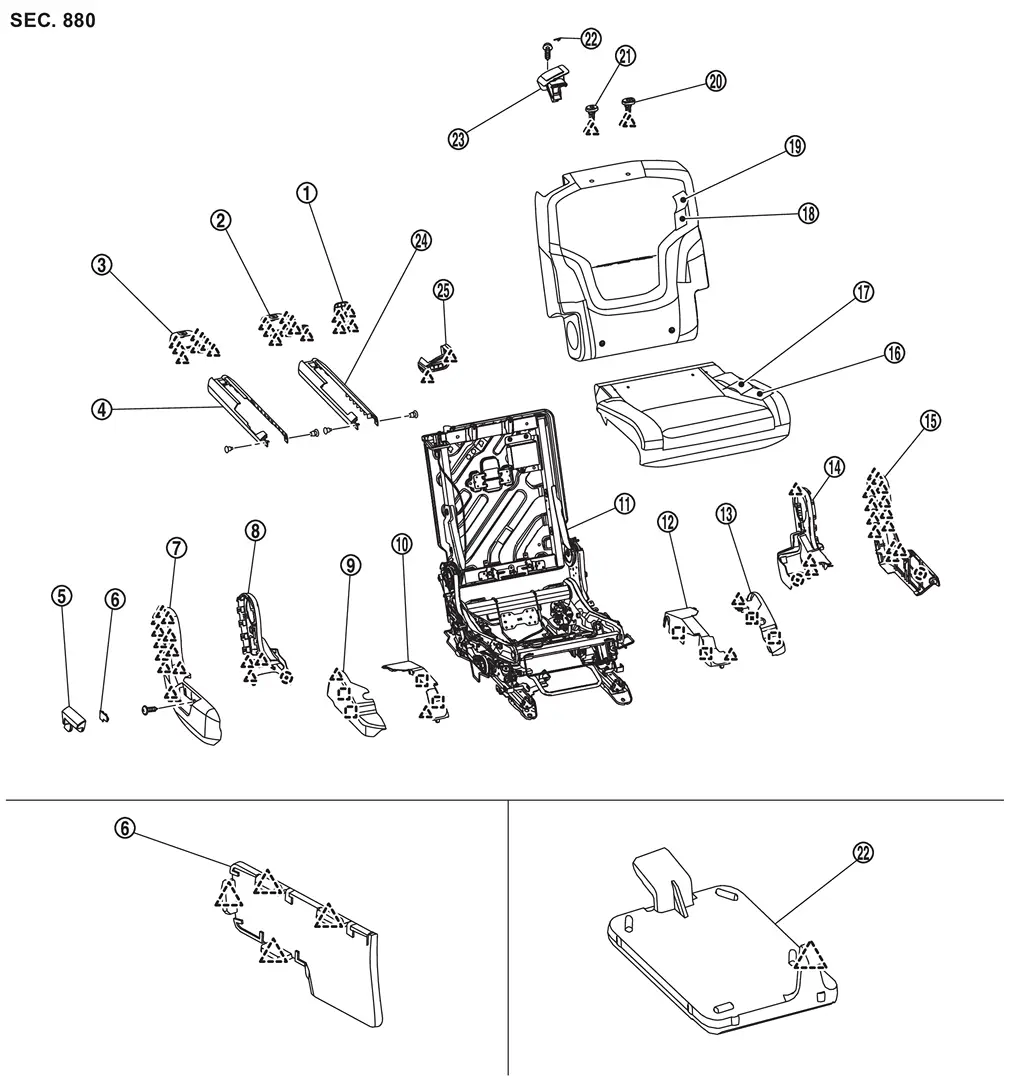
|
Tether anchor finisher | |
Inside striker cover | |
Outside striker cover |
|
Outside slide finisher | |
Reclining knob | |
Reclining knob cap |
|
Outside seat cushion finisher outer | |
Outside seat cushion finisher inner | |
Outside seat cushion lower cover outer |
|
Outside seat cushion lower cover inner | |
Seat frame assembly | |
Inside seat cushion lower cover inner |
|
Inside seat cushion lower cover outer | |
Inside seat cushion finisher inner | |
Inside seat cushion finisher outer |
|
Seat cushion pad | |
Seat cushion trim | |
Seatback pad |
|
Seatback trim | |
Headrest holder (lock) | |
Headrest holder (free) |
|
Seatback lever unit cap | |
Seatback lever unit | |
Inside slide finisher |
|
Seatback lever unit escutcheon | ||||
|
: Clip | ||||
|
: Pawl | ||||
|
: Metal clip | ||||
Removal and Installation
CAUTION:
-
When removing and installing, use shop cloths to protect parts and vehicle from damage.
-
Always work with 2 workers, because it is heavy weight.
REMOVAL
Remove headrest.
Slide second seat to front most position.
Disengage fixing pawls using a remover tool (A) according to numerical order 1→3 indicated by arrows as shown in the figure, and then remove center rail finisher (LH seat).
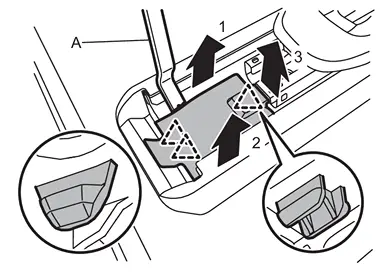
|
: Pawl |
Remove rear side mounting bolts of second seat assembly.
Slide second seat to rear most position.
Remove inside and outside seat leg cover.
-
LH seat
Disengage fixing pawls using a remover tool (A) according to numerical order 1→2 indicated by arrows as shown in the figure, and then remove inside seat leg cover (LH seat)
and outside seat leg cover (LH seat) .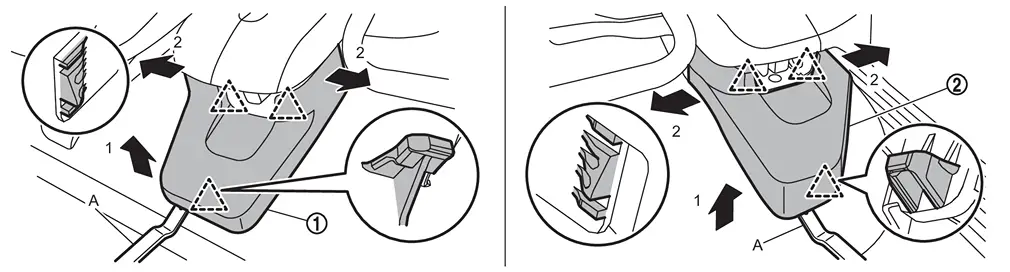
: Pawl -
RH seat
Disengage fixing pawls using a remover tool (A) according to numerical order 1→2 indicated by arrows as shown in the figure, and then remove outside seat leg cover (RH seat)
and inside seat leg cover (RH seat) .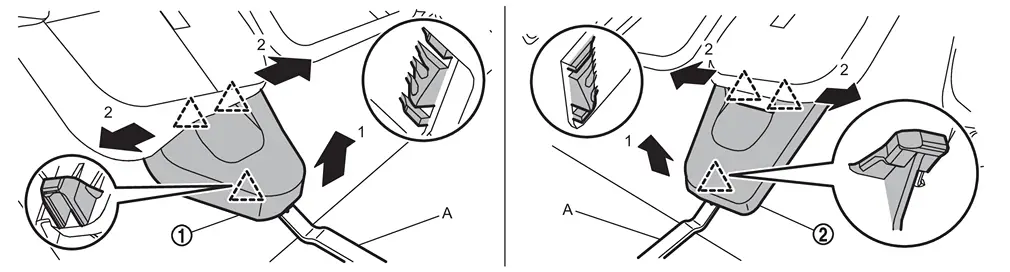
: Pawl
Remove front side mounting bolts of second seat assembly.
Pull up second seat to rearward.
Disengage body harness fixing clip, and then disconnect harness connector.
CAUTION:
Before performing removal operation, check the installation position of harness connector and harness fixing clip.
Remove second seat assembly from vehicle.
 NOTE:
NOTE:
If disassemble second seat after removing, move second seat to walk in condition to ensure the workspace for disassembling seat cushion finisher.
INSTALLATION
Note the following items, and then install in the reverse order of removal.
CAUTION:
-
Before installing seat to vehicle, check the slide rail locking position which inner and outer side. They should be locking same position.
-
Before tightening seat mounting bolt, check that carpet is not caught in seat mounting bolt hole.
-
When installing, tighten mounting bolts according to the numerical order 1→4 or 1→5 as shown in the figure.
-
LH seat
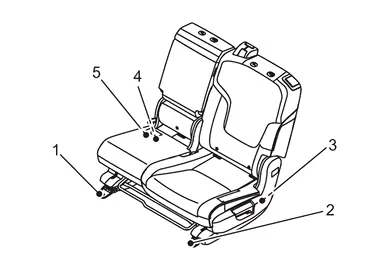
-
RH seat
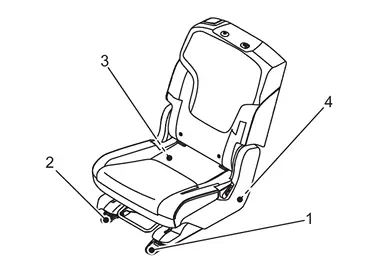
-
-
Tighten seat mounting bolts to the specified torque. Refer to Exploded View.
Other materials
Electric Intake Valve Timing Control Module
Exploded View
Bracket
Electric intake valve timing control module
: vehicle front
: N·m (kg-m, in-lb)
Removal & Installation
REMOVALRemove air cleaner body. Refer to Removal and Installation.
Remove harness clip to bracket.
Disconnect electric intake valve timing con ...
Front Fender Protector Tape
Removal and Installation
REMOVALRemove front fender protector tape from front fender assembly. INSTALLATIONNote the following items, and then install in the reverse order of removal.CAUTION:
Never reuse front fender protector tape. Always replace it with a new one when it is removed.
Degrease fr ...
Precautions
Precaution for Supplemental Restraint System (SRS) "AIR BAG" and "SEAT BELT PRE-TENSIONER"
The Supplemental Restraint System such as “AIR BAG” and “SEAT BELT PRE-TENSIONER”, used along with a front seat belt, helps to reduce the risk or severity of injury to the driver and front passenger fo ...