Disassembly and Assembly
CAUTION:
When disassemble, always use a remover tool that is made of plastic to prevent damage.
OUTSIDE SEAT CUSHION FINISHER OUTER
Disassembly
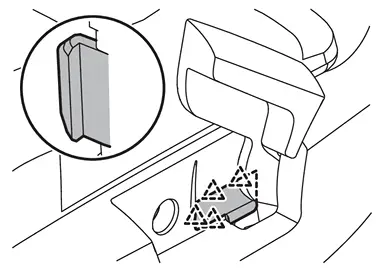
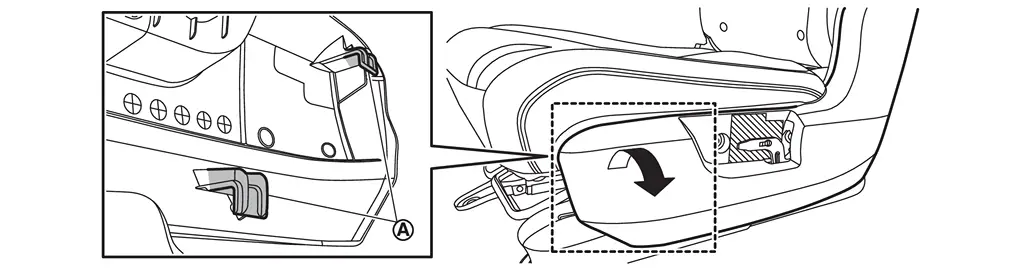
Disengage fixing pawls, and then remove reclining knob cap.
 |
: Pawl |
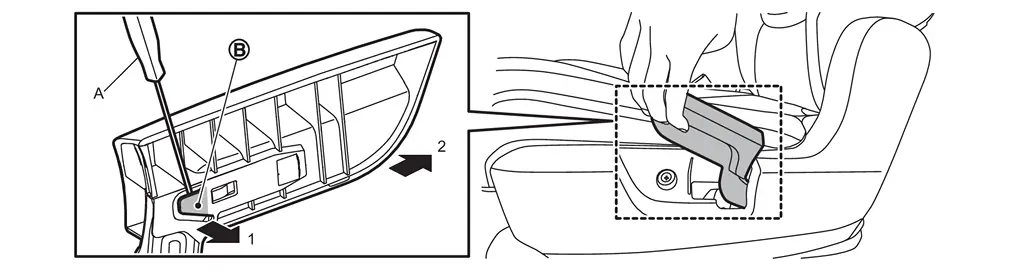
Disengage fixing portion  using a remover tool (A) according to numerical order 1→2 indicated by arrows as shown in the figure, and then remove reclining knob.
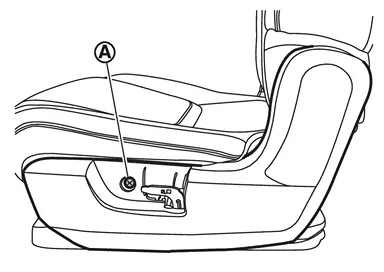
Remove outside seat cushion finisher outer.Remove outside seat cushion finisher outer fixing screw  .
.
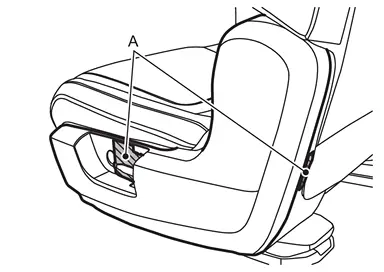
.
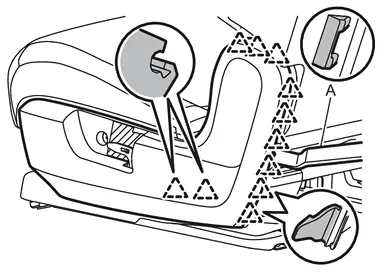
|
: Pawl |
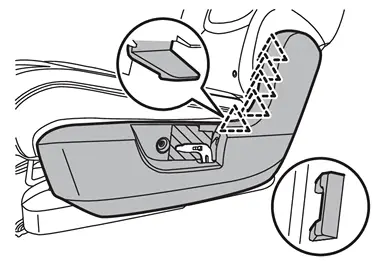
|
: Pawl |
Assembly
Assemble in the reverse order of disassembly.
INSIDE SEAT CUSHION FINISHER OUTER
Disassembly
Apply protective tapes (A) to prevent damage.
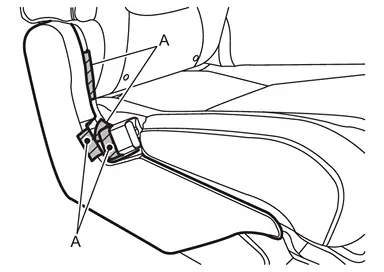
Disengage fixing portion and clip.
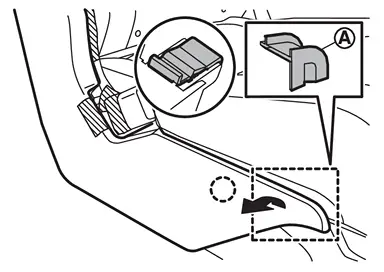
 |
: Clip |
Disengage fixing pawls using a remover tool (A).
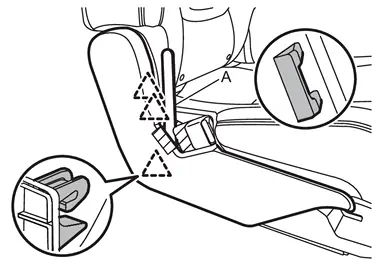
|
: Pawl |
Disengage fixing pawls using a remover tool (A).
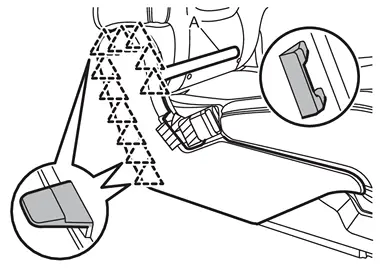
|
: Pawl |
Disengage fixing portion and pawls, and then remove inside seat cushion finisher outer.
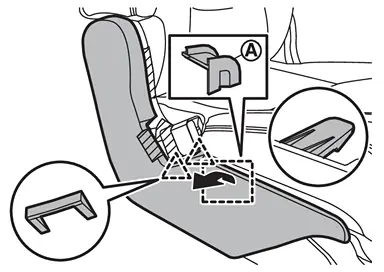
|
: Pawl |
Assembly
Assemble in the reverse order of disassembly.
INSIDE / OUTSIDE SEAT CUSHION FINISHER INNER
Disassembly
Remove seat cushion trim and pad. Refer to Disassembly and Assembly.
Disengage fixing clip, and then remove inside and outside seat cushion finisher inner.
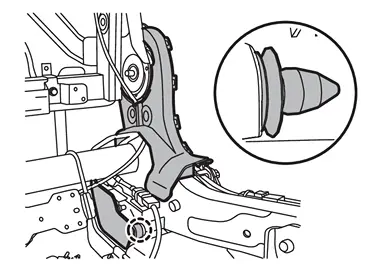
|
: Clip |
Assembly
Assemble in the reverse order of disassembly.
OUTSIDE SEAT CUSHION LOWER COVER OUTER
Disassembly
Remove outside striker cover.
Disengage fixing pawls and metal clips according to numerical order 1→3 indicated by arrows as shown in the figure, and then remove outside seat cushion lower cover outer.
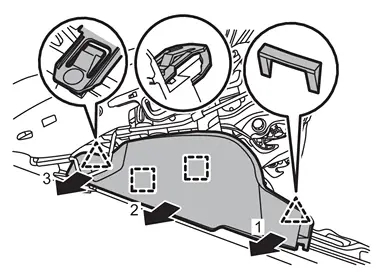
|
: Pawl |
 |
: Metal clip |
Assembly
Assemble in the reverse order of disassembly.
INSIDE SEAT CUSHION LOWER COVER OUTER
Disassembly
Remove inside striker cover.
Disengage fixing pawls and metal clips according to numerical order 1→3 indicated by arrows as shown in the figure, and then remove inside seat cushion lower cover outer.
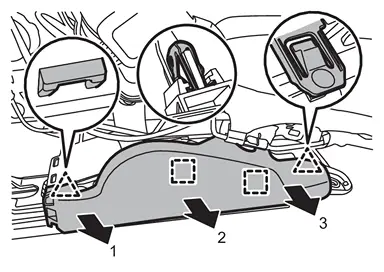
|
: Pawl |
|
: Metal clip |
Assembly
Assemble in the reverse order of disassembly.
OUTSIDE SEAT CUSHION LOWER COVER INNER
Disassembly
Remove outside seat cushion lower cover outer.
Disengage harness fixing clip from outside seat cushion lower cover inner.
CAUTION:
Before performing removal operation, check the installation position of harness fixing clip.
Disengage fixing metal clips, and then remove outside seat cushion lower cover inner.
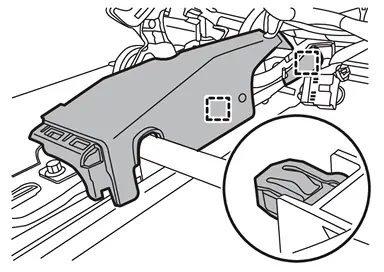
|
: Metal clip |
Assembly
Assemble in the reverse order of disassembly.
INSIDE SEAT CUSHION LOWER COVER INNER
Disassembly
Remove inside seat cushion lower cover outer.
Disengage harness fixing clip from inside seat cushion lower cover inner.
CAUTION:
Before performing removal operation, check the installation position of harness fixing clip.
Disengage fixing metal clips, and then remove inside seat cushion lower cover inner.
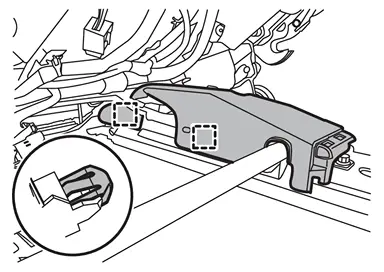
|
: Metal clip |
Assembly
Assemble in the reverse order of disassembly.
INSIDE / OUTSIDE SLIDE FINISHER
Disassembly
Remove fixing clips using a remover tool (A).
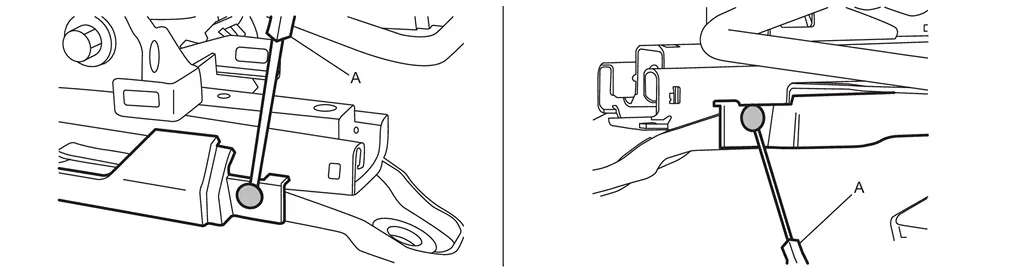
Disengage fixing portion using a remover tool (A) according to numerical order 1→2 indicated by arrows as shown in the figure, and then remove inside and outside slide finisher.
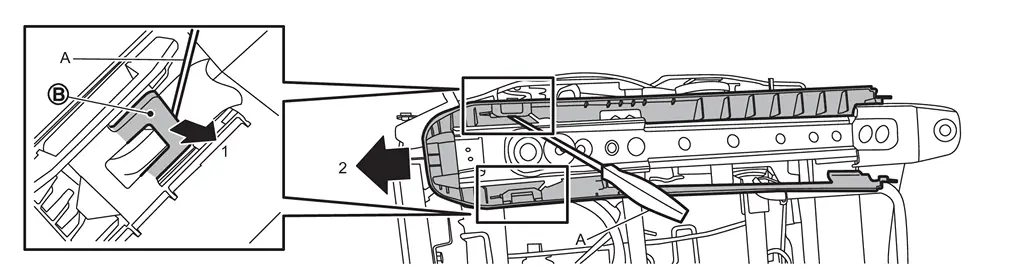
Assembly
Assemble in the reverse order of disassembly.
INSIDE / OUTSIDE STRIKER COVER
Disassembly
Disengage fixing pawls according to numerical order 1→3 indicated by arrows as shown in the figure, and then remove inside and outside striker cover.
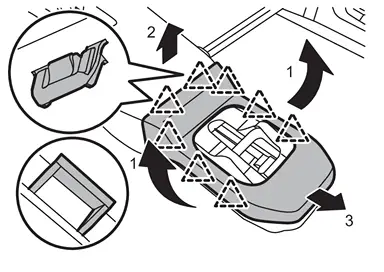
|
: Pawl |
Assembly
Assemble in the reverse order of disassembly.
Other materials
Steering Column
Exploded View
WITHOUT ELECTRIC MOTOR
Steering column assembly
Upper joint
: N·m (kg-m, ft-lb)
WITH ELECTRIC MOTOR
Steering column assembly
Upper joint
: N·m (kg-m, ft-lb)
Removal and Installation
REMOVALCAUTION:
Never give axial impact to steeri ...
Second Seat (bench Seat)
Exploded View
REMOVAL
Outer headrest
Second seat assembly
(RH seat)
Outside seat leg cover (RH seat)
Inside seat leg cover (RH seat)
Inside seat leg cover (LH seat)
Outside seat leg cover (LH seat)
Second seat assembly
(LH seat)
Center rail finisher
Center headrest
: P ...
Head up Display Symptoms
Symptom Table
Symptom Reference
Head Up Display screen is not displayed.
Refer to Diagnosis Procedure.
Head Up Display brightness is not changed.
Refer to Diagnosis Procedure.
Head Up Display screen is not displayed in the correct position.
Refer to Diagnosis Procedure.
...