Exploded View
REMOVAL
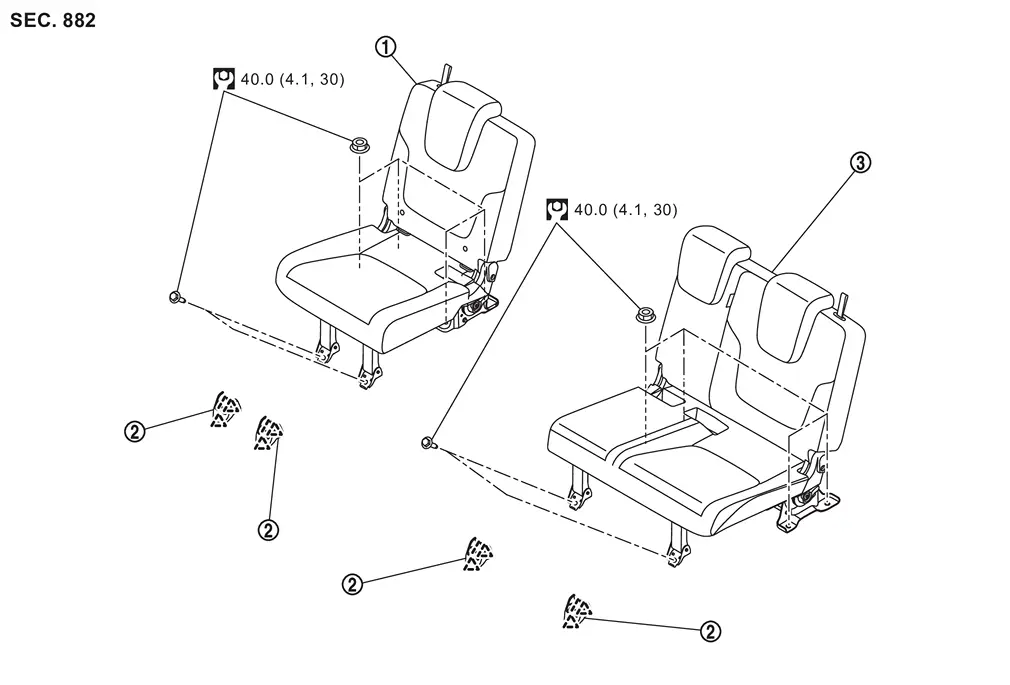
 |
Third seat assembly (RH seat) |  |
Seat leg cover |  |
Third seat assembly (LH seat) |
 |
: Pawl | ||||
 |
: N·m (kg-m, ft-lb) | ||||
DISASSEMBLY
Manual Seat
LH SEAT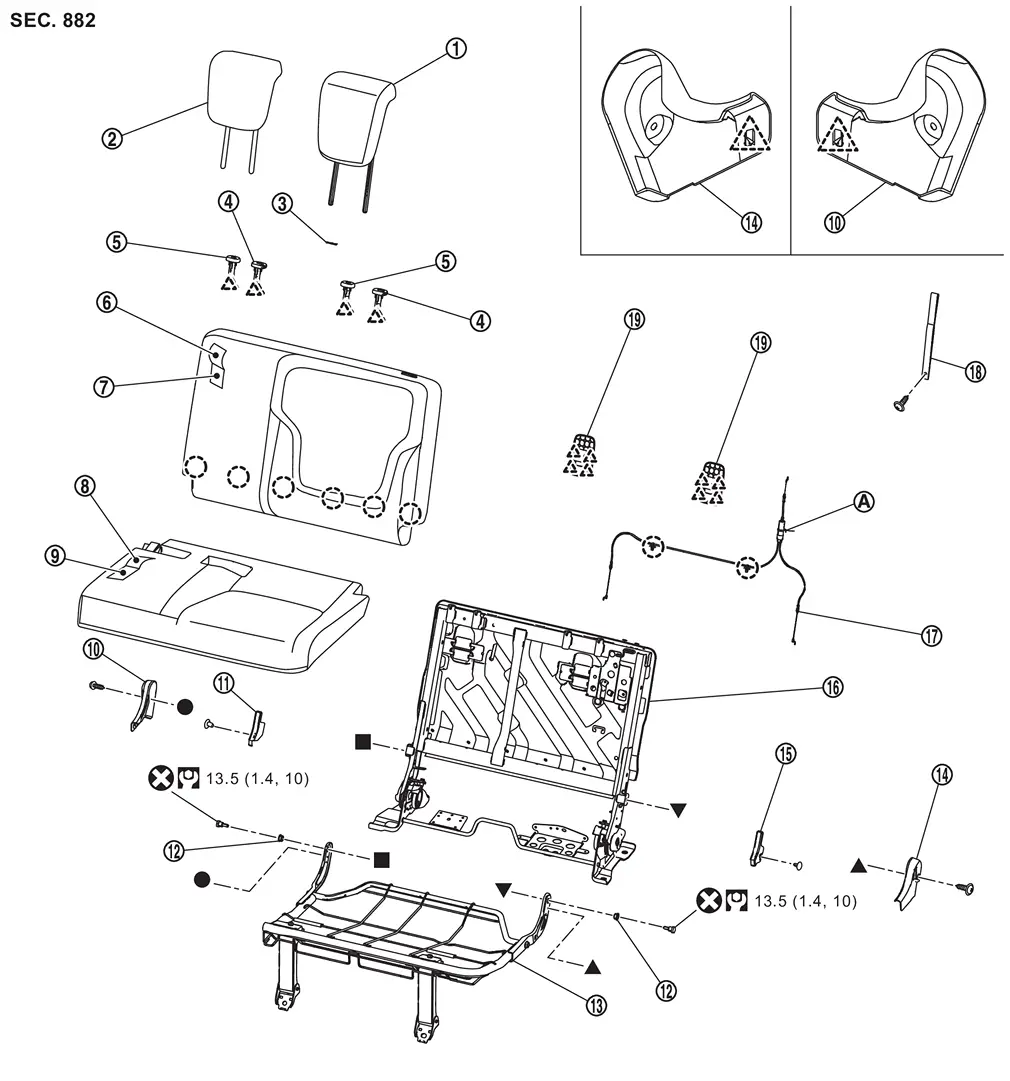
|
Outer headrest | |
Center headrest | |
Snap pin |
 |
Headrest holder (lock) |  |
Headrest holder (free) |  |
Seatback trim |
 |
Seatback pad |  |
Seat cushion trim |  |
Seat cushion pad |
 |
Hinge cover RH |  |
Arm cover RH |  |
Bush |
 |
Seat cushion frame assembly |  |
Hinge cover LH |  |
Arm cover LH |
 |
Seatback frame assembly |  |
Reclining cable |  |
Reclining strap |
 |
Tether anchor finisher | ||||
 |
Cable tie | ||||
 |
: Clip | ||||
|
: Pawl | ||||
 |
: Always replace after every disassembly. | ||||
|
: N·m (kg-m, ft-lb) | ||||
 , , , ,  , ,  : Indicates that the part is connected at points with same symbol in actual vehicle. : Indicates that the part is connected at points with same symbol in actual vehicle. |
|||||
RH SEAT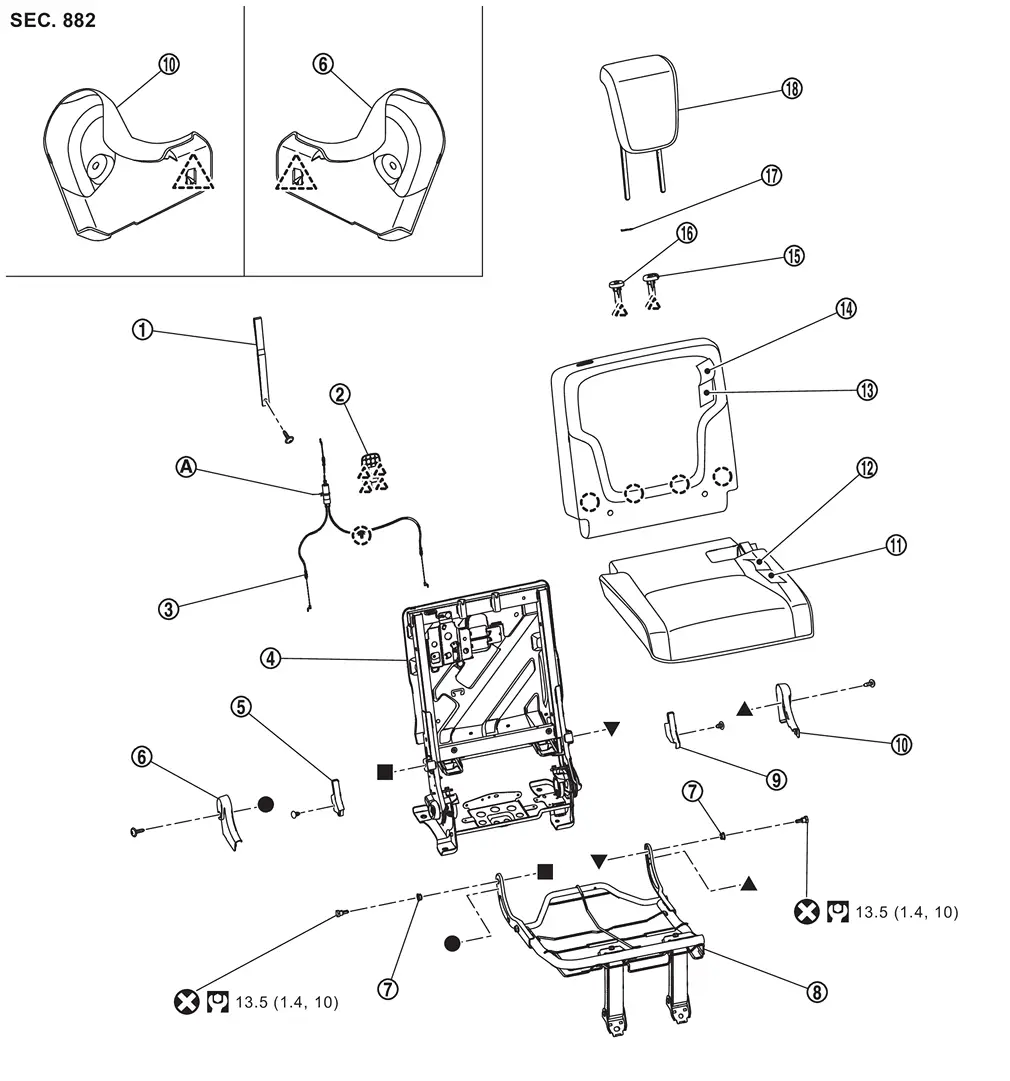
|
Reclining strap | |
Tether anchor finisher | |
Reclining cable |
|
Seatback frame assembly | |
Arm cover RH | |
Hinge cover RH |
|
Bush | |
Seat cushion frame assembly | |
Arm cover LH |
|
Hinge cover LH | |
Seat cushion pad | |
Seat cushion trim |
|
Seatback pad | |
Seatback trim | |
Headrest holder (lock) |
|
Headrest holder (free) | |
Snap pin | |
Outer headrest |
|
: Clip | ||||
|
: Pawl | ||||
|
: Always replace after every disassembly. | ||||
|
: N·m (kg-m, ft-lb) | ||||
| , , , : Indicates that the part is connected at points with same symbol in actual vehicle. |
|||||
Power Seat
LH SEAT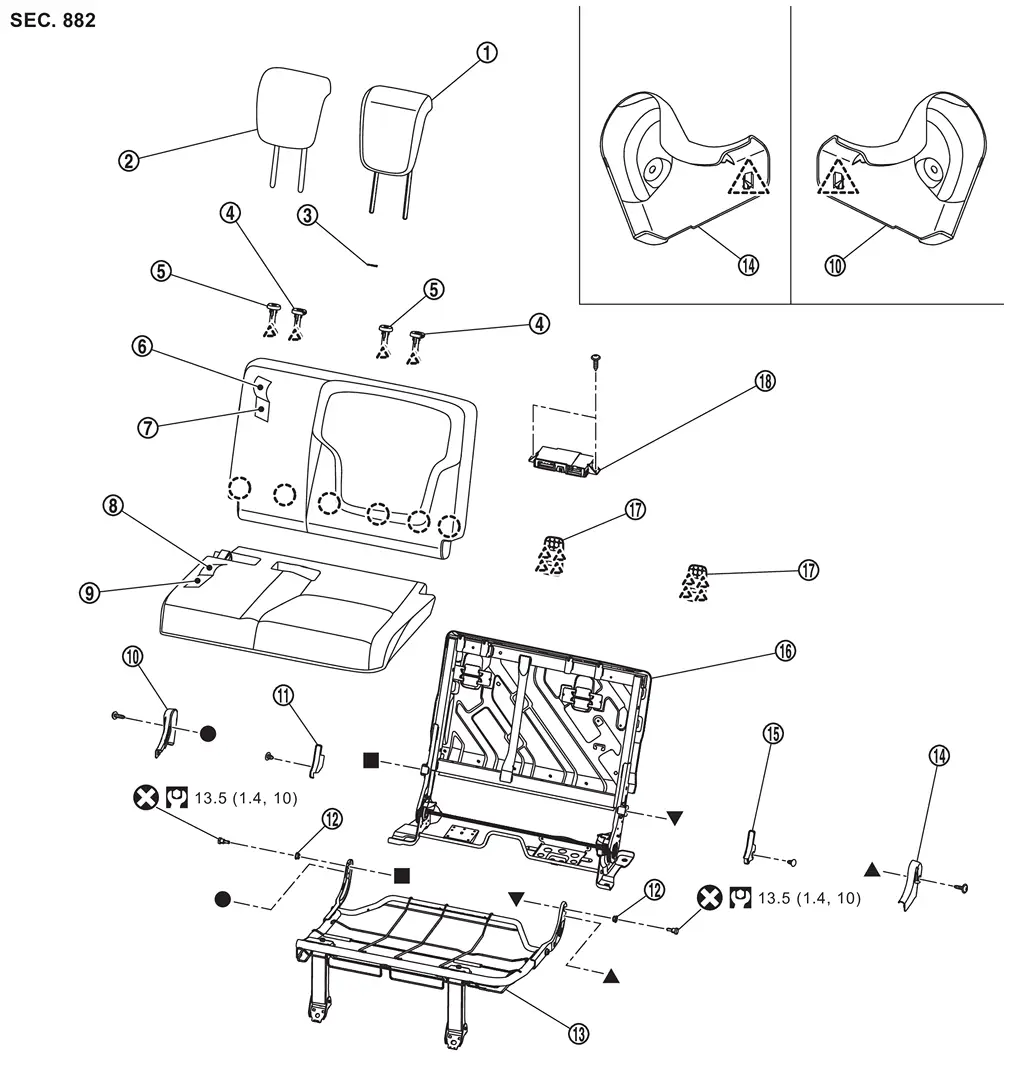
|
Outer headrest | |
Center headrest | |
Snap pin |
|
Headrest holder (lock) | |
Headrest holder (free) | |
Seatback trim |
|
Seatback pad | |
Seat cushion trim | |
Seat cushion pad |
|
Hinge cover RH | |
Arm cover RH | |
Bush |
|
Seat cushion frame assembly | |
Hinge cover LH | |
Arm cover LH |
|
Seatback frame assembly | |
Tether anchor finisher | |
Third seat control unit |
|
: Clip | ||||
|
: Pawl | ||||
|
: Always replace after every disassembly. | ||||
|
: N·m (kg-m, ft-lb) | ||||
| , , , : Indicates that the part is connected at points with same symbol in actual vehicle. |
|||||
RH SEAT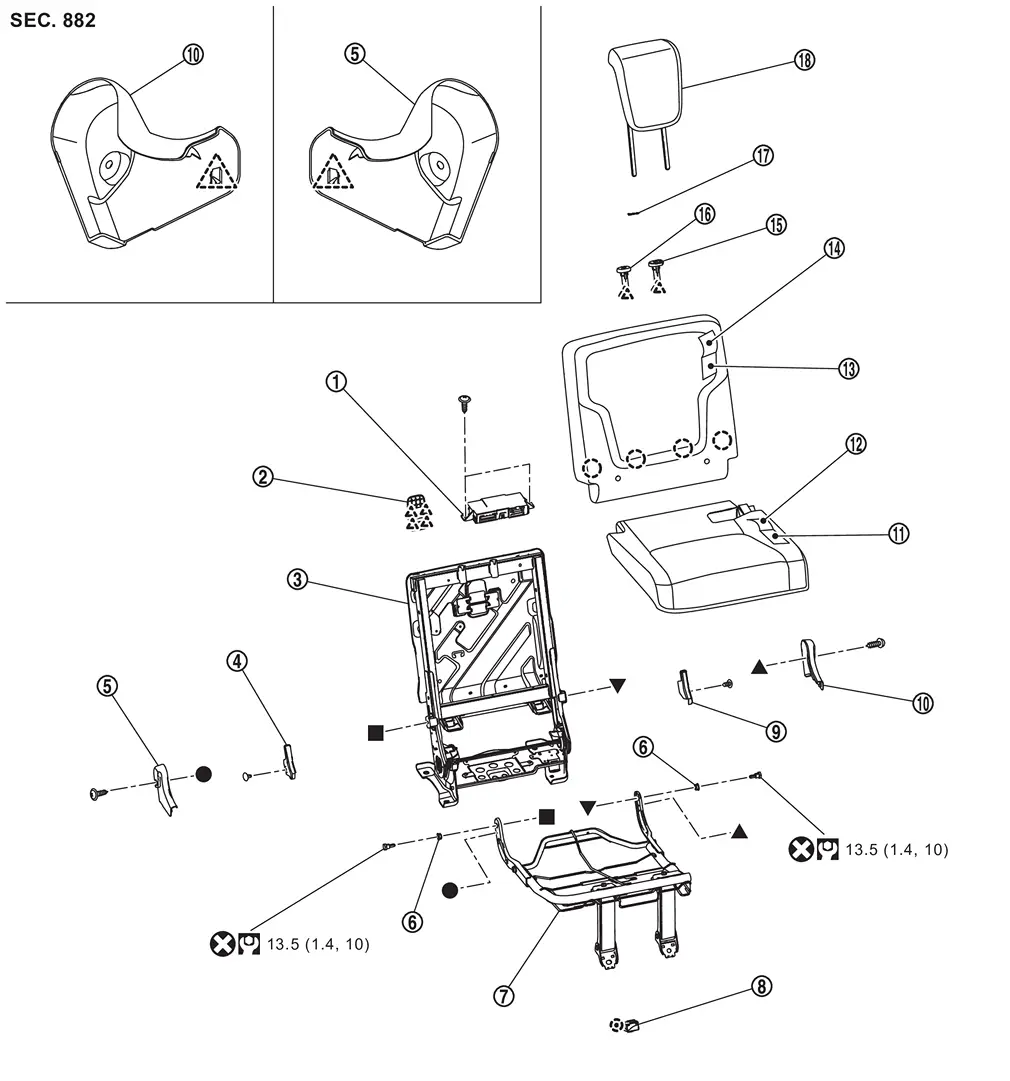
|
Third seat control unit | |
Tether anchor finisher | |
Seatback frame assembly |
|
Arm cover RH | |
Hinge cover RH | |
Bush |
|
Seat cushion frame assembly | |
Seat buzzer | |
Arm cover LH |
|
Hinge cover LH | |
Seat cushion pad | |
Seat cushion trim |
|
Seatback pad | |
Seatback trim | |
Headrest holder (lock) |
|
Headrest holder (free) | |
Snap pin | |
Outer headrest |
|
: Clip | ||||
|
: Pawl | ||||
|
: Always replace after every disassembly. | ||||
|
: N·m (kg-m, ft-lb) | ||||
| , , , : Indicates that the part is connected at points with same symbol in actual vehicle. |
|||||
Removal and Installation
CAUTION:
-
When removing and installing, use shop cloths to protect parts and vehicle from damage.
-
Always work with 2 workers, because it is heavy weight.
REMOVAL
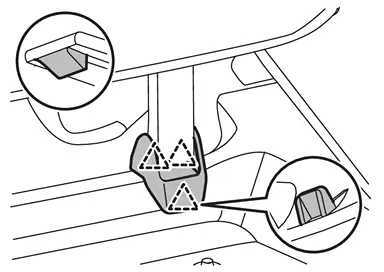
Disengage fixing pawls, and then remove seat leg covers.
|
: Pawl |
Remove front side mounting bolts of third seat assembly.
Remove luggage floor bracket. Refer to Removal and Installation.
Remove third seat belt buckle. Refer to Removal and Installation.
Remove rear side mounting nuts of third seat assembly.
Disconnect harness connectors.
CAUTION:
Before performing disconnect operation, check the installation position of harness connectors.
Remove third seat assembly from vehicle.
INSTALLATION
Note the following items, and then install in the reverse order of removal.
CAUTION:
-
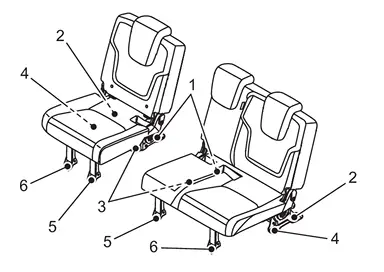
When installing, tighten third seat assembly, third seat belt buckle, and luggage floor bracket mounting bolts and nuts according to the numerical order 1→6 as shown in the figure.
-
Tighten seat mounting bolts and nuts to the specified torque. Refer to Exploded View.
Other materials
Unexpected Brake Pedal Reaction
Description
A malfunction of brake pedal feel (height or others) is detected when brake pedal is depressed.
Diagnosis Procedure
CHECK FRONT AXLE AND REAR AXLE
Disconnect 12V battery negative terminal.
Check that there is no excessive looseness in front and rear axle.
Front axle
2WD models: R ...
Additional Service When Replacing Ecm
Description
Performing the following procedure can automatically activate recommunication of ECM and Intelligent Key unit, but only when the ECM is replaced with a new one*. For details, refer to Work Procedure.*: New one means a virgin ECM that has never been energized on-board.(In this step, initi ...
The Ambient Temperature Display Is Incorrect
Diagnosis Procedure
The displayed ambient air temperature is higher than the actual temperature.
The displayed ambient air temperature is lower than the actual temperature.
NOTE:
Check that the symptom is not applicable to the normal operating condition before starting diagnosis. Refer to Desc ...