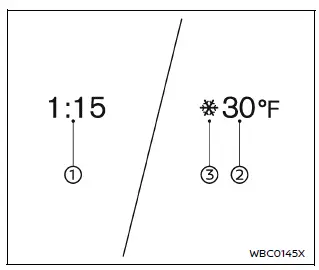
In the Nissan Armada, both the clock 1 and the outside air temperature 2 are conveniently displayed at the top section of the vehicle information display, allowing the driver to quickly access essential information while driving.
Clock
The clock in the Nissan Armada can be adjusted through the vehicle settings menu or by referring to the dedicated "Clock" section in the system settings or the NissanConnect Owner’s Manual.
Accurate time display in the Nissan Armada ensures better trip planning and synchronization with navigation and infotainment functions.
Outside air temperature (ºF or ºC)
The Nissan Armada displays the outside air temperature in either ºF or ºC, depending on user preference, within a measurement range of −40 to 140ºF (−40 to 60ºC).
This system also includes a low temperature alert feature. When the outside temperature drops below 27ºF (−3ºC), a warning indicator appears in the Nissan Armada to notify the driver of potential icy road conditions.
The temperature sensor 3 in the Nissan Armada is positioned in front of the radiator, where it continuously monitors ambient conditions.
However, readings may be influenced by external factors such as engine heat, road surface temperature, airflow direction, or prolonged idling, which can cause slight variations.
As a result, the temperature displayed in the Nissan Armada may differ from readings shown on road signs, billboards, or other external sources.
For optimal awareness, drivers of the Nissan Armada should consider these variations and always adapt driving behavior to real road conditions, especially in cold weather.
Other materials
Precautions
Precaution for Supplemental Restraint System (SRS) "AIR BAG" and "SEAT BELT PRE-TENSIONER"
The Supplemental Restraint System such as “AIR BAG� and “SEAT BELT PRE-TENSIONER�, used along with a front seat belt, helps to reduce the risk or severity of injury to the driver and front passenger fo ...
Headlining
Exploded View
Without Moonroof Models
Roof rear garnish
Room lamp bracket
Headlining assembly
Third assist grip RH
Personal lamp bracket
Personal lamp
Second assist grip RH
Vanity mirror lamp bracket
Front assist grip RH
Vanity mirror lamp
Map lamp bracket
Sun v ...
Center Pillar Lower Garnish
Removal and Installation
CAUTION:
Never damage the body panel.REMOVALRemove front kicking plate. Refer to Removal and Installation.
Remove rear kicking plate. Refer to Removal and Installation.
Disengage center pillar lower escutcheon fixing pawls, and then remove center pillar lower escutcheon.
...