Removal and Installation
CAUTION:
Never damage the body panel.
REMOVAL
Remove front kicking plate. Refer to Removal and Installation.
Remove rear kicking plate. Refer to Removal and Installation.
Disengage center pillar lower escutcheon fixing pawls, and then remove center pillar lower escutcheon.
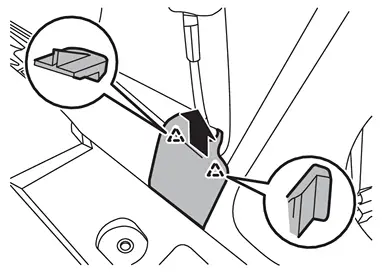
 |
: Pawl |
Disengage center pillar lower garnish upper side fixing pawls according to numerical order 1→2 indicated by arrows as shown in the figure.
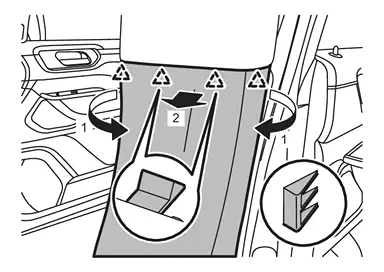
|
: Pawl |
Disengage center pillar lower garnish fixing clips, and then remove center pillar lower garnish.
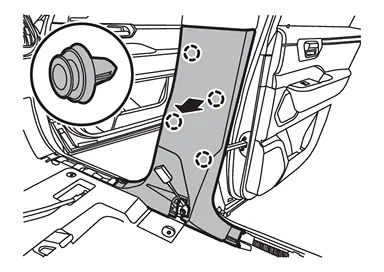
 |
: Clip |
INSTALLATION
Note the following items, and then install in the reverse order of removal.
CAUTION:
-
Visually check clips for deformation and damage during installation. Replace with new ones if necessary.
-
Check in advance that pawls and clips are accurately aligned with the portions on center pillar upper garnish and body panel, and then install by pressing in.
-
After installation, check that the lip of body side welt covers. Refer to Inspection.
Other materials
Hazard warning flasher switch
Press the hazard warning flasher switch in the Nissan Armada to alert other drivers
when your vehicle must stop or is parked under emergency conditions. Once activated,
all turn signal lights will flash simultaneously to increase visibility.
WARNING
In an emergency, always move the Niss ...
Door Motor
Exploded View
FRONT
Front heater & cooling unit assembly
Front air mix door motor (driver side)
Front mode door motor
Front blower unit assembly
Intake door motor
Front air mix door motor (passenger side)
: vehicle front
REAR
Rear A/C unit assembly
Rear mode door motor ...
Fender Protector
Exploded View
Off Road Models
Fender protector
Spring nut
Fender clip
Grommet
N·m (kg-m, in-lb)
City Models
Fender protector
Spring nut
Fender clip
Grommet
N·m (kg-m, in-lb)
...