Exploded View
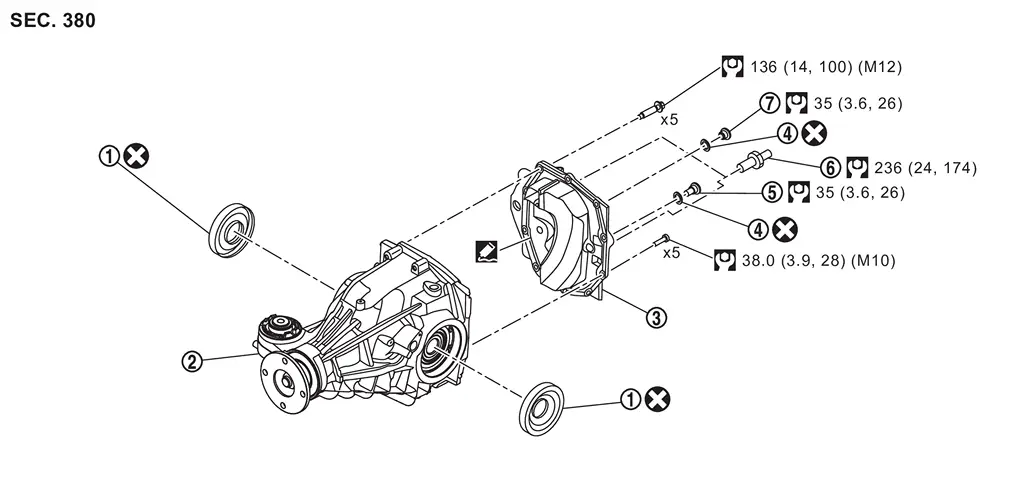
 |
Side oil seal |  |
Rear final drive assembly |  |
Rear cover |
 |
Gasket |  |
Drain plug |  |
Stud bolt |
 |
Filler plug | ||||
 : N·m (kg-m, ft-lb) : N·m (kg-m, ft-lb) |
|||||
 : Always replace after every disassembly. : Always replace after every disassembly. |
|||||
 : Apply Genuine Liquid Gasket, Three Bond 1217 or equivalent. Refer to Recommended Chemical Products and Sealants. : Apply Genuine Liquid Gasket, Three Bond 1217 or equivalent. Refer to Recommended Chemical Products and Sealants. |
|||||
Disassembly and Assembly
DISASSEMBLY
Remove drain plug and gasket from rear cover and drain gear oil.
Remove filler plug and gasket from rear cover.
Remove the side oil seals. Refer to Removal and Installation.
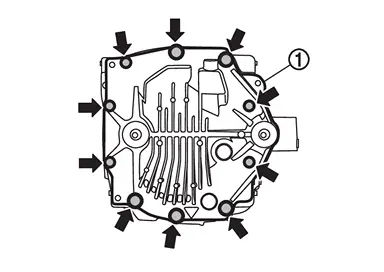
Remove rear cover mounting bolts ( ) and remove the rear cover .
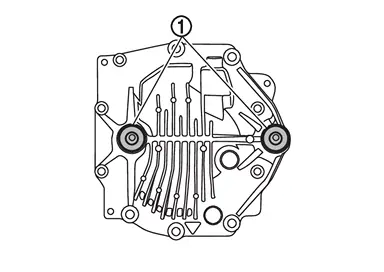
Remove stud bolt from rear cover.
 NOTE:
NOTE:
It is not necessary to remove stud bolt except when it is replaced.
ASSEMBLY
Install stud bolt to rear cover.
-
For tightening torque, refer to Exploded View.
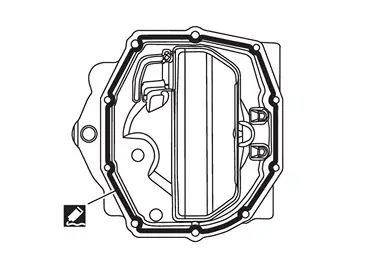
Apply liquid gasket to mating surface of rear cover.
-
For applying liquid gasket, refer to Exploded View.
CAUTION:
-
Remove old gasket adhering to the mounting surfaces. Also remove any moisture, oil, or foreign material adhering to the mounting surfaces.
-
The width of sealant bead is approximately 3 mm (0.12 in). Apply sealant evenly.
Install rear cover, and tighten rear cover mounting bolts to the specified torque.
-
For tightening torque, refer to Exploded View.
CAUTION:
-
Install the mounting bolts of rear cover according to the following standards.
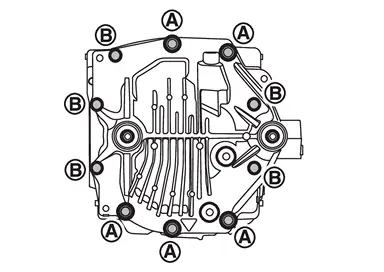
| Bolt symbol |  |  |
|---|---|---|
| Number of bolt | 5 | 5 |
| Bolt size | M12 | M10 |
Install the side oil seals. Refer to Removal and Installation.
Install drain plug, as per the following procedure.Install gasket to drain plug, and then install them to rear cover.
CAUTION:
Never reuse gasket.
Tighten drain plug to the specified torque.-
For tightening torque, refer to Exploded View.
Install filler plug, as per the following procedure.Install gasket to filler plug, and then install them to rear cover.
CAUTION:
Never reuse gasket.
Tighten filler plug to the specified torque.-
For tightening torque, refer to Exploded View.
CAUTION:
Fill with gear oil before tightening filler plug to the specified torque.
Other materials
Heated seats
Basic information
WARNING
In the Nissan Armada, avoid using seat heaters if occupants are unable to
sense temperature changes or pain. Improper use may result in overheating and serious
injury.
CAUTION
Do not operate the heated seats in the Nissan Armada for extended periods
when not i ...
Motion-activated liftgate
Example
Example
Basic information
The Nissan Armada features a convenient motion-activated liftgate system that
allows hands-free operation using a simple foot gesture beneath the rear bumper.
The kick motion sensor a is positioned on the left side under the rear bumper.
When you per ...
Diagnosis and Repair Work Flow
Work Flow
OVERALL SEQUENCEDETAILED FLOWGET INFORMATION FOR SYMPTOM
Get detailed information from the customer about the symptom (the condition and the environment when the incident/malfunction occurs).
Check operation condition of the function that is malfunctioning.
>>
GO TO 2.
CHECK ...