Example
Example
Basic information
The Nissan Armada features a convenient motion-activated liftgate system that allows hands-free operation using a simple foot gesture beneath the rear bumper.
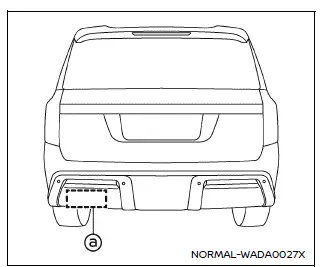
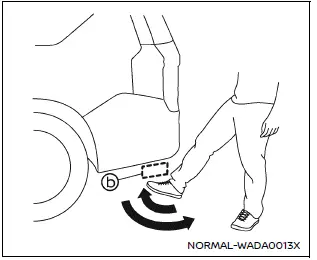
The kick motion sensor a is positioned on the left side under the rear bumper. When you perform a quick forward-and-back kicking motion within the designated detection area b while carrying the Nissan Armada Intelligent Key, the liftgate will automatically open or close.
This advanced feature enhances everyday usability of the Nissan Armada, especially when your hands are occupied.
Proper operation technique
- Stand directly behind the Nissan Armada and perform a swift forward kicking motion.
- Move your foot straight under the left side of the rear bumper and immediately return it to the ground in one smooth motion.
- Avoid holding your foot under the bumper or sweeping it sideways.
- The motion should be quick, controlled, and consistent.
- After performing the gesture, step back to allow the Nissan Armada liftgate to operate safely.
- Three audible beeps will sound, and the liftgate will begin moving within approximately 2 seconds.
WARNING
To prevent unintended activation of the Nissan Armada liftgate, keep the Intelligent Key outside the operating range (approximately 7 ft / 2 m) or inside the vehicle when washing, servicing, or working near the rear area.
NOTE:
- The Nissan Armada kick sensor may not function correctly in environments with strong radio interference, such as near broadcasting towers, power stations, or similar sources.
- Operation may also be affected when the Nissan Armada is parked near electronic systems such as parking meters.
- The liftgate may not respond if your foot remains within the detection area instead of performing a quick motion.
CAUTION
- When the Nissan Armada Intelligent Key is within range, another person without the key may still activate the liftgate using the kick motion.
- Avoid performing the kick motion near hot exhaust components to prevent burns.
- Do not attempt the motion on unstable surfaces such as slopes, mud, or uneven ground.
Power open or close function
The Nissan Armada liftgate will fully open or close automatically when activated by the motion sensor.
1. Ensure you are carrying the Nissan Armada Intelligent Key.
2. Perform a quick kick motion under the rear bumper within the sensor range.
3. The Nissan Armada liftgate will automatically open or close.
Stop and reverse function
If a kick motion is detected during liftgate operation, the Nissan Armada liftgate will immediately stop.
Performing another kick motion will cause the liftgate to reverse direction. This function operates only when the Intelligent Key is detected.
Other materials
Rear Door Weather-Strip
Removal and Installation
REMOVALApply protective tape (A) to rear door panel around rear door weather-strip fixing clips for preventing damage.
Disengage fixing clips on the reverse side of rear door weather-strip using a remover tool (A).
: Clip
CAUTION:
Never damage rear door panel.
...
Inside Mirror
Exploded View
MANUAL ANTI-DAZZLING
Inside mirror base
Inside mirror assembly
: N·m (kg-m, in-lb)
AUTO ANTI-DAZZLING
Inside mirror base
Inside mirror assembly
: N·m (kg-m, in-lb)
Removal and Installation
REMOVALCAUTION:
Never damage the windshield gl ...
Driver Monitor Camera
Exploded View
Driver monitor camera
Steering column cover upper
Removal and Installation
REMOVALRemove the steering column cover upper. Refer to Removal and Installation.
Disconnect the driver monitor camera connector.
Remove the driver monitor camera mounting screws , and remove the drive ...