Inspection
WARNING:
-
Jacking up or lift up the vehicle may the vehicle height to go down which cause a personal injury and/or damage to the air suspension component parts. Refer to Precaution for when Jacking and Lifting Up the vehicle with Electronic Air Suspension System.
OIL LEAKAGE
Make sure that oil is not leaking from final drive assembly or around it.
OIL LEVEL
Remove engine under cover. Refer to Exploded View.
Check oil level from filler plug mounting hole as shown in the figure after removing filler plug  and gasket from final drive assembly.
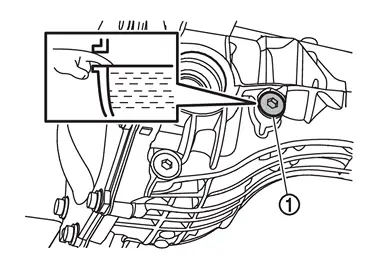
CAUTION:
The ignition switch OFF while checking oil level.
-
Oil level should be level with bottom of filler plug mounting hole. Add gear oil if necessary. Refer to Refilling.
Set a gasket on filler plug and install it on final drive assembly.
CAUTION:
Never reuse gasket.
Tighten filler plug to the specified torque. Refer to Exploded View.
Install engine under cover. Refer to Exploded View.
Draining
WARNING:
-
Jacking up or lift up the vehicle may the vehicle height to go down which cause a personal injury and/or damage to the air suspension component parts. Refer to Precaution for when Jacking and Lifting Up the vehicle with Electronic Air Suspension System.
The ignition switch OFF.
Remove engine under cover. Refer to Exploded View.
Remove drain plug and gasket.
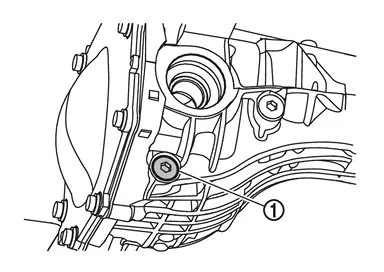
Drain gear oil.
Set a gasket on drain plug and install it to final drive assembly.
CAUTION:
Never reuse gasket.
Tighten drain plug to the specified torque. Refer to Exploded View.
Install engine under cover. Refer to Exploded View.
Refilling
WARNING:
-
Jacking up or lift up the vehicle may the vehicle height to go down which cause a personal injury and/or damage to the air suspension component parts. Refer to Precaution for when Jacking and Lifting Up the vehicle with Electronic Air Suspension System.
Remove engine under cover. Refer to Exploded View.
Remove filler plug and gasket. Then fill with new gear oil until oil level reaches the specified level near filler plug mounting hole.
| Recommended oil and capacity: | Refer to Fluids and Lubricants. |
Set a gasket on filler plug, and install it to final drive assembly.
CAUTION:
Never reuse gasket.
Tighten filler plug to the specified torque. Refer to Exploded View.
Install engine under cover. Refer to Exploded View.
Other materials
Inside mirror
Basic information
In the Nissan Armada, adjust the inside mirror by carefully setting both its
height and angle to achieve optimal rearward visibility and driving comfort.
Manual anti-glare type (if so equipped)
The Nissan Armada manual anti-glare inside mirror can be adjusted to reduce ...
Hazard warning flasher switch
Press the hazard warning flasher switch in the Nissan Armada to alert other drivers
when your vehicle must stop or is parked under emergency conditions. Once activated,
all turn signal lights will flash simultaneously to increase visibility.
WARNING
In an emergency, always move the Niss ...
Air Cleaner Filter
Exploded View
* When removing the crankcase ventilation valve* exchange as a set.
Removal & Installation
REMOVALNOTE:
The mass airflow sensor can be removed while still installed on the air cleaner cover.Pinch the clip on the air cleaner cover to release the lock, and remove the air cleaner co ...