Inspection
WARNING:
-
Jacking up or lift up the vehicle may the vehicle height to go down which cause a personal injury and/or damage to the air suspension component parts. Refer to Precaution for when Jacking and Lifting Up the vehicle with Electronic Air Suspension System.
OIL LEAKAGE
Make sure that oil is not leaking from final drive assembly or around it.
OIL LEVEL
Remove engine under cover. Refer to Exploded View.
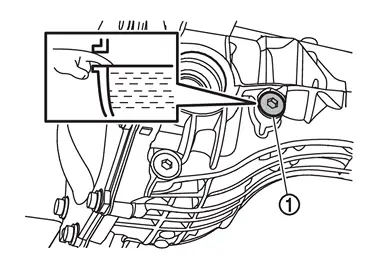
Check oil level from filler plug mounting hole as shown in the figure after removing filler plug  and gasket from final drive assembly.
CAUTION:
The ignition switch OFF while checking oil level.
-
Oil level should be level with bottom of filler plug mounting hole. Add gear oil if necessary. Refer to Refilling.
Set a gasket on filler plug and install it on final drive assembly.
CAUTION:
Never reuse gasket.
Tighten filler plug to the specified torque. Refer to Exploded View.
Install engine under cover. Refer to Exploded View.
Draining
WARNING:
-
Jacking up or lift up the vehicle may the vehicle height to go down which cause a personal injury and/or damage to the air suspension component parts. Refer to Precaution for when Jacking and Lifting Up the vehicle with Electronic Air Suspension System.
The ignition switch OFF.
Remove engine under cover. Refer to Exploded View.
Remove drain plug and gasket.
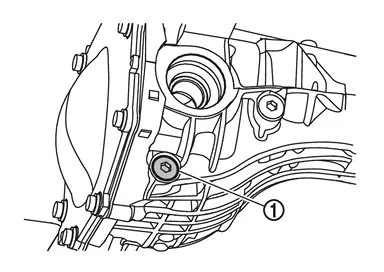
Drain gear oil.
Set a gasket on drain plug and install it to final drive assembly.
CAUTION:
Never reuse gasket.
Tighten drain plug to the specified torque. Refer to Exploded View.
Install engine under cover. Refer to Exploded View.
Refilling
WARNING:
-
Jacking up or lift up the vehicle may the vehicle height to go down which cause a personal injury and/or damage to the air suspension component parts. Refer to Precaution for when Jacking and Lifting Up the vehicle with Electronic Air Suspension System.
Remove engine under cover. Refer to Exploded View.
Remove filler plug and gasket. Then fill with new gear oil until oil level reaches the specified level near filler plug mounting hole.
| Recommended oil and capacity: | Refer to Fluids and Lubricants. |
Set a gasket on filler plug, and install it to final drive assembly.
CAUTION:
Never reuse gasket.
Tighten filler plug to the specified torque. Refer to Exploded View.
Install engine under cover. Refer to Exploded View.
Other materials
Low Tire Pressure Location Indicator Does Not Display
Description
When low tire pressure, low tire location indicator does not display though low tire pressure warning lamp turns ON.
Diagnosis Procedure
CHECK COMBINATION METER
Check combination meter. Refer to Work flow.
Is the inspection result normal?
YES>>
GO TO 2.
NO>>
Repair or repla ...
Second Seat (captain Seat)
Exploded View
REMOVAL
Headrest
Second seat assembly (RH seat)
Outside seat leg cover
Inside seat leg cover
Second seat assembly (LH seat)
: Pawl
: N·m (kg-m, ft-lb)
DISASSEMBLYLH Seat
Seatback lever unit cap
Seatback lever unit
Headrest holder (lock)
...
Roof Rail
Exploded View
Roof rail cover rear
Roof rail cover front
Roof rail
Roof rail bracket front
Roof rail bracket center
Roof rail bracket rear
: Rivet
: Clip
: Pawl
: Metal clip
: Always replace after every disassembly
Removal and Insta ...