Removal and Installation
REMOVAL
CAUTION:
Never excessively pull front door glass run.
Fully open front door glass.
Remove front door sash cover. Refer to Removal and Installation.
Remove front door sash inner cover. Refer to Removal and Installation.
Remove front door glass run according to numerical order 1→2 indicated by arrows as shown in the figure.
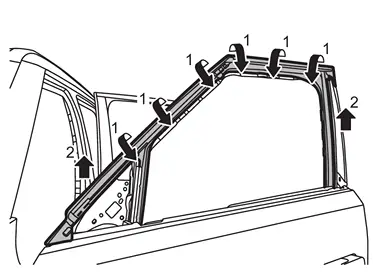
CAUTION:
Should be pulled out slowly to prevent damage front door glass run.
INSTALLATION
Note the following items, and then install in the reverse order of removal.
CAUTION:
- Make sure that front door glass run is engaged to front door lower sash and front door sash (door panel side).
-
After installing, perform the inspection and adjustment. Refer to Inspection and Adjustment.
Other materials
Precautions for Removing Battery Terminal
PRECAUTIONS FOR REMOVING BATTERY TERMINAL : Precautions
When disconnecting the 12V battery terminal, turn off the ACC power before disconnecting the 12V battery terminal, observing “How to disconnect 12V battery terminal� described below.
NOTE:
Some ECUs operate for a certain fixed time ev ...
Aeb Off Warning Lamp Is Blinking
Symptom Description
Without ProPILOT Assist 2.1The AEB OFF warning lamp is blinking. Refer to Diagnosis Procedure.NOTE:
When any of the following conditions, the AEB OFF warning lamp blinks:
The distance sensor area of the front of the vehicle is covered with dirt or is obstructed
The interior t ...
Sonar System Symptoms
Symptom Table
Symptom Possible cause Reference page
Malfunction is detected in only 1 sensor of display.
Sonar sensor circuit
Sonar sensor
Perform CONSULT self-diagnosis. Perform detected DTC self-diagnosis. Refer to DTC Index.
Front sonar sensors do not activate.
Front sensor po ...