The Nissan Armada liftgate height can be customized to suit specific environments, such as garages with limited clearance.
1. Open the Nissan Armada liftgate fully.
2. Manually adjust the liftgate to the desired height and hold it in position.
3. Press and hold the liftgate close and lock switch for approximately 3 seconds until two beeps are heard.
The Nissan Armada liftgate will now open to the programmed height. Repeat these steps to adjust the setting.
CAUTION
Do not set the Nissan Armada liftgate height below approximately one-third of its full range. If set lower, the system will automatically adjust it back to a safe minimum height.
Auto closure
When the Nissan Armada liftgate reaches the secondary latch position, the auto-closure system engages and securely pulls the liftgate into the fully closed position.
Avoid applying force during this process, as excessive pressure may damage the mechanism.
CAUTION
- The Nissan Armada liftgate will automatically close from the secondary
latch position.
Keep hands and fingers clear to avoid injury.
- Do not allow children to operate the Nissan Armada liftgate.
Liftgate release lever
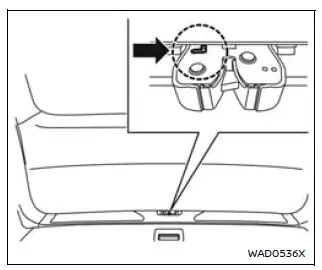
If the Nissan Armada liftgate cannot be opened due to a discharged battery, follow these emergency steps:
1. Fold down the third-row seats to access the cargo area.
2. Insert a suitable tool into the access opening and move the release lever to the left to unlatch the liftgate.
3. Lift the Nissan Armada liftgate manually to open it.
For proper repair and system inspection, it is recommended to contact an authorized Nissan dealer as soon as possible.
The Nissan Armada motion-activated and power liftgate systems provide enhanced convenience, safety, and flexibility, making everyday loading and unloading easier and more efficient.
Other materials
Air Cleaner and Air Duct
Exploded View
* When removing the crankcase ventilation valve exchange as a set.
Removal and Installation
WARNING:
Jacking up or lift up the vehicle may the vehicle height to go down which cause a personal injury and/or damage to the air suspension component parts. Refer to Precaution for when Jacki ...
Engine Lubrication System Tools and Preparation
Special Service Tools
The actual shapes of TechMate tools may differ from those of special service tools illustrated here.
Tool number
(TechMate No.)
Tool name Description
ST25051001
(NI-25695-1)
Oil pressure gauge
Measuring oil pressure
Maximum measuring range: 2,452 kPa (25 kg/cm2, 356 psi ...
Electric Intake Valve Timing Control Module
Exploded View
Bracket
Electric intake valve timing control module
: vehicle front
: N·m (kg-m, in-lb)
Removal & Installation
REMOVALRemove air cleaner body. Refer to Removal and Installation.
Remove harness clip to bracket.
Disconnect electric intake valve timing con ...