Exploded View
Refer to Exploded View.
Removal and Installation
CAUTION:
Always work with a helper.
REMOVAL
Tilt glass lid up.
Disengage side trim from glass lid.
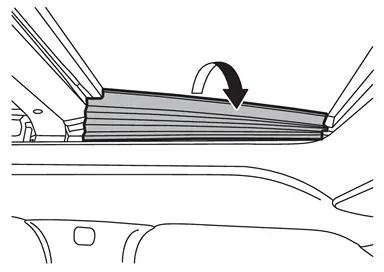
Remove glass lid fixing screws  .
.
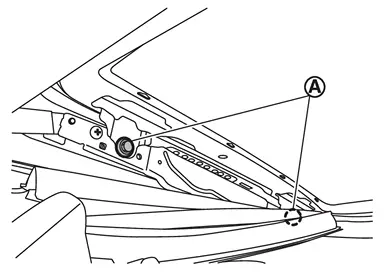
Remove glass lid from vehicle.
INSTALLATION
Note the following items, and then install in the reverse order of removal.
CAUTION:
-
After installing the glass lid, perform the leak test and check that there is no malfunction.
-
After installation, perform fitting adjustment. Refer to Adjustment.
 NOTE:
NOTE:
Before installation, tilt glass lid up so that secure work space.
Adjustment
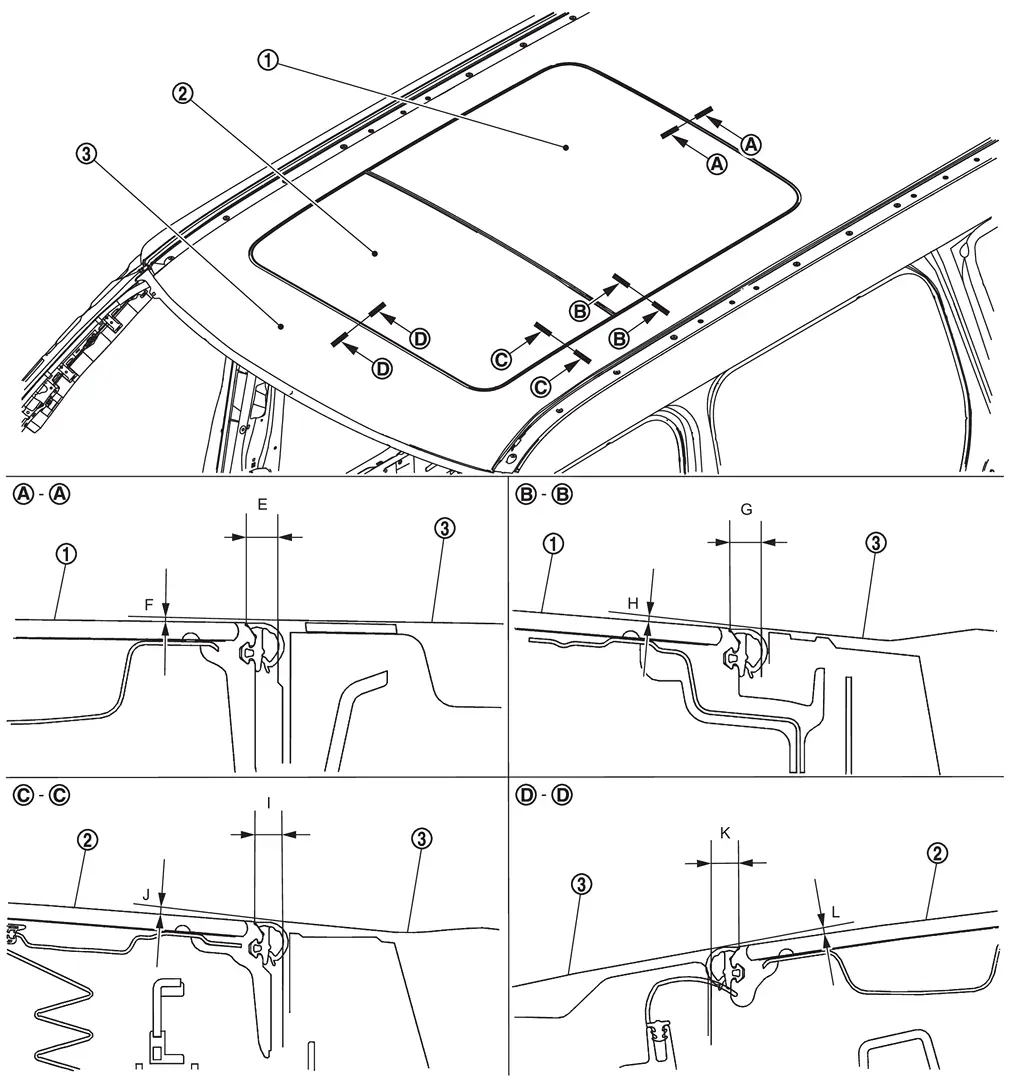
 |
Rear moonroof glass |  |
Glass lid |  |
Roof panel |
If the clearance and the surface height are out of specification, adjust them according to the procedures shown below.
NOTE:
Standard of surface height is given assuming that the glass upper side status is (+), and the glass lower side status is (−) relative to the roof panel.
Unit: mm [in]
| Portion | Standard | |||
|---|---|---|---|---|
| Roof panel – Rear moonroof glass | – |
E | Clearance |
6.4 – 8.0 [0.252 – 0.315] |
| F | Surface height |
(−2.4) – (+1.0) [(−0.094) – (+0.039)] |
||
 – – |
G | Clearance |
6.1 – 8.3 [0.240 – 0.327] |
|
| H | Surface height |
(−2.4) – (+1.0) [(−0.094) – (+0.039)] |
||
| Roof panel – Glass lid |  – – |
I | Clearance |
6.4 – 8.0 [0.252 – 0.315] |
| J | Surface height |
(−2.4) – (+1.0) [(−0.094) – (+0.039)] |
||
 – – |
K | Clearance |
6.4 – 8.0 [0.252 – 0.315] |
|
| L | Surface height |
(−2.4) – (+1.0) [(−0.094) – (+0.039)] |
||
Loosen glass lid fixing screws.
Adjust the clearance of glass lid and roof panel according to the fitting standard dimension.
To prevent glass lid from moving after adjustment, first tighten the fixing screw of front left, and then tighten the screw of rear right.
Tighten remaining fixing screws, being careful to prevent glass lid from moving.
Tilt glass lid up and down several times to check that it moves smoothly.
CAUTION:
After adjusting the moonroof unit assembly, perform additional service. Refer to Work Procedure.
Other materials
Back Door Trim
Exploded View
Back door panel
Back door upper garnish
Back door side garnish RH
Back door lower finisher
Back door pull handle
Back door finisher cap*1
Automatic back door switch finisher*2
Back door inner finisher
Back door side garnish LH
: Clip
: Pawl
: Metal ...
Third Seat Reclining Switch
Removal and Installation
REMOVALRemove seat switch escutcheon. Refer to Removal and Installation.
Disengage fixing pawls and then remove third seat reclining switch.
: Pawl
INSTALLATIONInstall in the reverse order of removal. ...
Diagnosis and Repair Work Flow
Work Flow (With EXP-800 NI or GR8-1200 NI)
CHARGING SYSTEM DIAGNOSIS WITH EXP-800 NI OR GR8-1200 NITo test the charging system, use the following special service tools:
EXP-800 NI Battery and electrical diagnostic analyzer
GR8-1200 NI Multitasking battery and electrical diagnostic station
NOTE:
...