Removal and Installation
CAUTION:
Never damage the body panel.
REMOVAL
Front Kicking Plate
Disengage front kicking plate fixing pawls according to numerical order 1→3 indicated by arrows as shown in the figure, and then remove front kicking plate.
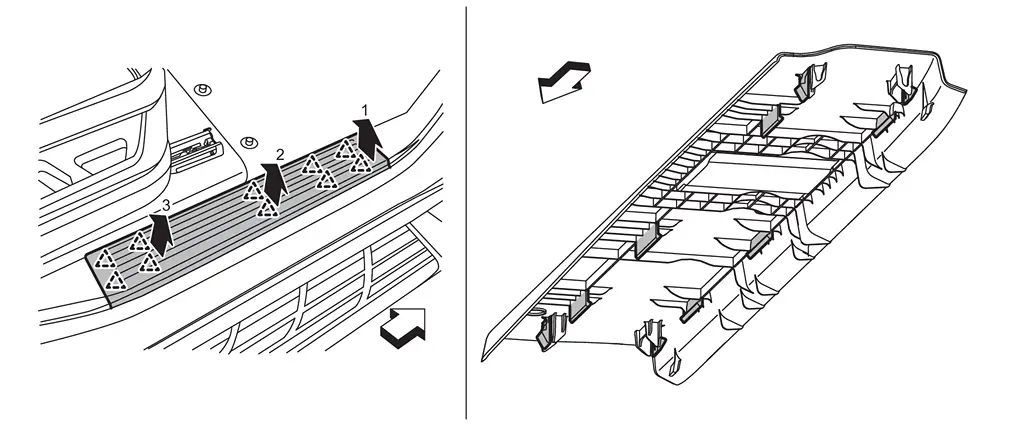
 |
: Pawl |
| : vehicle front |
Rear Kicking Plate
Disengage rear kicking plate fixing pawls according to numerical order 1→3 indicated by arrows as shown in the figure.
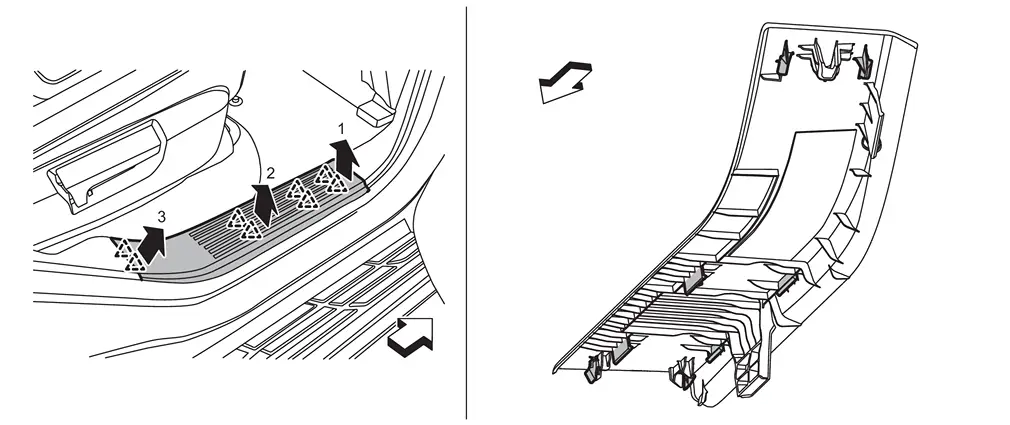
|
: Pawl |
| : vehicle front |
Disengage rear kicking plate from fixing part of trim metal clip, and then remove rear kicking plate.
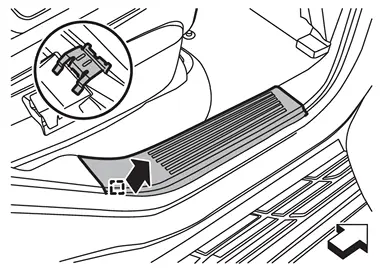
 |
: Metal clip |
| : vehicle front |
INSTALLATION
Note the following items, and then install in the reverse order of removal.
CAUTION:
-
Visually check metal clip for deformation and damage during installation. Replace with new ones if necessary.
-
Check in advance that pawls are accurately aligned with the portions on each finishers, and then install by pressing in.
-
After installation, check that the lip of body side welt covers. Refer to Inspection.
Other materials
Wheel Sensor
Front Wheel Sensor
Exploded View
Front LH wheel sensor
Bracket
Steering knuckle
: vehicle front
: N·m (kg-m, in-lb)
NOTE:
Front RH wheel sensor is symmetrically opposite of LH.
Removal and Installation
WARNING:
Jacking up or lift up the vehicle may the vehicle he ...
Performance Test
Inspection
INSPECTION PROCEDURE
Connect recovery/recycling/recharging equipment (for HFO-1234yf) or manifold gauge.
Start the engine, and set to the following condition.
Test condition Surrounding condition
Indoors or in the shade
(in a well-ventilated place)
vehicle condition
Door
Closed ...
Bcm
Removal and Installation
CAUTION:
When replacing the BCM, always replace it with a new one. The functions controlled by the BCM does not operate properly in case of reuse of the BCM from another vehicle.
Be sure to perform the following items must be performed when replacing BCM.
Writing vehic ...