
Nissan Armada 2025-2026 Service and Repair Manual: Removal and Installation
REMOVAL
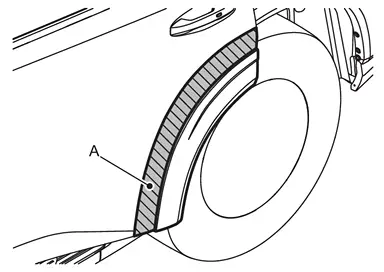
Apply protective tape (A) on the part to protect it from damage.
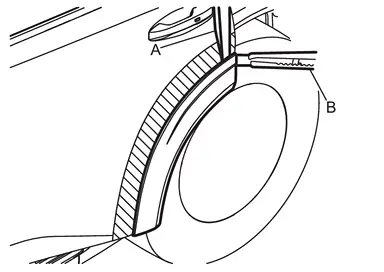
Insert a remover tool (A) between rear fillet molding front and rear door panel, cut double-sided tape using a cutter (B) while lifting rear fillet molding front.
Disengage fixing clips, and then remove rear fillet molding front indicated by arrows as shown in the figure.
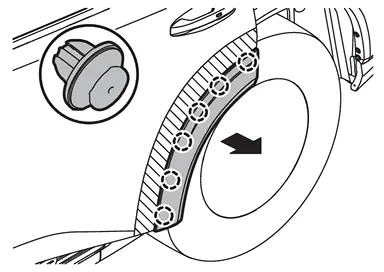
 | : Clip |
INSTALLATION
Note the following items, and then install in the reverse order of removal.
CAUTION:
Always replace double-sided tape with a new one, if rear fillet molding front is reused.
Remove double-sided tape remaining on rear door panel and back of rear fillet molding front with a double-sided tape remover, after removing rear fillet molding front.
Degrease rear fillet molding front door panel mounting surface of rear door panel.
Paint grain or dust on mounting surface of rear fillet molding front may spoil exterior appearance if it remains. Clean the mounting surface and check that no paint grain or dust remains, before starting the operation.
When installing rear fillet molding front, visually check the clips, then replace it with new parts if they are damaged.
When installing rear fillet molding front, check that clips are securely fitted in rear door panel holes, and then press it in.
Never wash the vehicle within 24 hours after installing so as to keep adhesive.


Other materials:
Work Flow
CUSTOMER INTERVIEW
Squeak – (Like tennis shoes on a clean floor)
Creak – (Like walking on an old wooden floor)
Rattle – (Like shaking a baby rattle)
Knock – (Like a knock on a door)
Tick – (Like a clock second hand)
action or road conditions.
Thump – (Heavy, muffled knock noise)
Buzz †...
Layout
Air suspension RH duct assembly Air tube (rear RH air spring) Rear RH air spring Rear RH shock absorber Air tube (front RH shock absorber) Front RH Shock absorber (With Built In Air Spring) Front LH Shock absorber (With Built In Air Spring) Air tube (front LH shock absorber) Protector Air ...
Removal and Installation
WARNING:
REMOVAL
The ignition switch OFF.
CAUTION:
Wait for 60 seconds after the ignition switch OFF.
Disconnect negative battery terminal. Refer to Removal and Installation
Disconnect the transfer control actuator connector .
Remove harness clip .
Remove transfer control actuator mounting bolt ...

0.0054