Disassembly and Assembly
CAUTION:
When disassemble, always use a remover tool that is made of plastic to prevent damage.
OUTSIDE SEAT CUSHION FINISHER OUTER
Disassembly
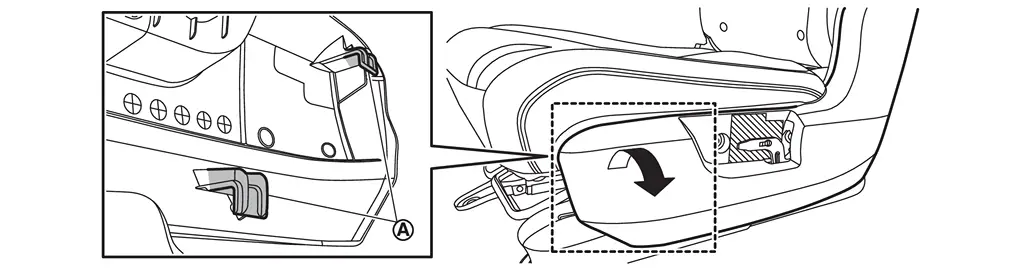
Disengage fixing pawls, and then remove reclining knob cap.
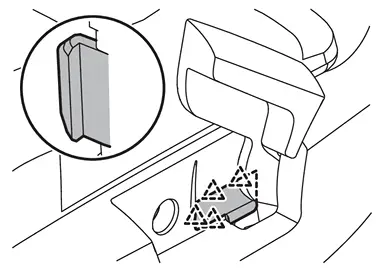
 |
: Pawl |
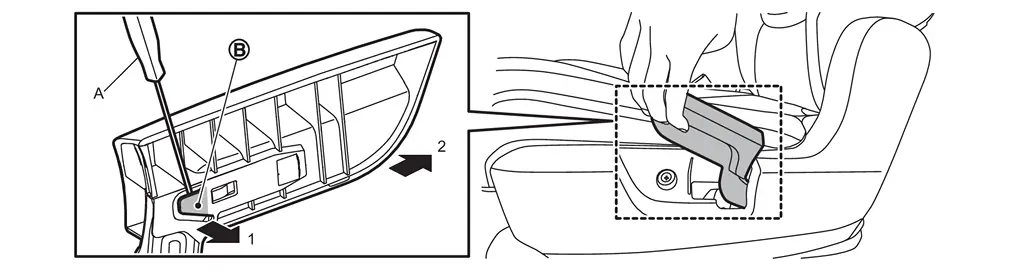
Disengage fixing portion  using a remover tool (A) according to numerical order 1→2 indicated by arrows as shown in the figure, and then remove reclining knob.
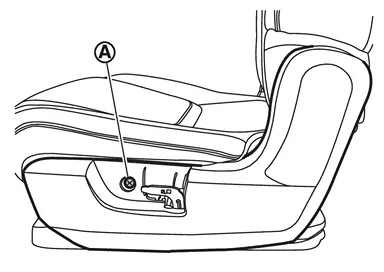
Remove outside seat cushion finisher outer.Remove outside seat cushion finisher outer fixing screw  .
.
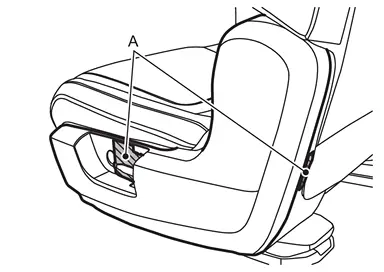
.
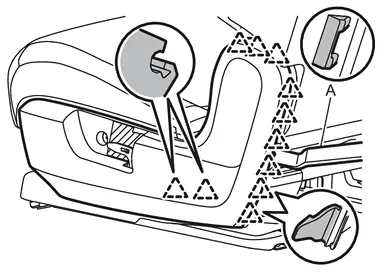
|
: Pawl |
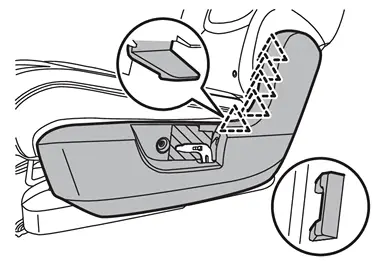
|
: Pawl |
Assembly
Assemble in the reverse order of disassembly.
INSIDE SEAT CUSHION FINISHER OUTER
Disassembly
Apply protective tapes (A) to prevent damage.
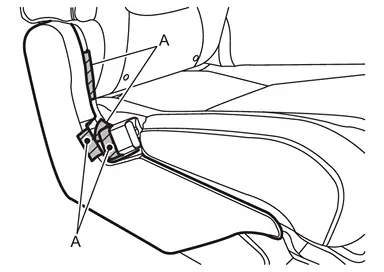
Disengage fixing portion and clip.
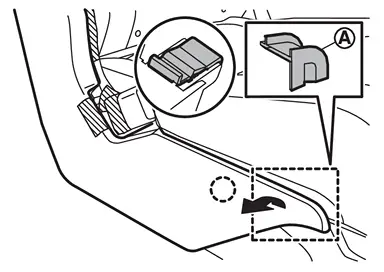
 |
: Clip |
Disengage fixing pawls using a remover tool (A).
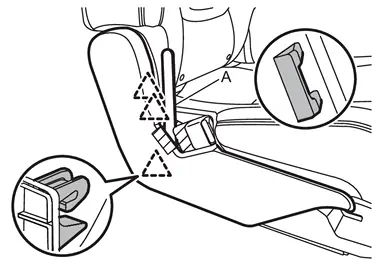
|
: Pawl |
Disengage fixing pawls using a remover tool (A).
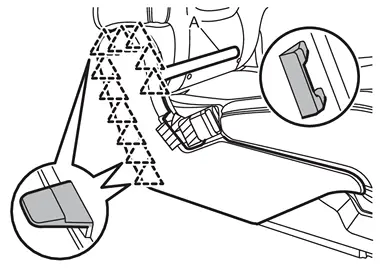
|
: Pawl |
Disengage fixing portion and pawls, and then remove inside seat cushion finisher outer.
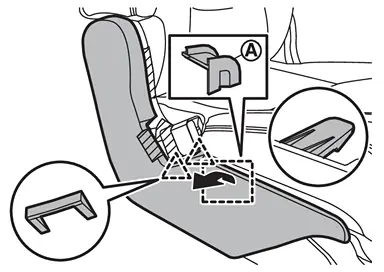
|
: Pawl |
Assembly
Assemble in the reverse order of disassembly.
INSIDE / OUTSIDE SEAT CUSHION FINISHER INNER
Disassembly
Remove seat cushion trim and pad. Refer to Disassembly and Assembly.
Disengage fixing clip, and then remove inside and outside seat cushion finisher inner.
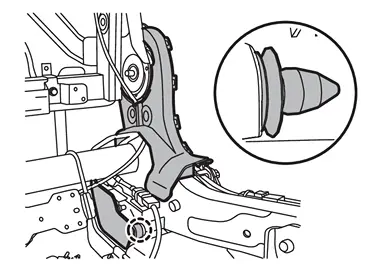
|
: Clip |
Assembly
Assemble in the reverse order of disassembly.
OUTSIDE SEAT CUSHION LOWER COVER OUTER
Disassembly
Remove outside striker cover.
Disengage fixing pawls and metal clips according to numerical order 1→3 indicated by arrows as shown in the figure, and then remove outside seat cushion lower cover outer.
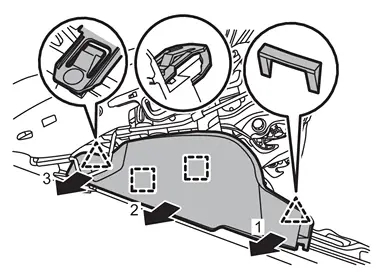
|
: Pawl |
 |
: Metal clip |
Assembly
Assemble in the reverse order of disassembly.
INSIDE SEAT CUSHION LOWER COVER OUTER
Disassembly
Remove inside striker cover.
Disengage fixing pawls and metal clips according to numerical order 1→3 indicated by arrows as shown in the figure, and then remove inside seat cushion lower cover outer.
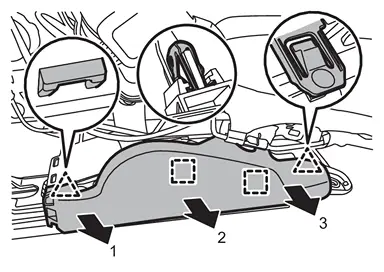
|
: Pawl |
|
: Metal clip |
Assembly
Assemble in the reverse order of disassembly.
OUTSIDE SEAT CUSHION LOWER COVER INNER
Disassembly
Remove outside seat cushion lower cover outer.
Disengage harness fixing clip from outside seat cushion lower cover inner.
CAUTION:
Before performing removal operation, check the installation position of harness fixing clip.
Disengage fixing metal clips, and then remove outside seat cushion lower cover inner.
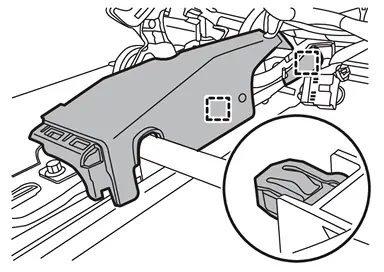
|
: Metal clip |
Assembly
Assemble in the reverse order of disassembly.
INSIDE SEAT CUSHION LOWER COVER INNER
Disassembly
Remove inside seat cushion lower cover outer.
Disengage harness fixing clip from inside seat cushion lower cover inner.
CAUTION:
Before performing removal operation, check the installation position of harness fixing clip.
Disengage fixing metal clips, and then remove inside seat cushion lower cover inner.
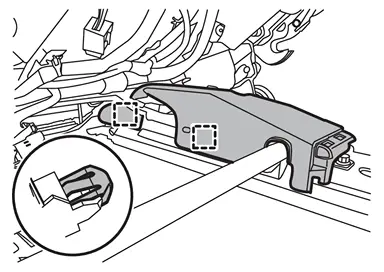
|
: Metal clip |
Assembly
Assemble in the reverse order of disassembly.
INSIDE / OUTSIDE SLIDE FINISHER
Disassembly
Remove fixing clips using a remover tool (A).
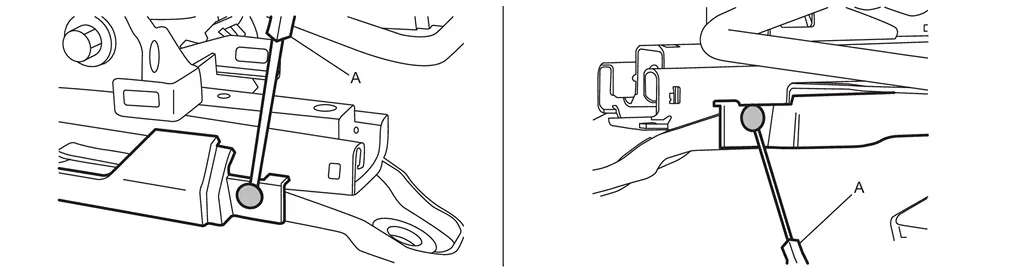
Disengage fixing portion using a remover tool (A) according to numerical order 1→2 indicated by arrows as shown in the figure, and then remove inside and outside slide finisher.
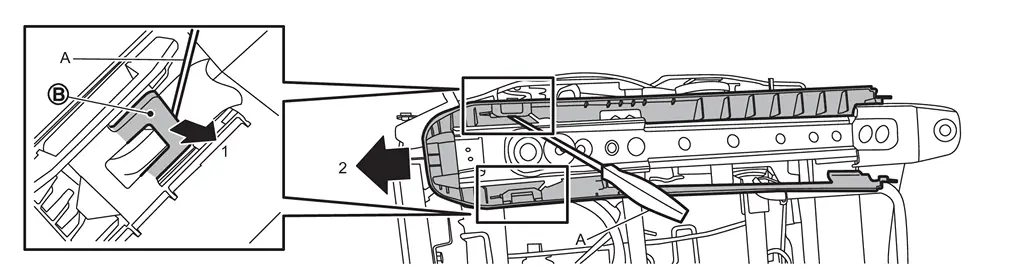
Assembly
Assemble in the reverse order of disassembly.
INSIDE / OUTSIDE STRIKER COVER
Disassembly
Disengage fixing pawls according to numerical order 1→3 indicated by arrows as shown in the figure, and then remove inside and outside striker cover.
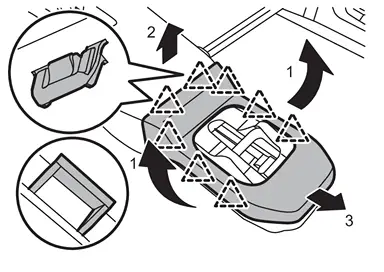
|
: Pawl |
Assembly
Assemble in the reverse order of disassembly.
Other materials
Rab System Symptoms
Symptom Table
CAUTION:
Perform the self-diagnosis with CONSULT before the symptom diagnosis. Perform the trouble diagnosis if any DTC is detected. Symptom Confirmation item Reference page
RAB system display does not display
Combination meter
On Board Diagnosis Function
...
Noise
Symptom Table
Symptom Noise source Probable cause Corrective action
Unusual noise from A/C compressor when A/C is ON.
Inside of A/C compressor
Wear, breakage, or clogging of foreign material in inner parts.
Check A/C compressor oil. Refer to Inspection.
Magnet clutch
Contact of clut ...
Moonroof Motor Assembly
Exploded View
Refer to Exploded View.
Removal and Installation
REMOVALCAUTION:
Before removing moonroof motor, check that glass lid is fully closed.
After removing moonroof motor, never attempt to rotate moonroof motor assembly as a single unit.
Remove headlining to make work space. Refer to Re ...