Connecting Rod Bearing
DESCRIPTION
| Selection points | Selection parts | Selection items | Selection methods |
|---|---|---|---|
| Between cylinder block and crankshaft | Main bearing |
Main bearing grade (bearing thickness) |
Determined by match of cylinder block bearing housing grade (inner diameter of housing) and crankshaft journal grade (outer diameter of journal) |
| Between crankshaft and connecting rod | Connecting rod bearing | Connecting rod bearing grade (bearing thickness) | Combining service grades for connecting rod big end diameter and crankshaft pin outer diameter determine connecting rod bearing selection. |
| Between piston and connecting rod | — | — | — |
-
The identification grade stamped on each part is the grade for the dimension measured in new condition. This grade cannot apply to reused parts.
-
For reused or repaired parts, measure the dimension accurately. Determine the grade by comparing the measurement with the values of each selection table.
-
For details of the measurement method of each part, the reuse standards and the selection method of the selective fitting parts, refer to the text.
WHEN NEW CONNECTING ROD AND CRANKSHAFT ARE USED
Apply connecting rod big end diameter grade stamped on connecting rod side face to the row in the “CONNECTING ROD BEARING SELECTION TABLE�.
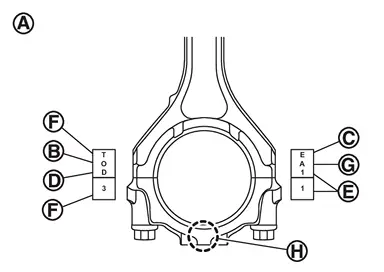
 |
: Sample codes |
 |
: Small-end diameter grade |
 |
: Big-end diameter grade |
 |
: Weight grade |
 |
: Cylinder No. |
 |
: Management code |
 |
: Management code |
-
Be sure that front mark
 on connecting rod bearing cap is facing the front of the engine.
Apply crankshaft pin journal diameter grade stamped on crankshaft front side to the column in the “CONNECTING ROD BEARING SELECTION TABLE�
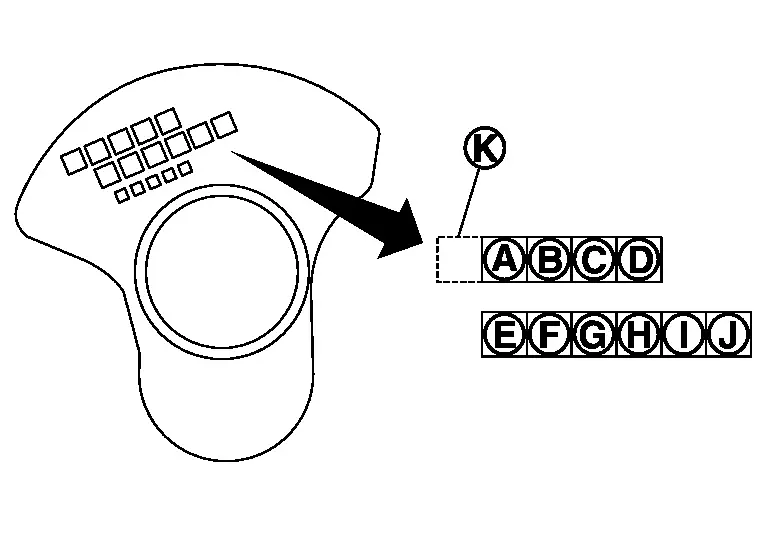
|
: Journal diameter grade No. 1 |
|
|
: Journal diameter grade No. 2 |
|
: Journal diameter grade No. 3 |
|
: Journal diameter grade No. 4 |
|
: Pin diameter grade No. 1 |
|
: Pin diameter grade No. 2 |
|
: Pin diameter grade No. 3 |
|
: Pin diameter grade No. 4 |
 |
: Pin diameter grade No. 5 |
 |
: Pin diameter grade No. 6 |
 |
: Identification |
Read the symbol at the cross point of selected row and column in the “CONNECTING ROD BEARING SELECTION TABLE�.
Apply the symbol obtained to the “CONNECTING ROD BEARING GRADE TABLE� to select connecting rod bearing.
WHEN CONNECTING ROD AND CRANKSHAFT ARE REUSED
Measure connecting rod big end diameter and crankshaft pin journal diameter. Refer to Inspection.
Correspond the measured dimension in “connecting rod big end diameter� row of “CONNECTING ROD BEARING SELECTION TABLE�.
Correspond the measured dimension in “crankshaft pin diameter� column of “CONNECTING ROD BEARING SELECTION TABLE�.
Follow step 3 and later in “WHEN NEW CONNECTING ROD AND CRANKSHAFT ARE USED�.
CONNECTING ROD BEARING SELECTION TABLE
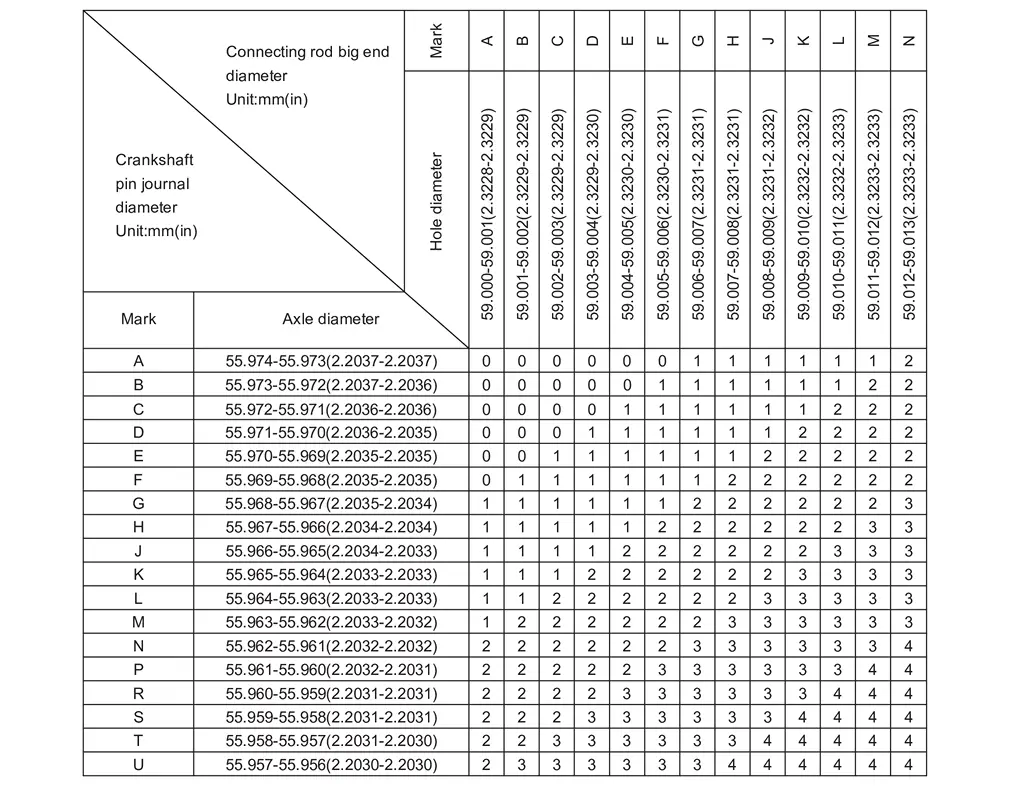
CONNECTING ROD BEARING GRADE TABLE
| Connecting rod bearing grade table | : Refer to Connecting Rod Bearing. |
UNDERSIZE BEARING USAGE GUIDE
-
When the specified connecting rod bearing oil clearance is not obtained with standard size connecting rod bearings, use undersize (US) bearings.
-
When using undersize (US) bearing, measure the connecting rod bearing inner diameter with bearing installed, and grind crankshaft pin so that the connecting rod bearing oil clearance satisfies the standard.
CAUTION:
In grinding crankshaft pin to use undersize bearings, keep the fillet R
[1.5 - 1.7 mm (0.059 - 0.067 in)].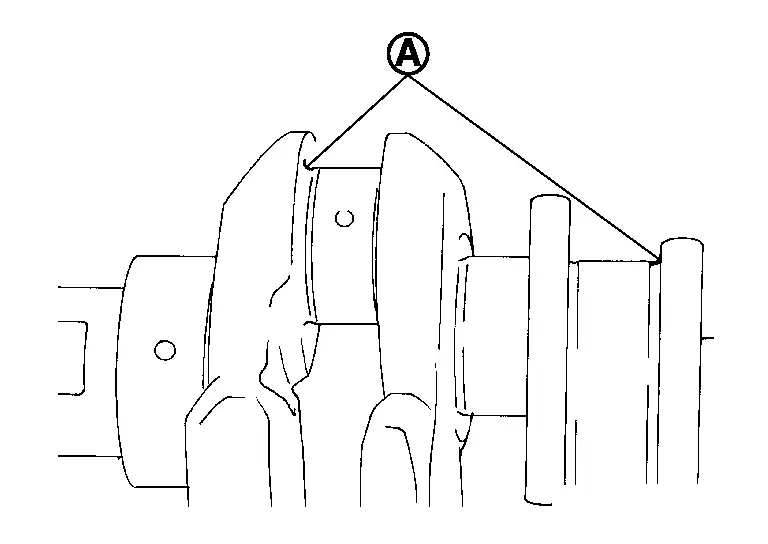
| Bearing undersize table | : Refer to Connecting Rod Bearing. |
Other materials
RCTA system operation
Side indicator light
Vehicle information display
Steering-wheel-mounted controls (right side)
The Nissan Armada RCTA system enhances driver awareness by monitoring cross traffic
when reversing. When the transmission is shifted into R (Reverse) and the vehicle
speed remains below ap ...
Front Drive Shaft
Exploded View
Removal and Installation
WARNING:
Jacking up or lift up the vehicle may the vehicle height to go down which cause a personal injury and/or damage to the air suspension component parts. Refer to Precaution for when Jacking and Lifting Up the vehicle with Electronic Air Suspension Sys ...
Driver Monitor Camera
Exploded View
Driver monitor camera
Steering column cover upper
Removal and Installation
REMOVALRemove the steering column cover upper. Refer to Removal and Installation.
Disconnect the driver monitor camera connector.
Remove the driver monitor camera mounting screws , and remove the drive ...