Removal and Installation
CAUTION:
Never damage the body panel.
REMOVAL
CAUTION:
When removing, always use a remover tool that is made of plastic to prevent damage to the parts.
Remove luggage rear plate. Refer to Removal and Installation.
Release luggage side lower finisher portion of back door weather-strip. Refer to Removal and Installation.
Set second seat to walk-in position.
Remove third seat. Refer to Removal and Installation.
Remove second seat belt anchor plate. Refer to Removal and Installation.
Remove third seat belt anchor plate. Refer to Removal and Installation.
Remove luggage hook.Slide pin part  of luggage hook
  using a remover tool (B) to release fixing pawls of luggage hook.
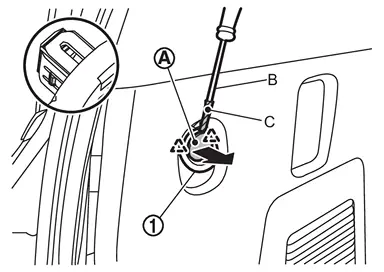
CAUTION:
Use a remover tool wrapped in protective tape (C) to prevent damage to the parts.
 |
: Pawl |
Remove rope hooks.Disengage rope hook fixing pawls using a remover tool (A), and then open rope hook cover.
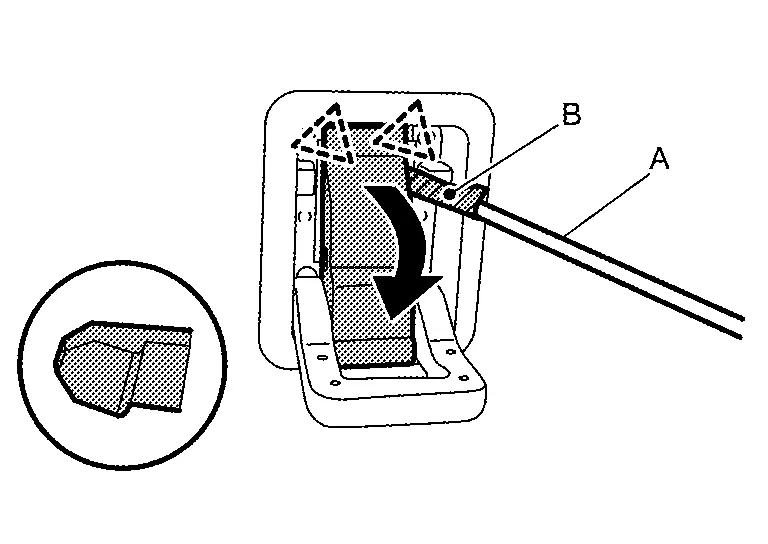
CAUTION:
Use a remover tool wrapped in protective tape (B) to prevent damage the parts.
|
: Pawl |
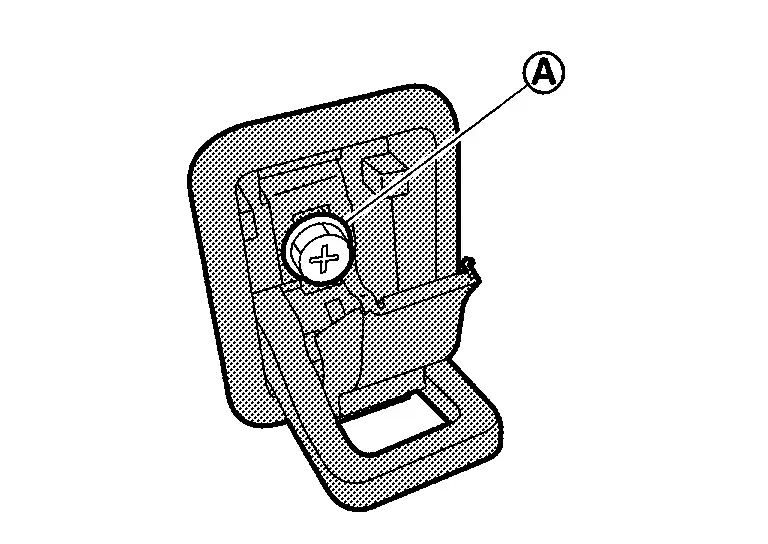
, and then remove rope hook.
Remove seat switch escutcheon.Apply protective tape (A) on luggage side lower finisher to protect it from damage.
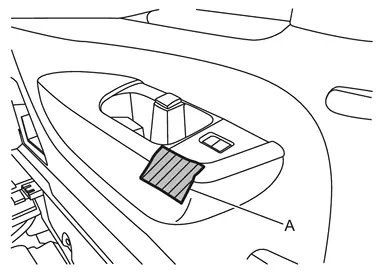
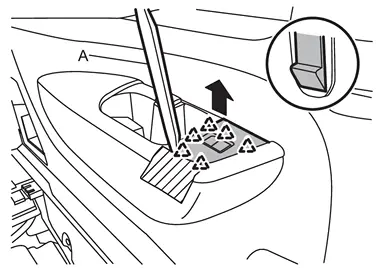
|
: Pawl |
Apply protective tapes (A) on luggage side lower finisher to protect it from damage.
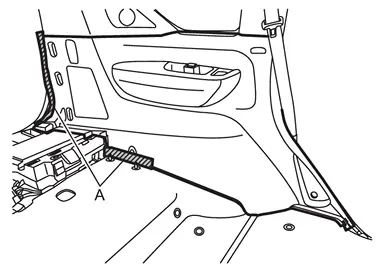
Disengage luggage side lower finisher fixing clips and pawls using a remover tool (A) according to numerical order 1→4 indicated by arrows as shown in the figure.
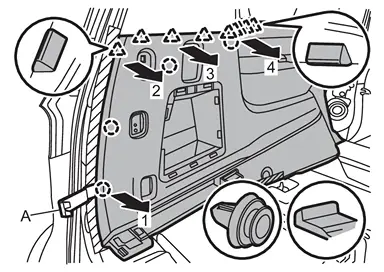
 |
: Clip |
|
: Pawl |
Disengage luggage side lower finisher fixing clips and pawls according to numerical order 1→4 indicated by arrows as shown in the figure.
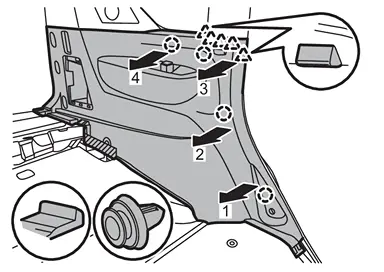
|
: Clip |
|
: Pawl |
Disengage each harness connector, and then remove luggage side lower finisher.
INSTALLATION
Note the following items, and then install in the reverse order of removal.
CAUTION:
-
Visually check clips for deformation and damage during installation. Replace with new ones if necessary.
-
Check in advance that clips and pawls are accurately aligned with the portions on body panel, and then install by pressing in.
-
After installation, check that the lip of body side welt covers. Refer to Inspection
Other materials
4WD shift switch
Example
Select the appropriate 4WD mode in the Nissan Armada by shifting the 4WD
switch to AUTO, 4H, or 4L (if equipped), depending on current road and driving
conditions. This flexibility allows the Nissan Armada to adapt to both on-road
and off-road environments.
When AUTO mode ...
Rear Final Drive: R240 Tools and Preparation
Preparation
Special Service Tools
The actual shapes of the TechMate tools may differ from those of the special service tools illustrated here.
Tool number
(TechMate No.)
Tool name Description
KV10122000
(NI-53383)
Side oil seal puller
Removing side oil seal
KV10123000
(NI-53384)
Side oil ...
Squeak and Rattle Trouble Diagnoses
Work Flow
CUSTOMER INTERVIEW
The customer may not be able to provide a detailed description or the location of the noise. Attempt to obtain all the facts and conditions that exist when the noise occurs (or does not occur).
If there is more than one noise in the vehicle, perform a diagnosis and re ...