Exploded View
REMOVAL
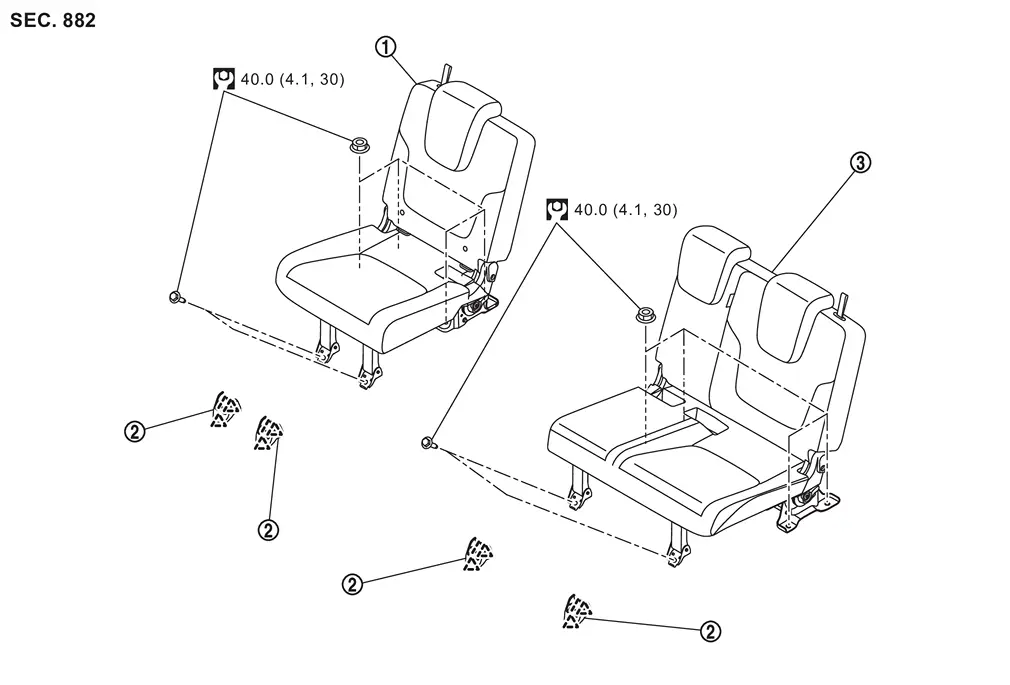
 |
Third seat assembly (RH seat) |  |
Seat leg cover |  |
Third seat assembly (LH seat) |
 |
: Pawl | ||||
 |
: N·m (kg-m, ft-lb) | ||||
DISASSEMBLY
Manual Seat
LH SEAT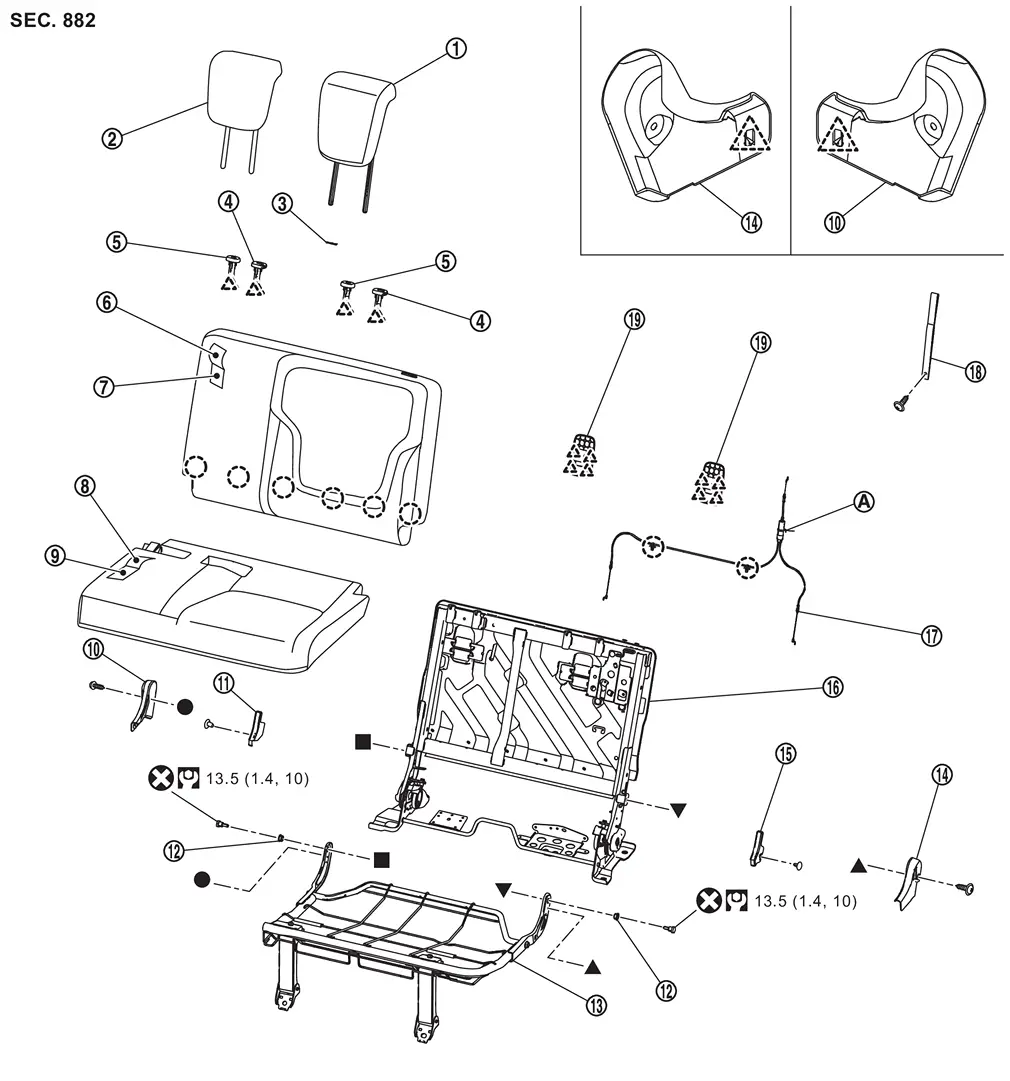
|
Outer headrest | |
Center headrest | |
Snap pin |
 |
Headrest holder (lock) |  |
Headrest holder (free) |  |
Seatback trim |
 |
Seatback pad |  |
Seat cushion trim |  |
Seat cushion pad |
 |
Hinge cover RH |  |
Arm cover RH |  |
Bush |
 |
Seat cushion frame assembly |  |
Hinge cover LH |  |
Arm cover LH |
 |
Seatback frame assembly |  |
Reclining cable |  |
Reclining strap |
 |
Tether anchor finisher | ||||
 |
Cable tie | ||||
 |
: Clip | ||||
|
: Pawl | ||||
 |
: Always replace after every disassembly. | ||||
|
: N·m (kg-m, ft-lb) | ||||
 , , , ,  , ,  : Indicates that the part is connected at points with same symbol in actual vehicle. : Indicates that the part is connected at points with same symbol in actual vehicle. |
|||||
RH SEAT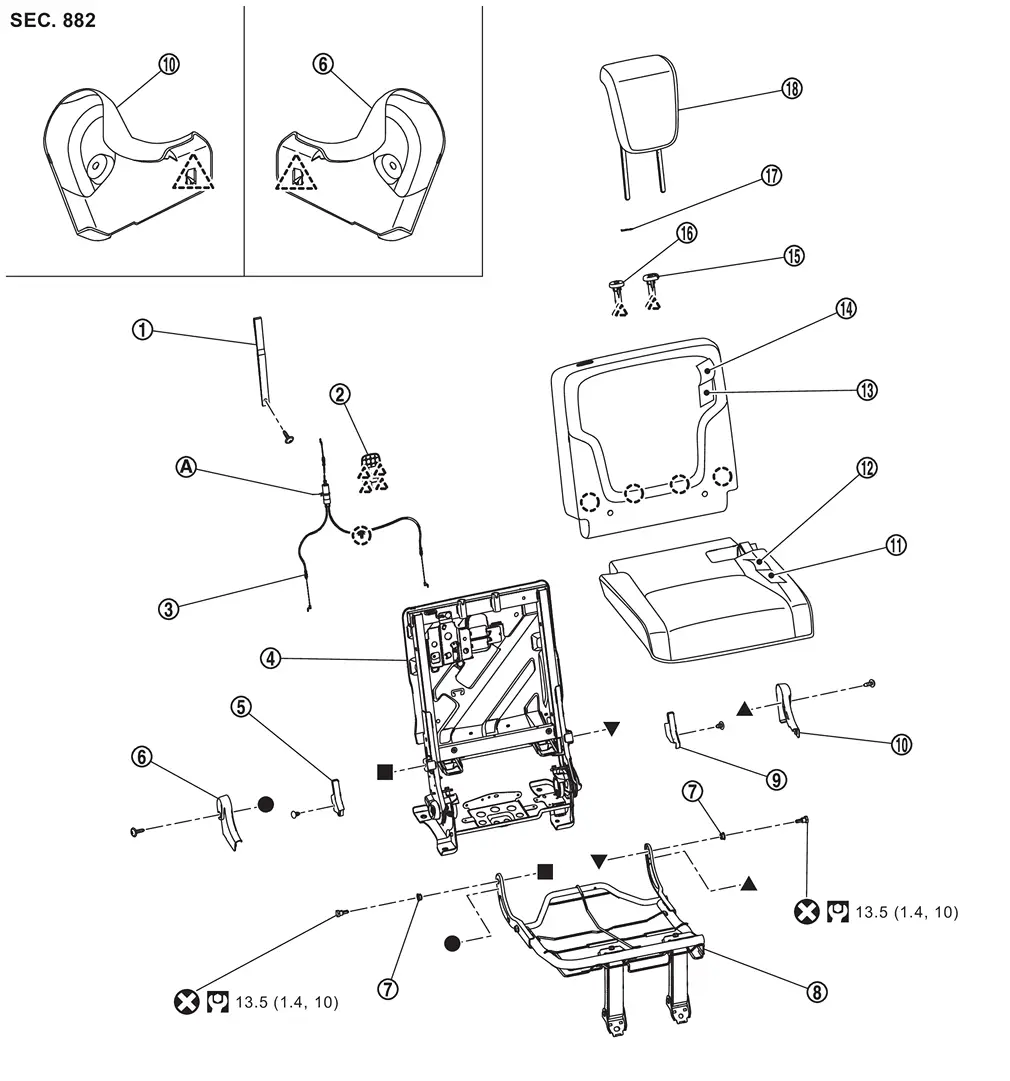
|
Reclining strap | |
Tether anchor finisher | |
Reclining cable |
|
Seatback frame assembly | |
Arm cover RH | |
Hinge cover RH |
|
Bush | |
Seat cushion frame assembly | |
Arm cover LH |
|
Hinge cover LH | |
Seat cushion pad | |
Seat cushion trim |
|
Seatback pad | |
Seatback trim | |
Headrest holder (lock) |
|
Headrest holder (free) | |
Snap pin | |
Outer headrest |
|
: Clip | ||||
|
: Pawl | ||||
|
: Always replace after every disassembly. | ||||
|
: N·m (kg-m, ft-lb) | ||||
| , , , : Indicates that the part is connected at points with same symbol in actual vehicle. |
|||||
Power Seat
LH SEAT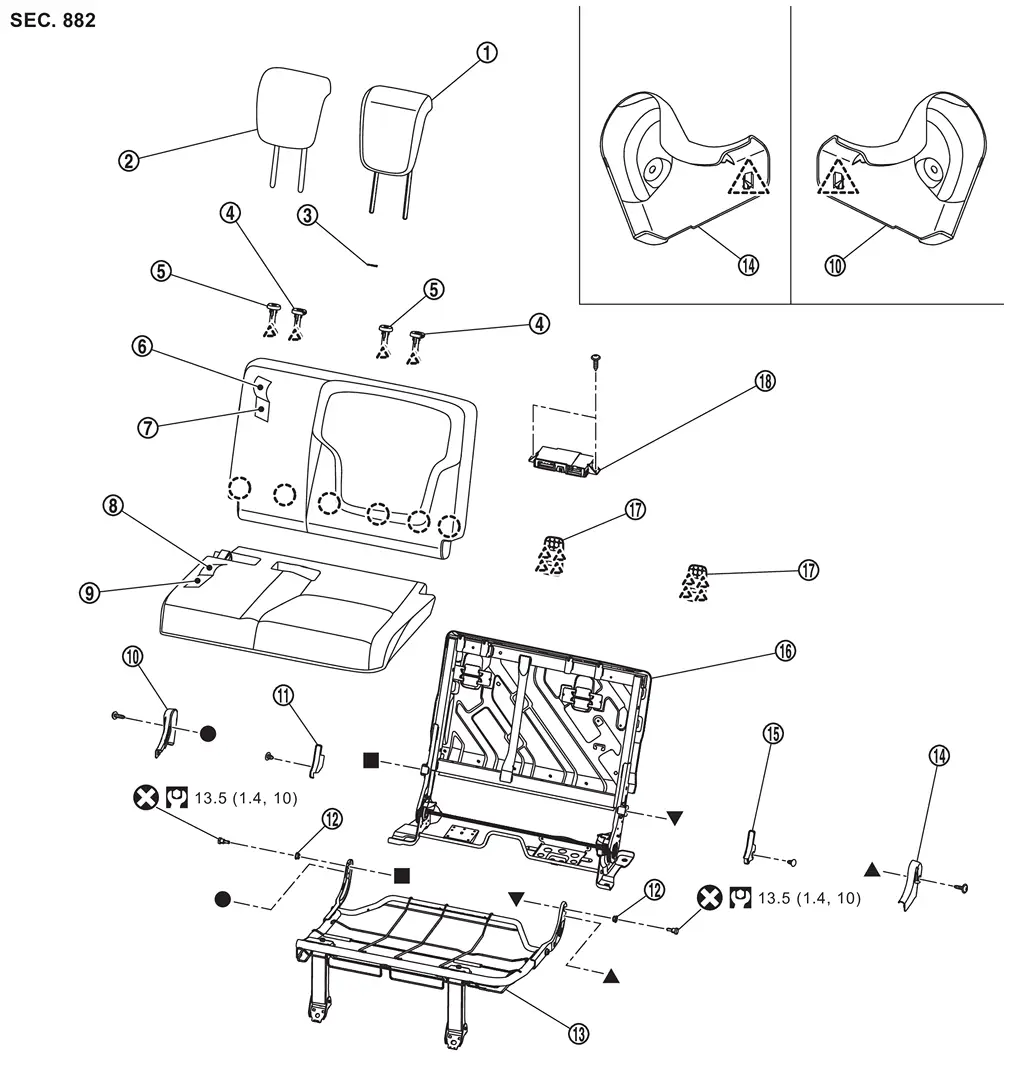
|
Outer headrest | |
Center headrest | |
Snap pin |
|
Headrest holder (lock) | |
Headrest holder (free) | |
Seatback trim |
|
Seatback pad | |
Seat cushion trim | |
Seat cushion pad |
|
Hinge cover RH | |
Arm cover RH | |
Bush |
|
Seat cushion frame assembly | |
Hinge cover LH | |
Arm cover LH |
|
Seatback frame assembly | |
Tether anchor finisher | |
Third seat control unit |
|
: Clip | ||||
|
: Pawl | ||||
|
: Always replace after every disassembly. | ||||
|
: N·m (kg-m, ft-lb) | ||||
| , , , : Indicates that the part is connected at points with same symbol in actual vehicle. |
|||||
RH SEAT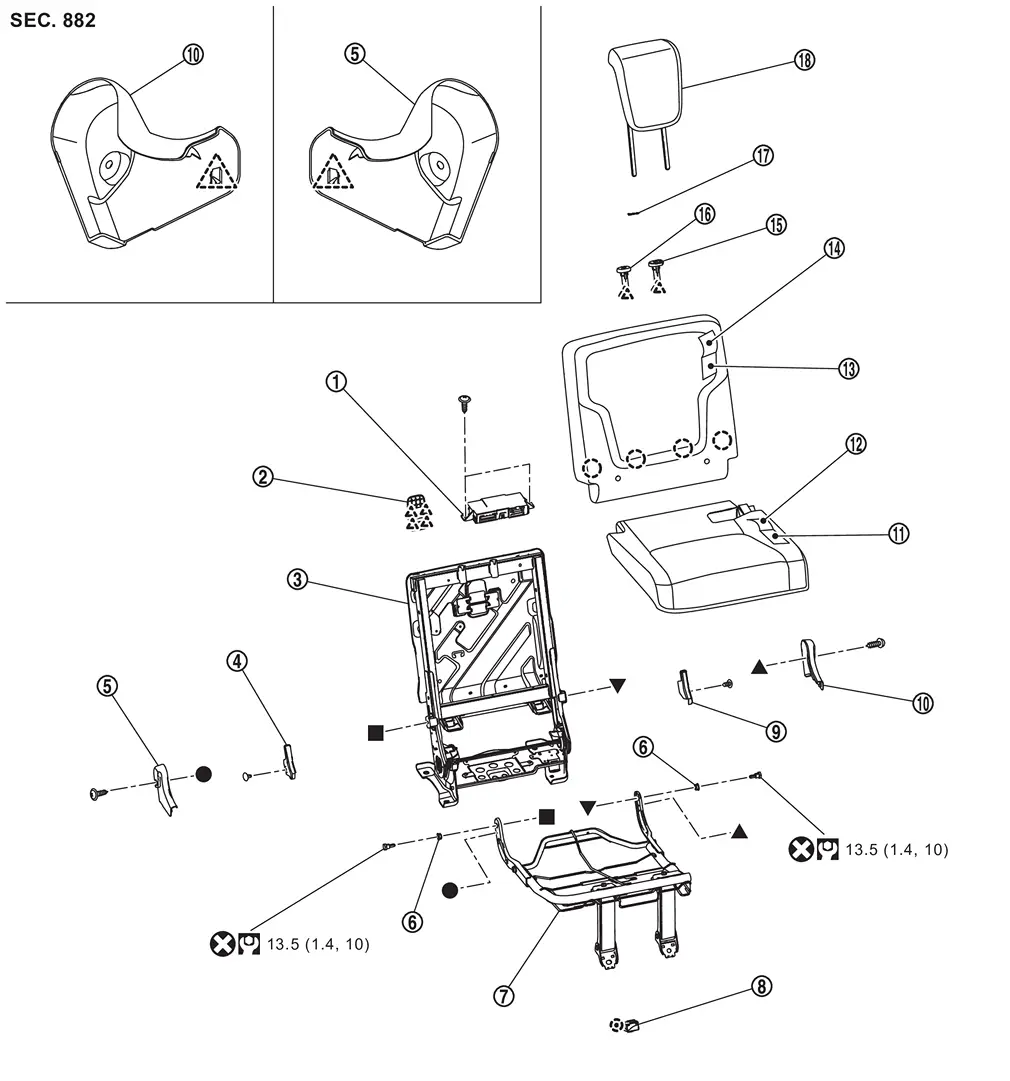
|
Third seat control unit | |
Tether anchor finisher | |
Seatback frame assembly |
|
Arm cover RH | |
Hinge cover RH | |
Bush |
|
Seat cushion frame assembly | |
Seat buzzer | |
Arm cover LH |
|
Hinge cover LH | |
Seat cushion pad | |
Seat cushion trim |
|
Seatback pad | |
Seatback trim | |
Headrest holder (lock) |
|
Headrest holder (free) | |
Snap pin | |
Outer headrest |
|
: Clip | ||||
|
: Pawl | ||||
|
: Always replace after every disassembly. | ||||
|
: N·m (kg-m, ft-lb) | ||||
| , , , : Indicates that the part is connected at points with same symbol in actual vehicle. |
|||||
Removal and Installation
CAUTION:
-
When removing and installing, use shop cloths to protect parts and vehicle from damage.
-
Always work with 2 workers, because it is heavy weight.
REMOVAL
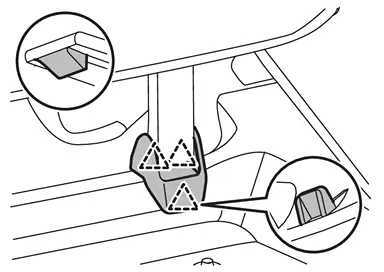
Disengage fixing pawls, and then remove seat leg covers.
|
: Pawl |
Remove front side mounting bolts of third seat assembly.
Remove luggage floor bracket. Refer to Removal and Installation.
Remove third seat belt buckle. Refer to Removal and Installation.
Remove rear side mounting nuts of third seat assembly.
Disconnect harness connectors.
CAUTION:
Before performing disconnect operation, check the installation position of harness connectors.
Remove third seat assembly from vehicle.
INSTALLATION
Note the following items, and then install in the reverse order of removal.
CAUTION:
-
When installing, tighten third seat assembly, third seat belt buckle, and luggage floor bracket mounting bolts and nuts according to the numerical order 1→6 as shown in the figure.
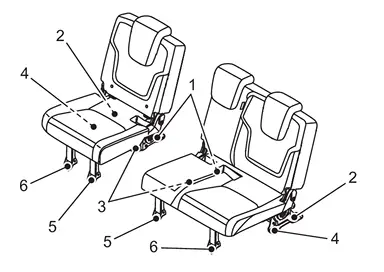
-
Tighten seat mounting bolts and nuts to the specified torque. Refer to Exploded View.
Other materials
Garage mode system
The Nissan Armada liftgate height can be customized to suit specific environments,
such as garages with limited clearance.
1. Open the Nissan Armada liftgate fully.
2. Manually adjust the liftgate to the desired height and hold it in position.
3. Press and hold the liftgate close and lock switc ...
Rear Lh Side Power Window Does Not Operate
When Both Power Window Main Switch and Rear Power Window Switch Lh Are Operated
Diagnosis Procedure
CHECK REAR POWER WINDOW MOTOR LH POWER SUPPLY AND GROUND CIRCUIT
Check rear power window motor LH power supply and ground circuit. Refer to Diagnosis Procedure.
Is the inspection result normal?
YE ...
Precautions
Precaution for Supplemental Restraint System (SRS) "AIR BAG" and "SEAT BELT PRE-TENSIONER"
The Supplemental Restraint System such as “AIR BAG� and “SEAT BELT PRE-TENSIONER�, used along with a front seat belt, helps to reduce the risk or severity of injury to the driver and front passenger fo ...